

Hikvision Wireless Alarm System is now getting over the world, seizing its positions and taking a piece of the market share. And due to the fact, it is the elaboration of 2 serious companies, Pyronix and Hikvision, – we are interested in it, and so the world is too. Today our goal is to show you how to Hikvision and Ezviz cameras to Hikvision Alarm Systems, specifically Door and PIR sensors, in order to receive 10-second length videos-captures of an event in the form of notifications whenever the sensor is triggered and the alarm is raised. Thereby, we will be able to see what happened in the moment of an event remotely via the camera, and not just see the notification that a sensor is actuated, we’ll get a video. Hikvision Alarm System, Ezviz, and Hikvision cameras are available for you on a Pipl Systems Store ?
Step-by-step Instruction:
Here’s a complete list of actions you got to do in order to connect cameras to Hikvision Alarm System and configure them that way to send you video-notifications so you will see an event recording.
1. Activate AXHub in Hik-connect; 2. Activate & Connect PIR and Door Detectors; 3. Activate Camera via SADP / IVMS / Ezviz; 4. Untick “DHCP” for Camera to Make Static IP, Save; 5. Initialize a MicroSD for the Camera / Restart the Camera; 6. Turn On a Motion Recording to be Saved on MicroSD via Web Interface / Ezviz App; 7. Go to Alarm System’s Web Interface by typing its IP address in the Browser, Log In (“admin” + “your_password”); 8. Go to “System” Tab, then “Network Camera”, Press “Add”; 9. Type in the Camera’s IP address and user data (“admin” + “your_password”), Save; 10. Go into the Hik-connect App, Select Sensor, Press “Link Camera” and pick a channel (1 or 2), Save.
However, it’s not as easy to do as I thought it was the first time. We have to activate our cameras and configure them in a specific way, we have to have a microSD initialized in them and we need to turn on a motion-triggered recording on the cameras, and we need to input their addresses and user’s data on the Alarm System’s web interface, and finally tie up a camera within a detector in a Hik-connect app, so when the one is triggered, we will receive a video-notification with a recording of an event – 2 seconds before it started and 5 seconds after. Be aware that you can connect a maximum of 2 cameras to the Hikvision Alarm System for now. In this material we skip steps 1, 2, and 3 because nothing is interesting and difficult in there, so we begin our path from step number 4- a specific set of actions to connect cameras to the Alarm System and set up a video-notifications.
Main Part 1
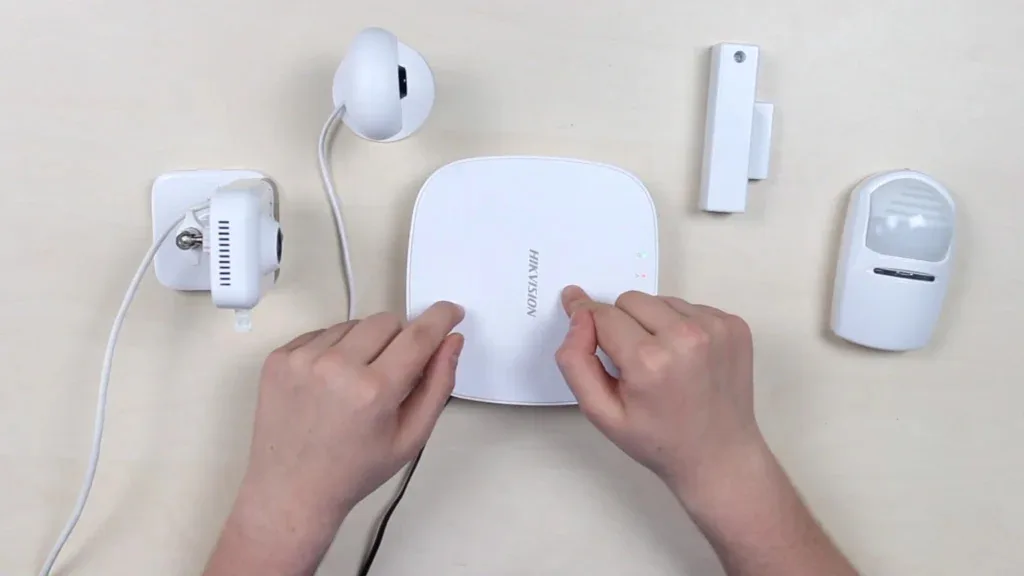
I've got the HIkvision’s AXHub powered on via the power adapter from a box, connected to the internet via Wi-Fi, and it is activated in my Hik-connect app. I’ve got 2 detectors that are tied up with the Hub, which is a passive infrared detector and door opening sensor. I have an Ezviz C1C home Wifi camera activated via the Ezviz free phone app, and also Hikvision’s quite famous DS-2CD2443 cube network camera, activated via Hikvision’s SADP Tool. And I already have a microSD card inserted in both of them and initialized. Similarly, your setup should look like this. Now step number

By default, the cameras have dynamic IP addresses and we want to switch them to a static IP. To do that, go into your SADP tool, select a camera and untick the “Enable DHCP” box, input the user’s data – for a Hikvision DS-2CD cube ip-camera we created a password when we were activating a camera, the default login name is admin. For Ezviz C1C, the camera’s password is set by default and is normally located on the exact camera, near the QR code, search for a “Verification Code”, in most cases that’s a 6-symbols inscription, consisting of letters and numbers and is case-sensitive, default name is “admin”. Untick a DHCP box for both cameras, type in the user’s data, and press modify, you’ll see a success message, everything’s good, you’ve just switched the camera’s IP to a static one.
Also, we’re skipping step 5 because I have already initialized a MicroSD card. But step number 6 requires us to turn on a motion-triggered recording. For Ezviz that is turned on by default so we don’t need to modify anything, but for Hikvision’s DS-2CD2443 camera, we need to go to the camera's web interface. We input the camera's IP address into our browser address field and sign in. What we need is to go to the Event tab and turn on Motion detection and dynamic analysis. You may also want to draw a zone and switch the sensitivity to 80 as I did. Now we’re going to the linkage method item and tick 3 boxes: Notify, Upload, and A1 on your right, save. Now we want to make sure that our recording will be saved on a MicroSD we go to Storage, schedule settings, and it should be enabled and switched to “Event” recording mode, its color is pink.
As we’ve just made sure everything is good, our next step is to tie these cameras to an Alarm System. In order to do that we go to Alarm System’s web interface by typing its IP into the browser search field, System tab, network camera, pressing add, and now adding cameras, typing in their IP addresses and user data. For A Hikvision camera, the default name is admin, and the password we created during the activation it, the Ezviz is admin, and a verification code that we can find on the camera’s body. Refresh, and we are done!
Watch The Video-instruction Here:
To end up we need a phone with an activated AXHub and sensors in there. We select a sensor and press a camera to add a button, you select a required channel, press add and it’s done! Now we’re doing the same thing for a second sensor that we have. And we’re finally done! Now let's arm the system and trigger our sensors to see how that works.
Sum Up
It is incredibly good to have such a function from a box. A normal stable-working alarm system with camera integration to instantly switch to camera view and see what happened, and I didn’t expect less from a Hikvision. However, what I expect next from them is to make all this process available for performing in an easier and faster way, with no special training and big guides, via only 1 app, and I hope they will simplify all of this for regular users.