

If you’re just starting your UniFi Protect journey, this guide is for you. Choosing the right UniFi OS Console, picking compatible cameras, and setting up PoE power can be overwhelming at first. This UniFi Protect guide is designed to walk you through every key decision – from selecting hardware to configuring your system – whether you’re building a home setup or planning a larger commercial installation.
To get the most out of your UniFi Protect deployment, it’s important to think about how each component supports your overall setup. Your UniFi OS Console defines system performance, your cameras should match your environment, and the PoE switch ensures reliable power delivery. This UniFi guide for beginners shows you how to align all these pieces, even if you don’t have a technical background.
Common Questions from First-Time Installers
Most beginners ask the same things: What exactly is a UniFi OS Controller? How do you know if it supports UniFi Protect? Can you use a third-party PoE switch, or do you need Ubiquiti’s own gear? These are exactly the types of questions we cover in this basic User Guide for the UniFi Project. By the end, you’ll know which cameras work best for your needs, how to connect them, and how to fully configure the Protect interface with no steps skipped.

What This Guide Covers
You’ll learn how each UniFi Console fits into the ecosystem, how to use the Ubiquiti capacity calculator, and what trade-offs exist when choosing between affordable residential hardware and enterprise-ready NVRs. We’ll also walk you through setting up the UniFi Protect app, understanding AI detection settings, and deploying advanced features like remote access, local retention, and multi-camera tracking.
Let’s dive in.
What Is UniFi Protect?
Ubiquiti’s All-in-One AI Video Surveillance Platform
A Native, AI-Powered Video Ecosystem
UniFi Protect is Ubiquiti’s advanced video surveillance platform, built to run natively on UniFi Consoles like the Dream Machine Pro (UDM Pro), UniFi Network Video Recorders (UNVR, UNVR Pro), and Dream Wall (UDW). It consolidates your security cameras, recording logic, and remote access into one tightly integrated system, eliminating the need for third-party NVR software or cloud subscriptions.
Unlike typical IP camera solutions that rely on disconnected hardware and fragmented apps, UniFi Protect delivers a unified experience – from camera setup and event detection to storage management and mobile alerts. The entire system is controlled through the UniFi Protect interface, accessible via a web browser, the UniFi Protect app, or the UniFi Cloud Console.
Built for Scale, Reliability, and Local Control
Advanced features like smart motion zones, object detection (people, vehicles, packages), and even cross-camera tracking are all processed locally using Ubiquiti’s AI engine. This keeps latency low and reliability high, even when your internet connection is interrupted.
Why Choose UniFi Protect Over Other NVRs?
For many users, UniFi Protect is more than a camera system – it’s a full-service surveillance backbone that grows with your property or project. It integrates seamlessly with UniFi networking and access control, meaning your cameras, door readers, Wi-Fi, and even intercoms can be monitored and configured from the same console.
There’s no need to stitch together separate systems for different use cases. Whether you're reviewing footage from your phone, managing storage rules from your browser, or unlocking doors remotely, everything happens inside the same secure, encrypted environment.
That’s what sets UniFi Protect apart: AI-powered simplicity, professional-grade tools, and full ecosystem integration – all under your control.
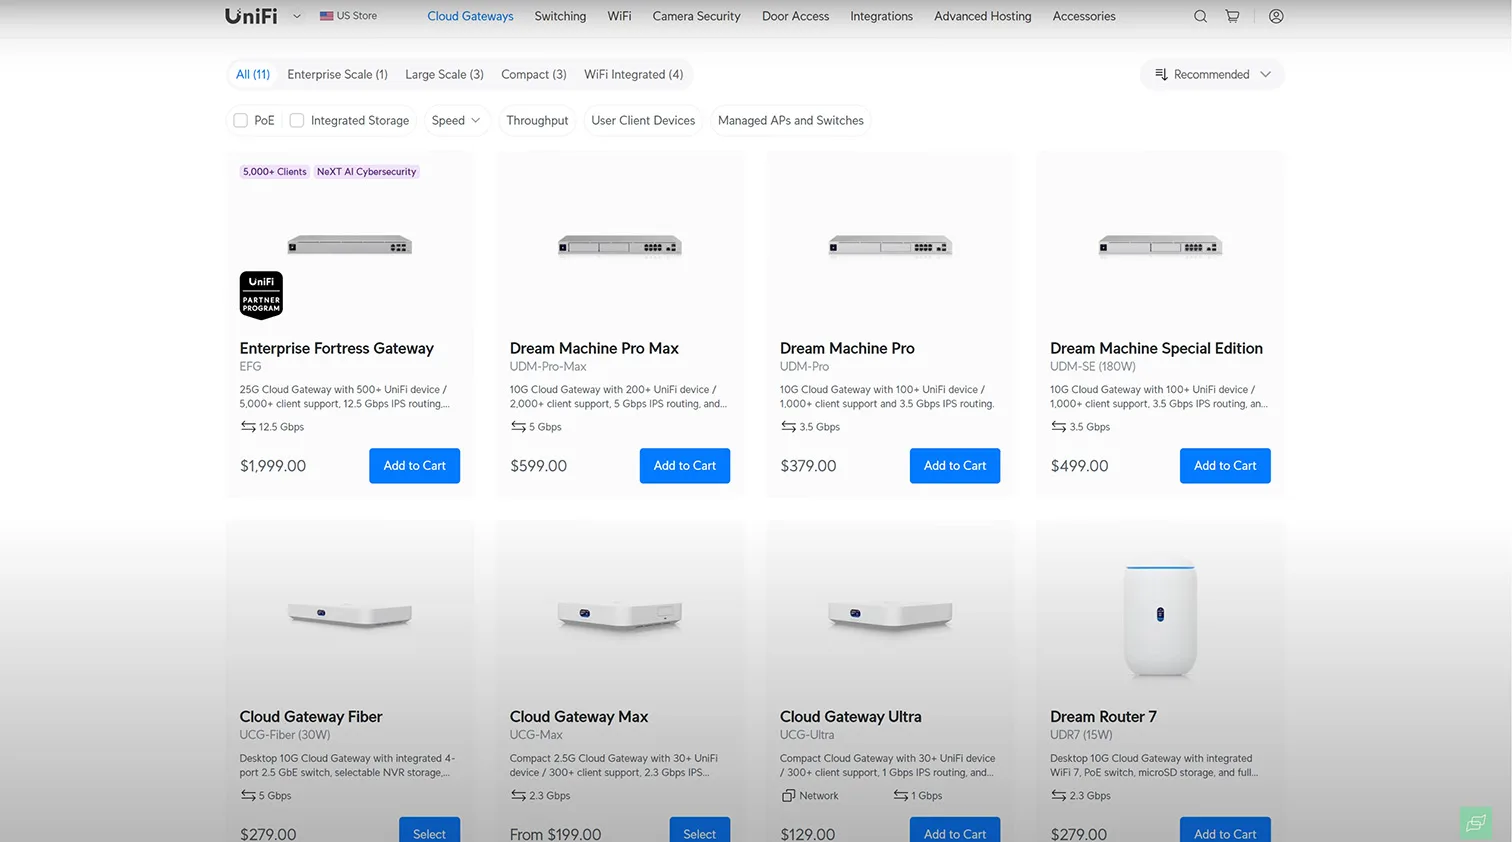
Choosing the Right UniFi OS Console for Your Project
How to Match the Right Console to Your Protection System Needs
Why Your Console Choice Matters
Whether you’re setting up UniFi for a residential system or configuring UniFi for a small business, selecting the right console such as the UDM-Pro is one of the most important decisions. Best practices for UniFi setups emphasize planning your network capacity ahead of time, especially if you expect to expand.
The first major decision in this UniFi guide is selecting the right UniFi OS console. It’s not just about price or aesthetics – it’s about long-term compatibility with UniFi Protect and future scalability.


1 / 7
Remote Monitoring with Web and App Control
UniFi Protect operates through a web interface or mobile app, meaning you don’t need to be physically near the device to access footage, configure settings, or monitor events. Whether managing a residential property or a commercial facility, you can do it remotely with confidence.
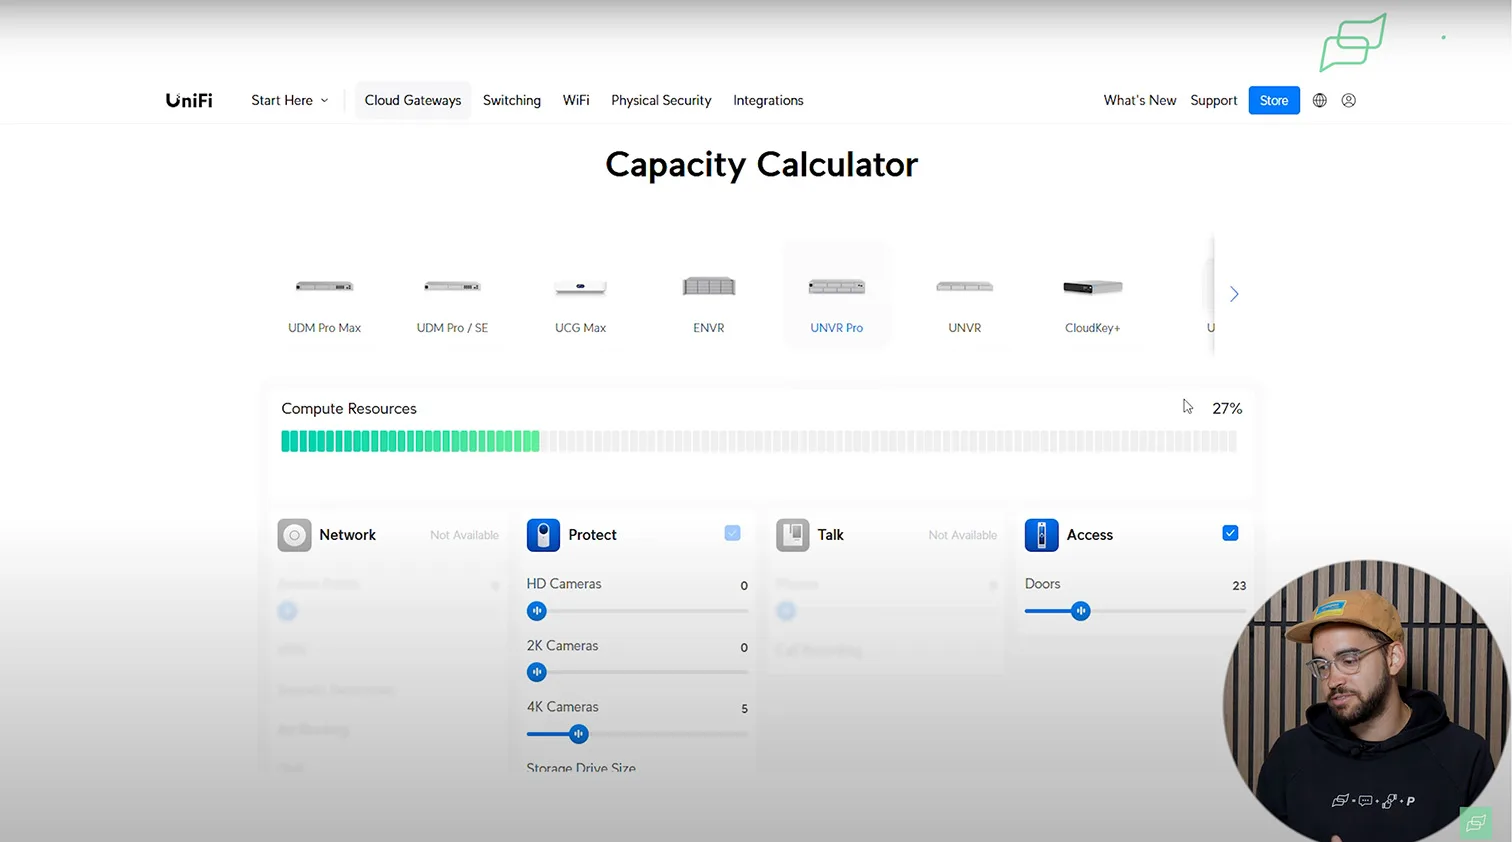
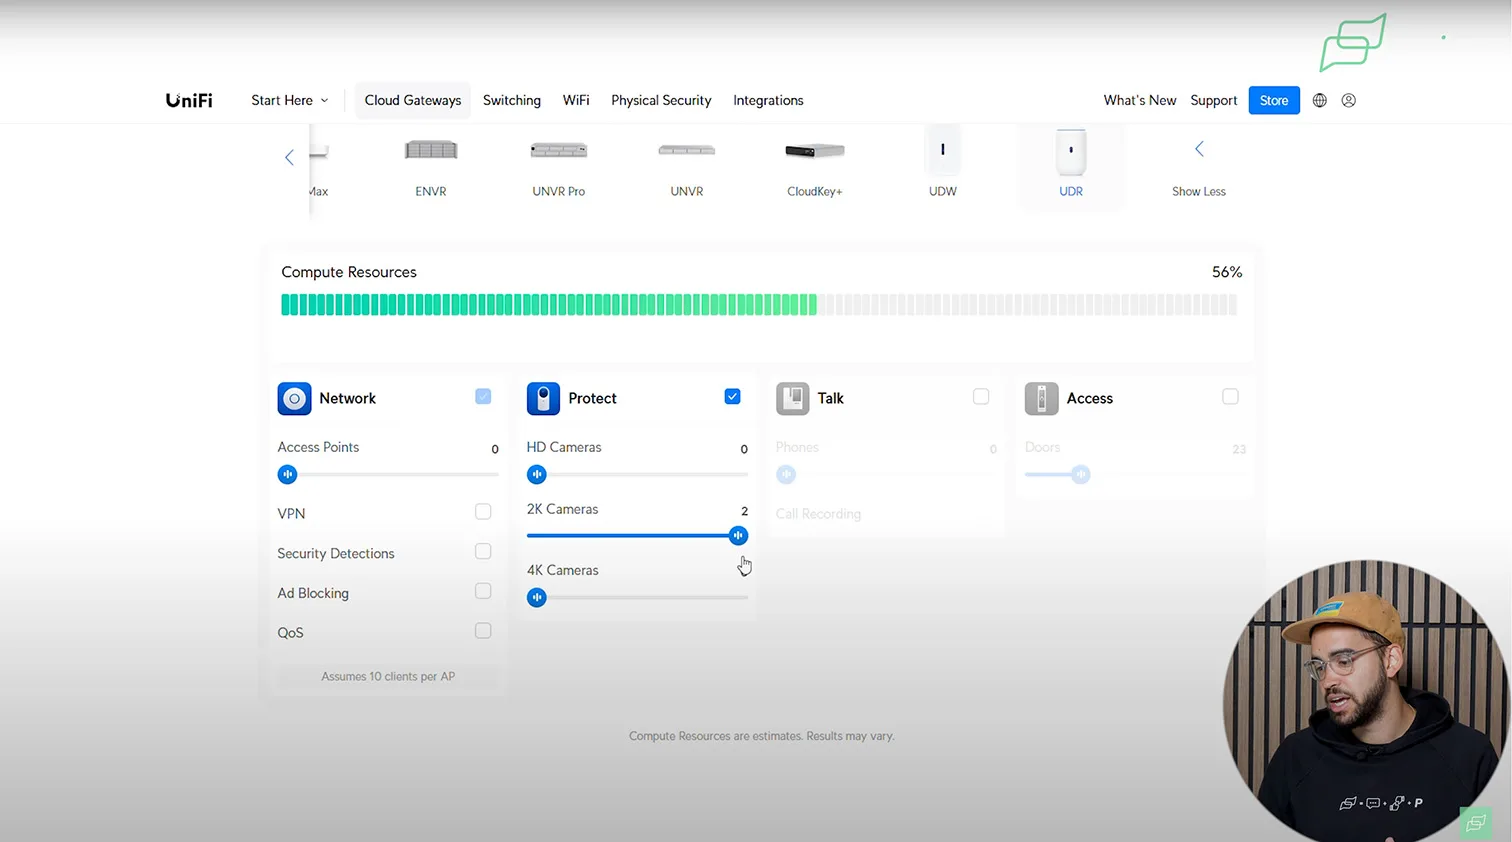
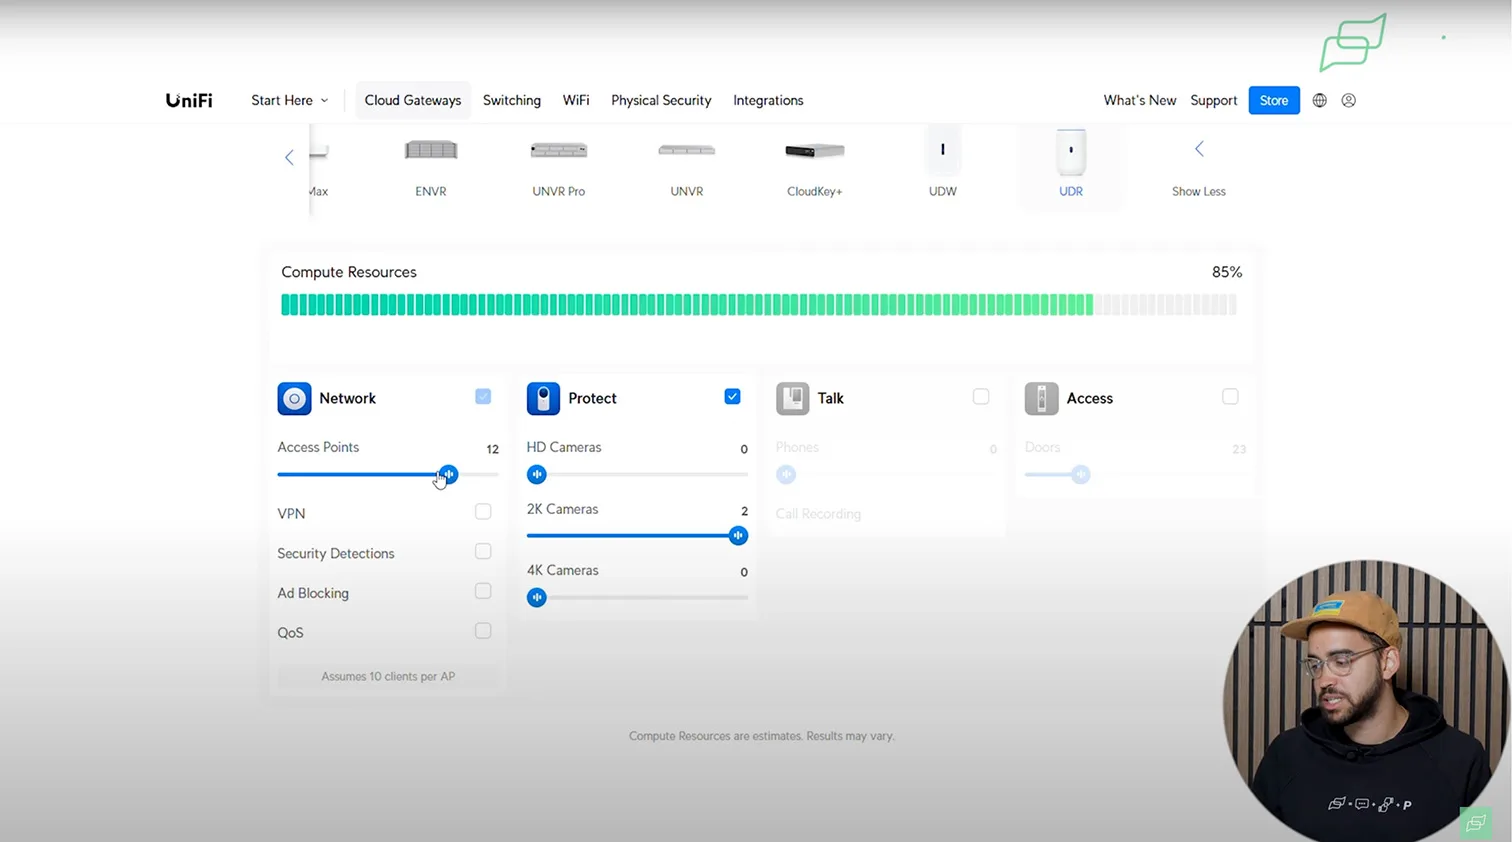
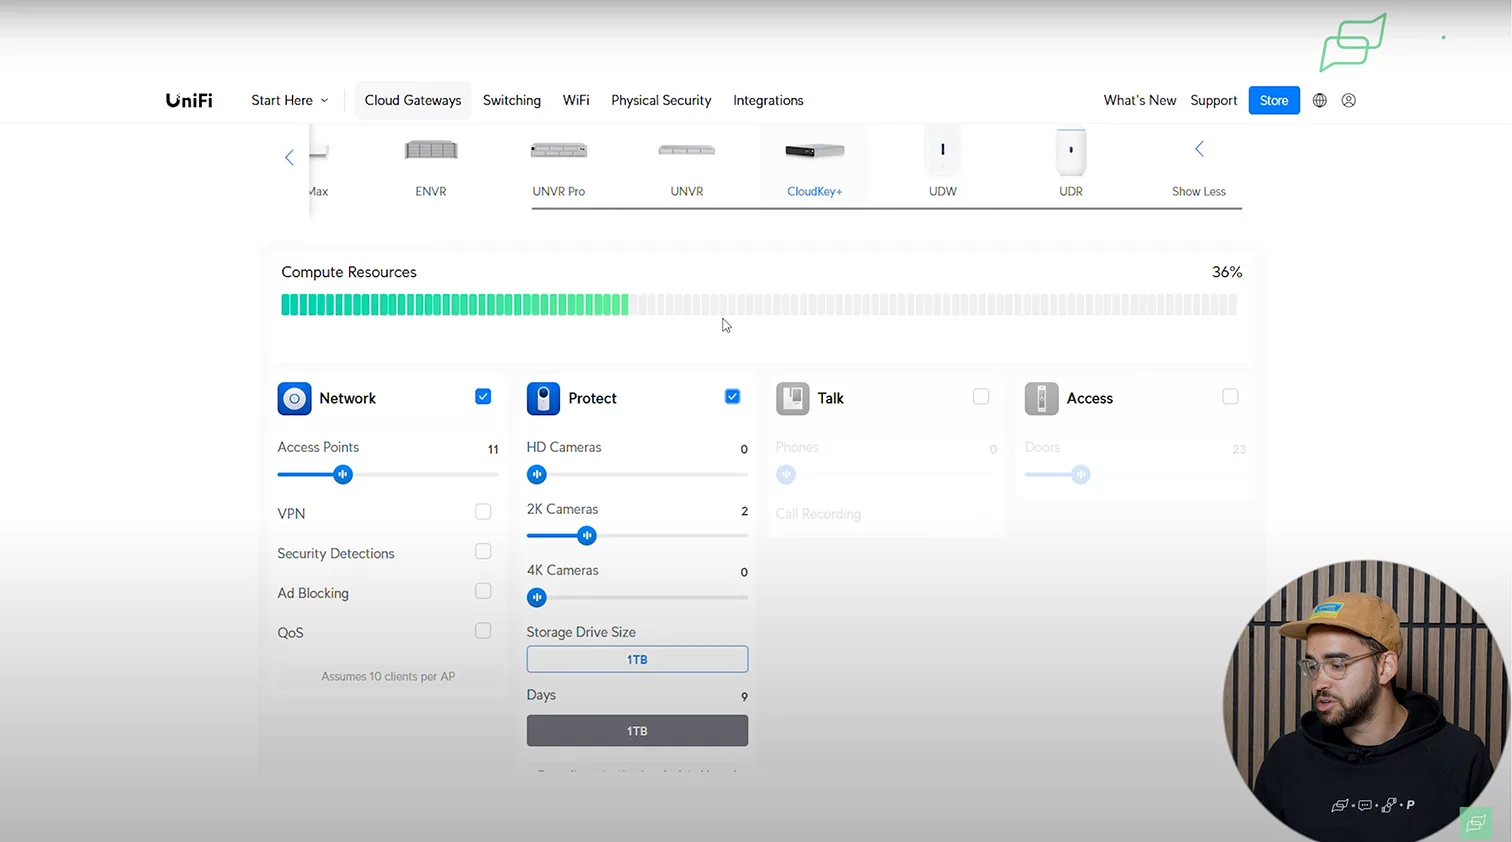
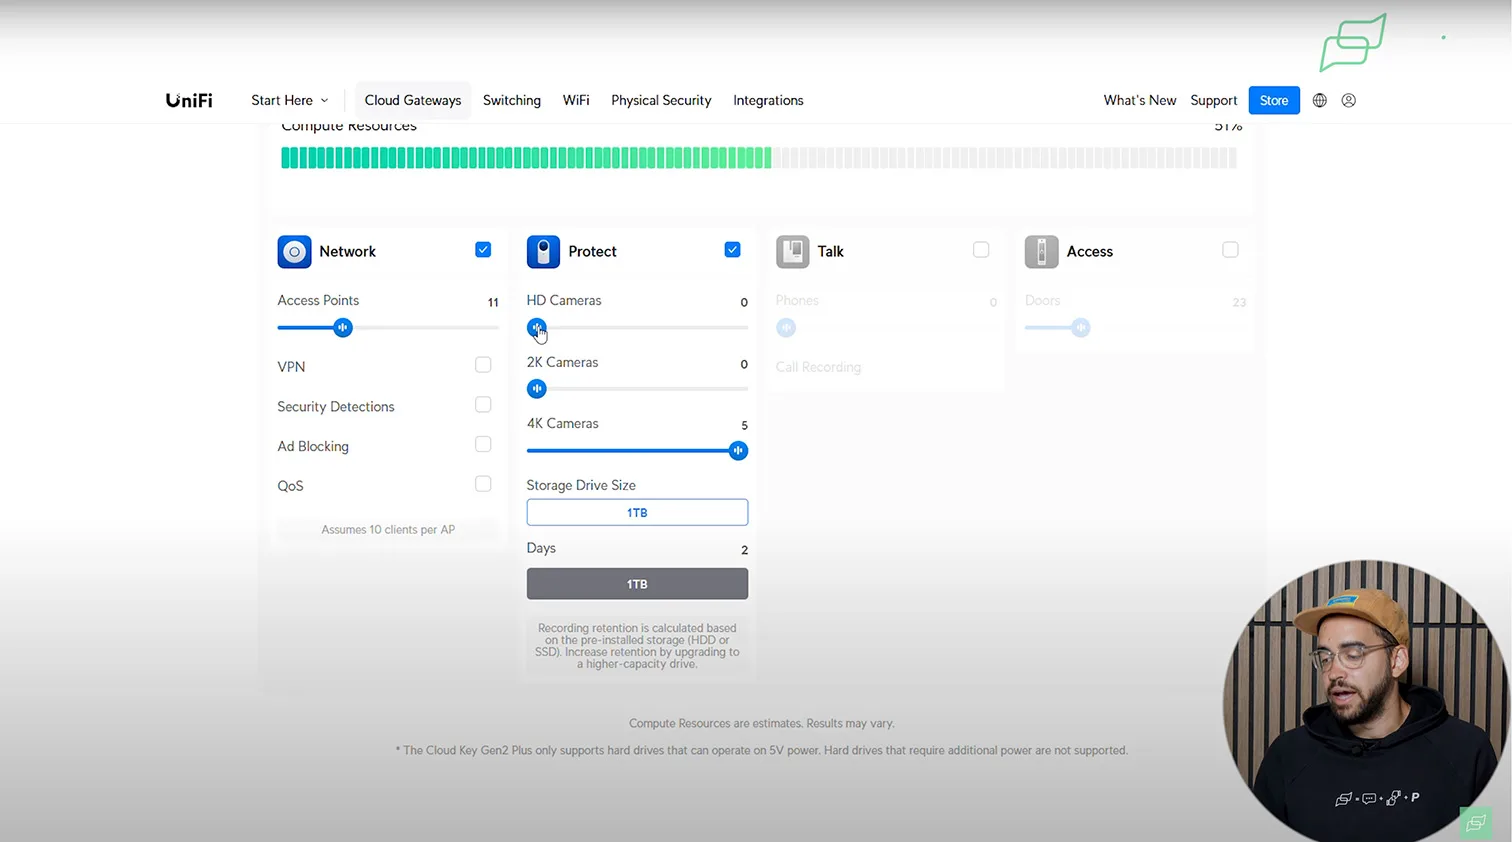
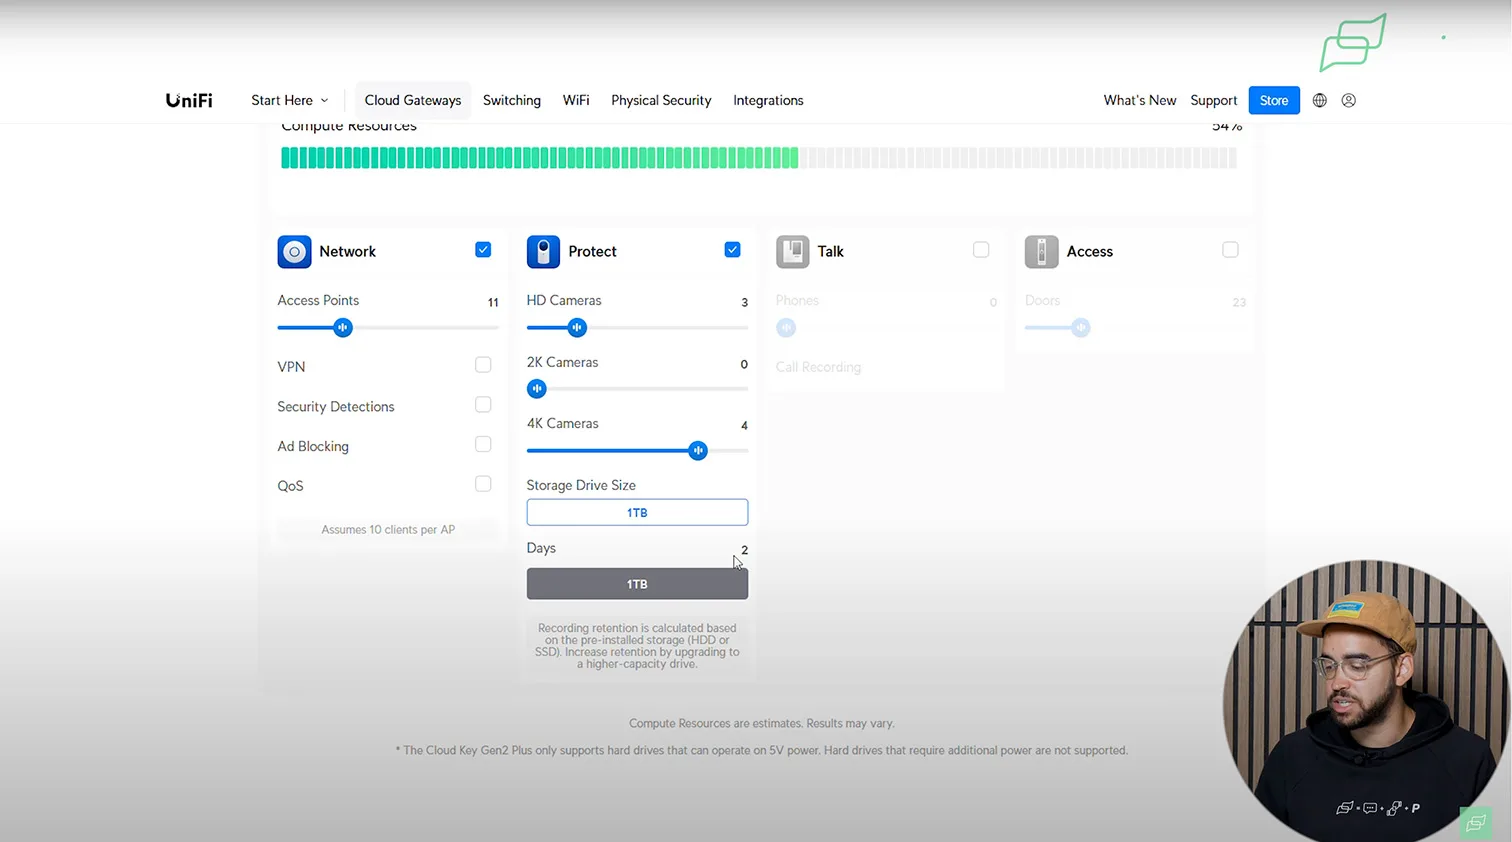
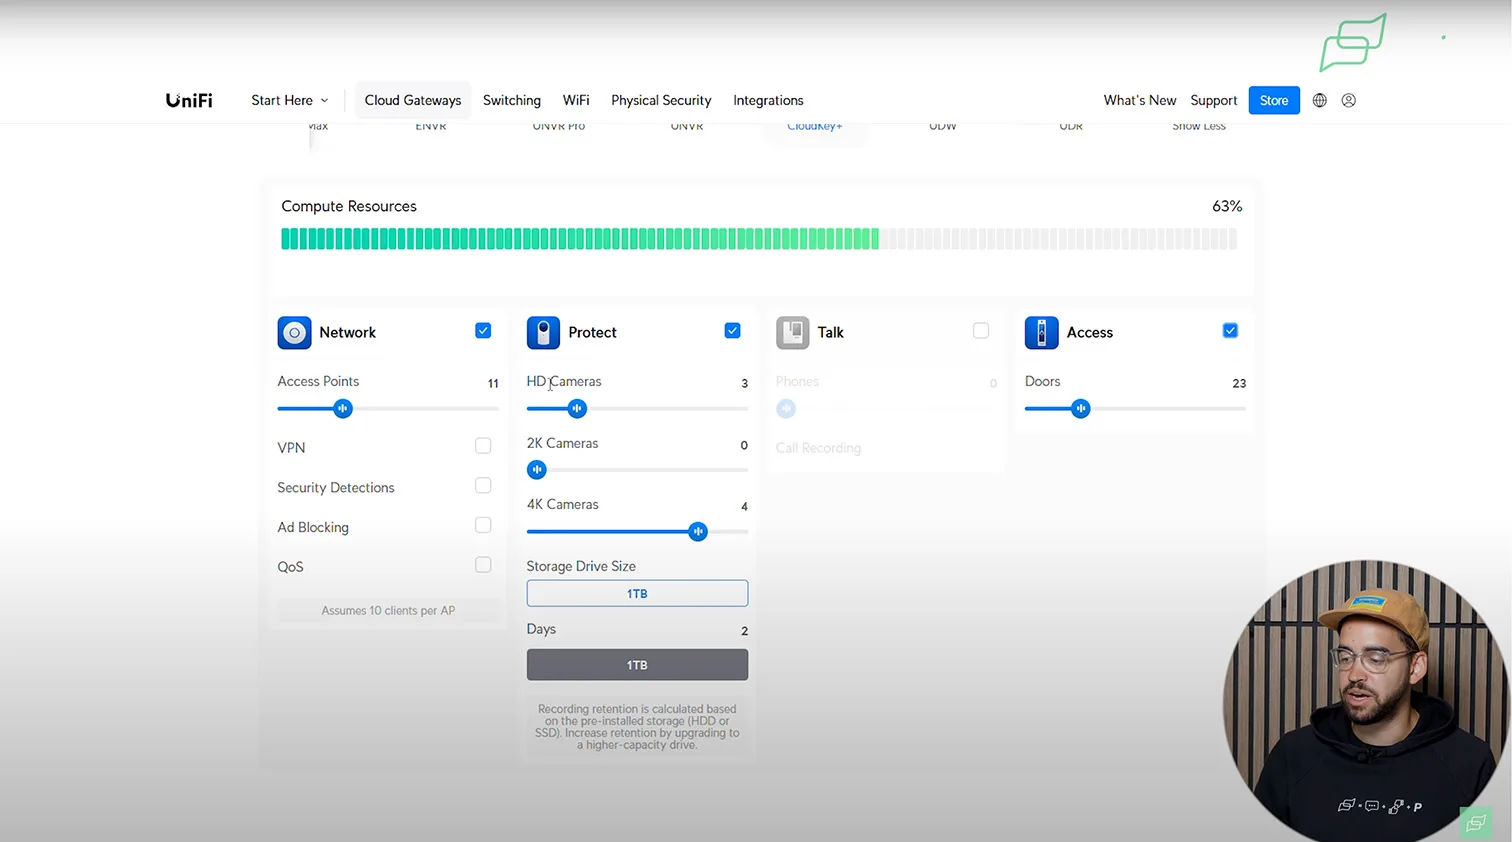
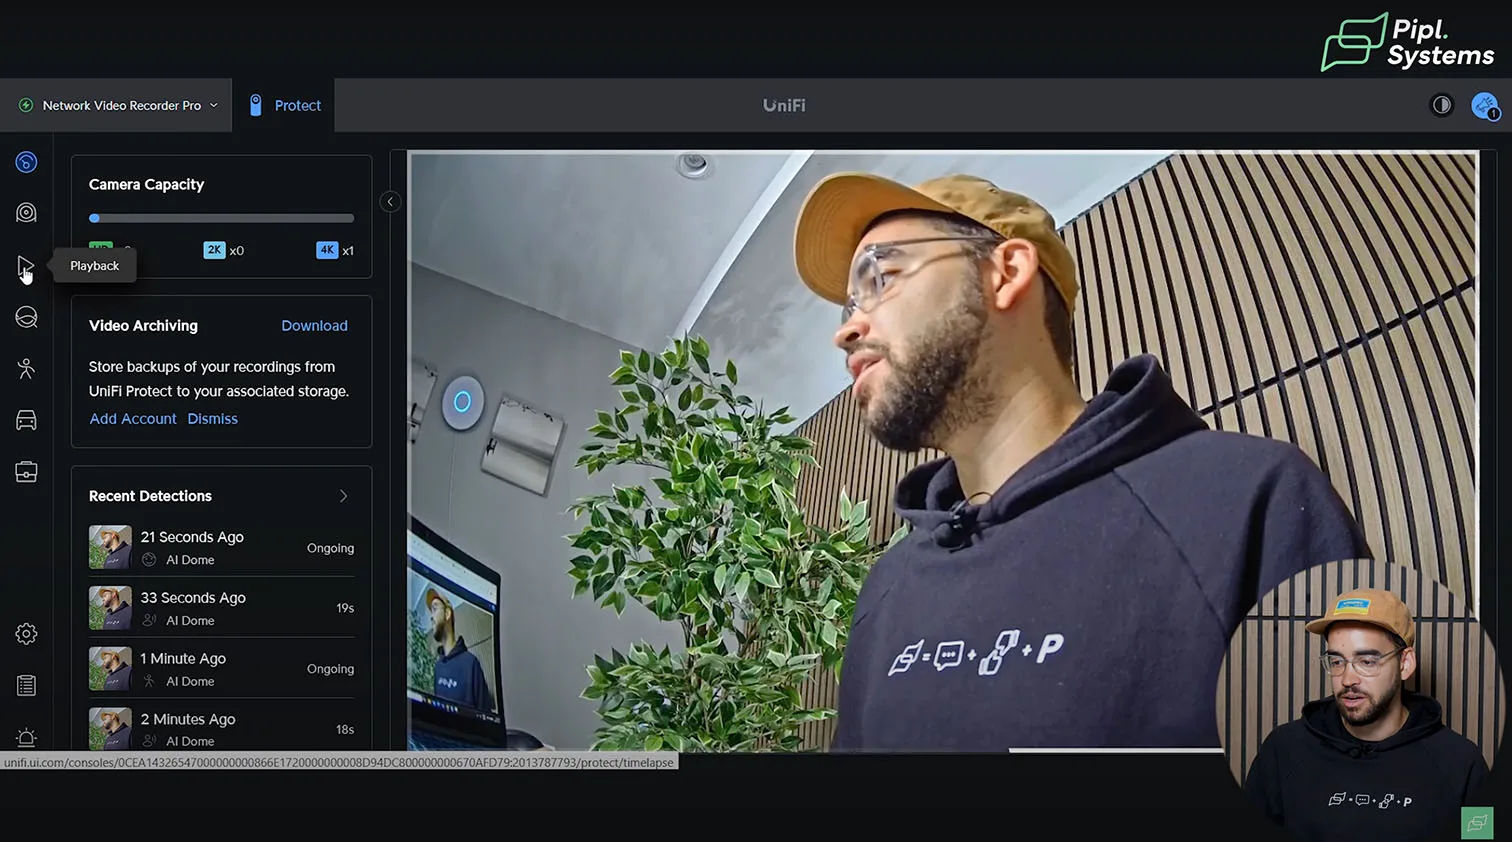
Using the Capacity Calculator as Your Roadmap
We recommend starting with Ubiquiti’s official capacity calculator – this tool shows only compatible devices and gives insight into system limits, such as camera counts, AI load, and video retention. It’s not just about what works now, but what will work as your needs grow.
1 / 3
Planning for the Future
When evaluating any UniFi OS controller, think ahead. Ask yourself: how many cameras do I plan to install now? In six months? Will I need to add access control or integrate with UniFi network gear? These answers help determine the right balance between computing power and storage retention.
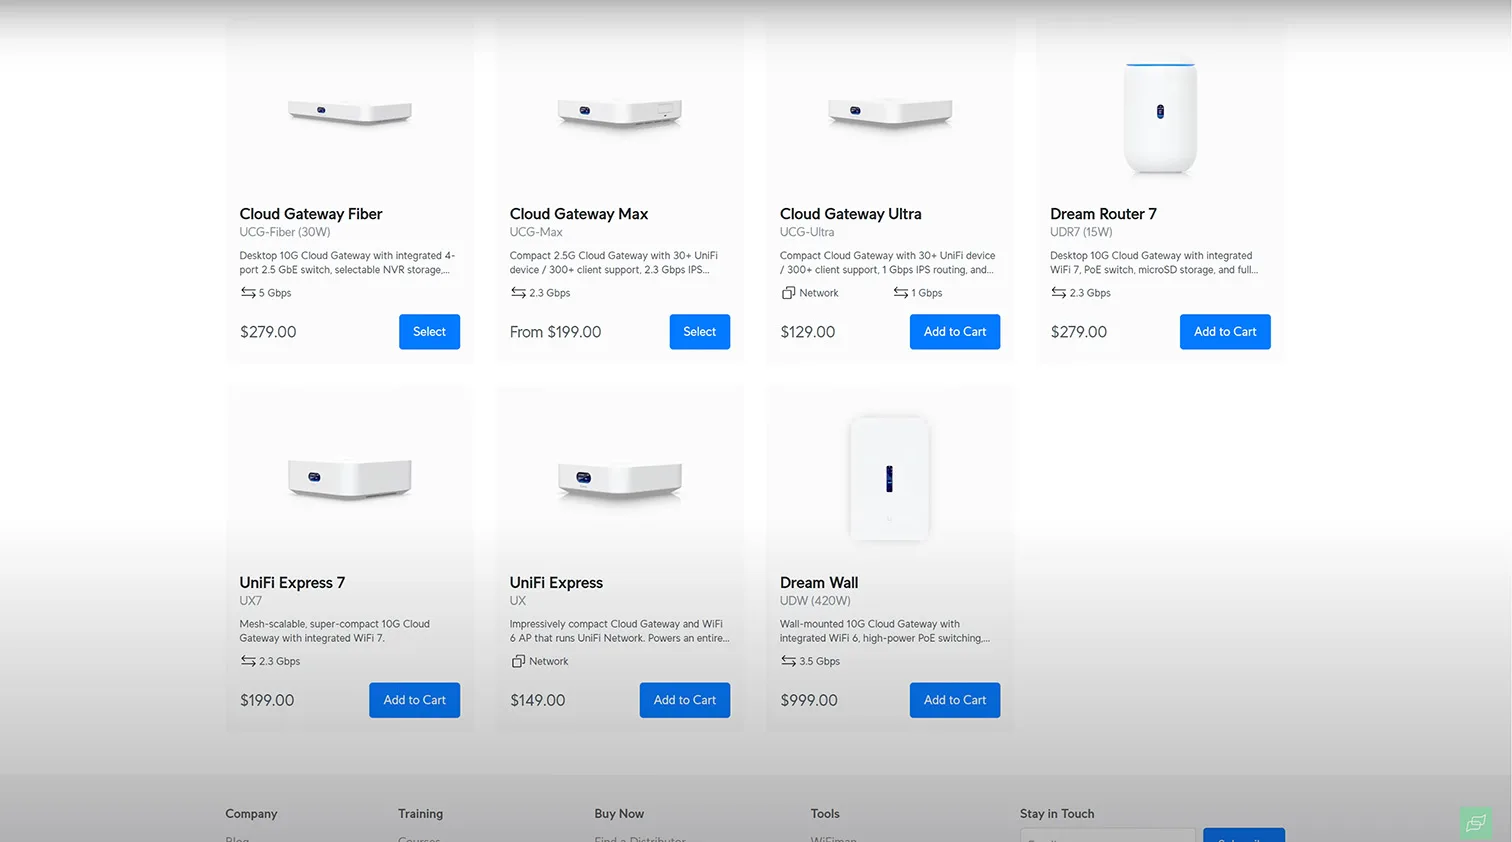
Dream Router (UDR): Entry-Level, Entry Budget
A Modest Start into the UniFi Ecosystem
Yes, It Works with UniFi Protect
The UDR is a compact device marketed primarily as a residential router, but yes, it’s compatible with UniFi Protect. It also gives you access to the UniFi Network interface, making it suitable for small home setups that don’t require long-term footage retention.
Performance Limits and Storage Tradeoffs
However, performance is limited. In the [basic User Guide for UniFi Project], the UDR maxes out with just a single 4K camera, or two 2K cameras, based on current CPU capabilities. Storage is limited to microSD cards, offering approximately 20 hours of recording time. That’s enough for live monitoring or quick reviews – not enough for long-term event tracking.


1 / 5
Entry Point into the UniFi World
The upside? It’s a great entry into the UniFi ecosystem. It can run your Wi-Fi network, basic video, and get you familiar with the UniFi Protect app without a large investment. But don’t expect enterprise performance.
When It Falls Short
For those considering full-scale adoption – more cameras, longer storage, or integrated access control – the UDR will quickly become insufficient. Still, as a first step into AI-powered security, it’s a respectable option.
Dream Router 7 (UDR7): A Modernized Alternative
Next-Gen WiFi 7 and Expanded Multi-Cam Support
The Dream Router 7 takes everything from the original UDR and upgrades it substantially. You get tri-band WiFi 7, a built-in PoE switch, and notably improved camera support – now handling up to five HD, two 2K, or one 4K camera. That makes it far more practical for basic residential surveillance, particularly if you’re working with a mix of resolutions.
Its compact cylindrical design hides a surprising number of features. It comes with a 64GB pre-installed microSD card and allows expansion for more storage. Networking capabilities include one 10G SFP+ and one 2.5 GbE WAN port, plus four LAN ports (one PoE) that can support UniFi Access Points or cameras directly.
While the PoE budget is still modest (15.4W total), it’s enough for powering one or two standard UniFi cameras without needing an external switch. For users needing a clean, all-in-one desktop deployment with modern wireless throughput, the UDR7 is a compelling step up.
Additional benefits include:
- IDS/IPS throughput of 2.3 Gbps
- Full UniFi OS integration: Protect, Network, Access, Talk, and Connect
- VLAN segmentation, advanced firewall rules, SD-WAN, and VPN features
- Easy port-level PoE control and device adoption from a single dashboard
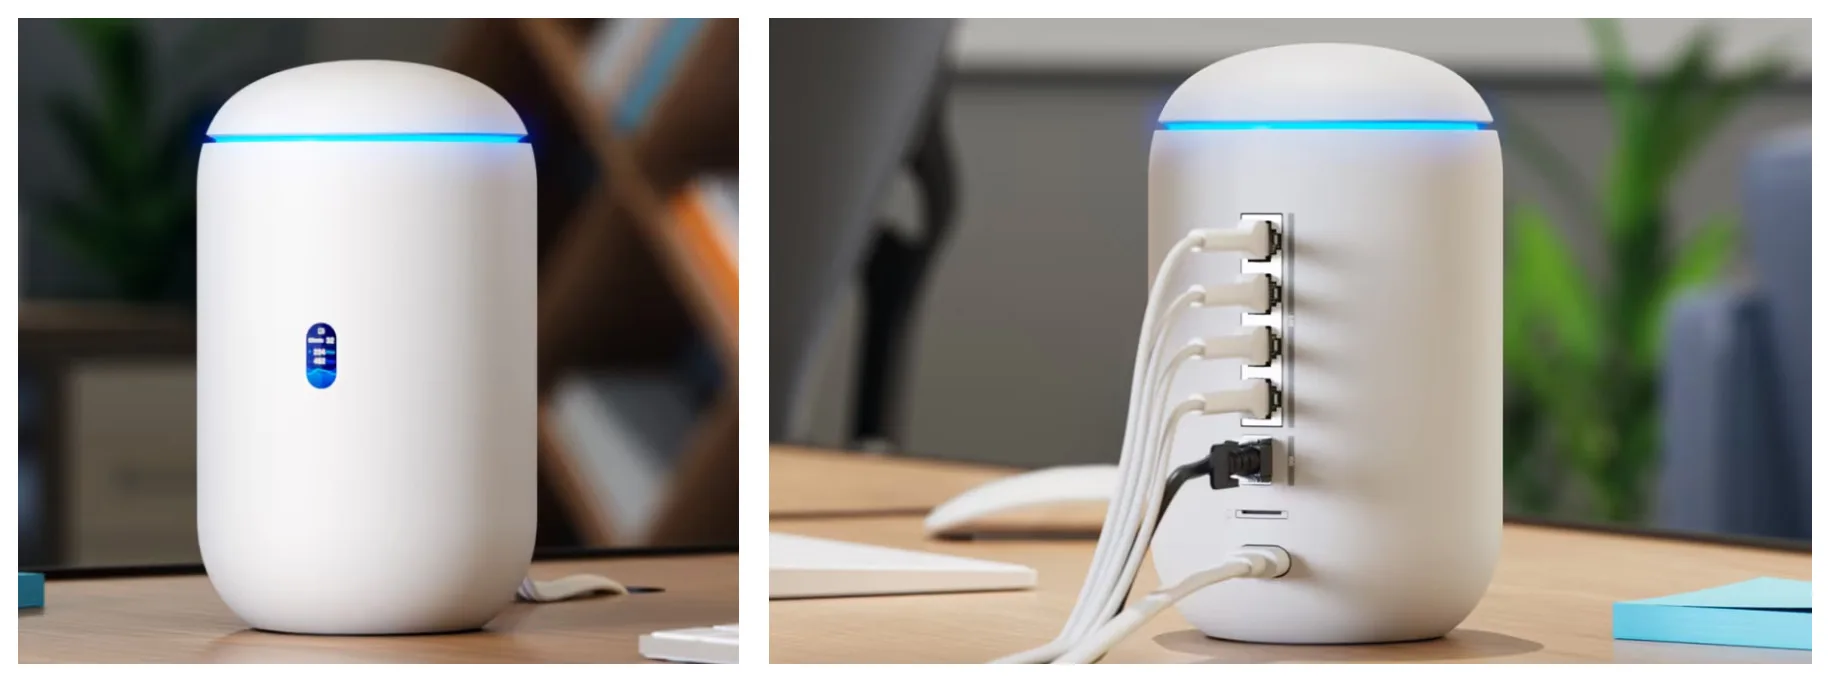
Cloud Key Plus (UCK-G2-SSD): Compact Powerhouse with Real Storage
A Practical Step Up with Multi-System Integration
Built-In Storage and Broader Use Case
For a more practical entry point into UniFi Protect, the Cloud Key Plus makes a serious case. It ships with a pre-installed 1TB drive and supports a wide array of UniFi services – not just video, but access control, network management, and more.
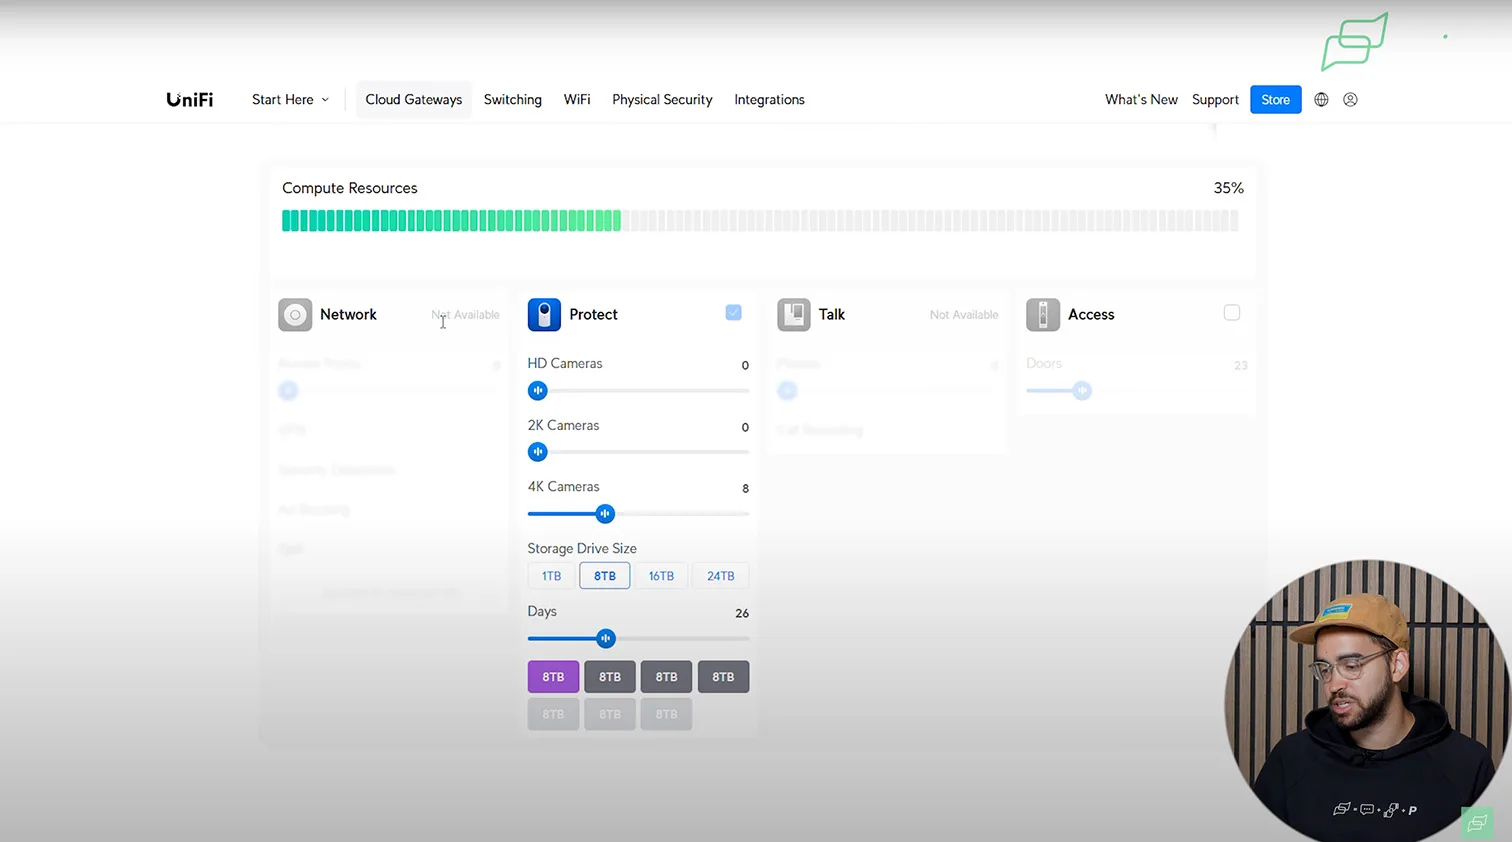
Capacity and Camera Balancing
Using the capacity calculator, this console supports two 2K cameras with up to 9 days of recording. Switch to 4K cameras, and you’ll get 5 connected devices with about two days of retention. You can also mix camera types to balance compute load and disk space – for instance, a combination of 4K and HD cameras can stretch storage while preserving quality where needed.

1 / 5
All-in-One System for Growing Needs
Real-World Testing Results
For home installations with a future in mind, or light commercial use, it’s a balanced choice. We’ve tested it in various setups, and it consistently delivers stable performance across multiple platforms. We also have a full video breakdown of this unit on the Pipl Systems channel:
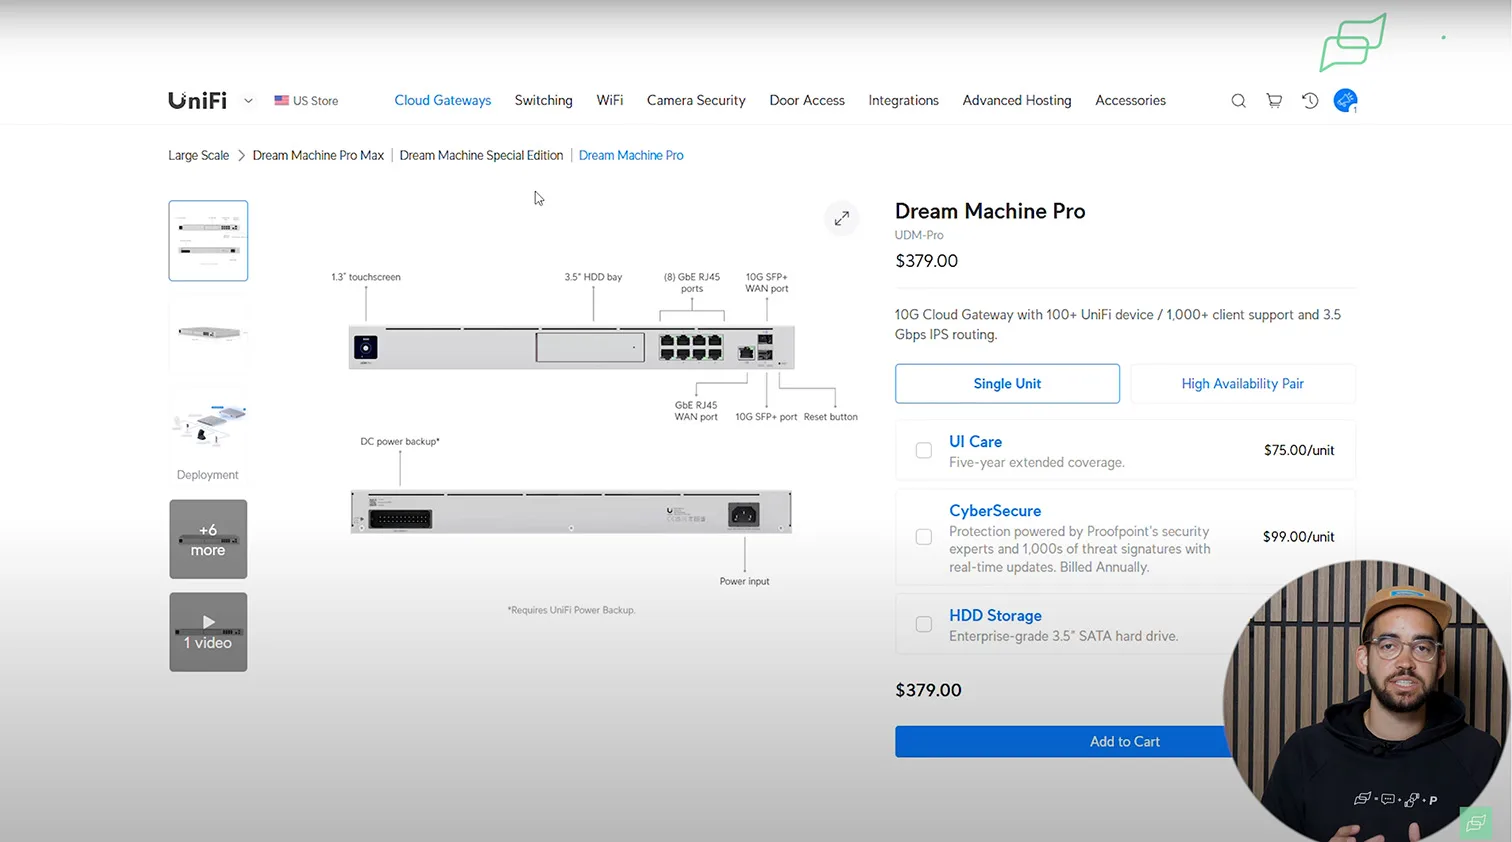
Dream Machine Pro and UDM-SE: The Backbone of a Scalable UniFi Protect Setup
Pro-Level Surveillance with Residential Simplicity
Ideal for Power Users and SMBs
The Dream Machine Pro (UDM-Pro) and Dream Machine Special Edition (UDM-SE) are widely regarded as the go-to UniFi consoles for serious users. Whether you're building a robust residential UniFi Protect setup or deploying security cameras across a retail space, these models offer the power and flexibility most projects demand.
In our lab at Pipl Systems, we use the UDM-Pro as a benchmark device for testing because it covers almost every residential and light commercial need. It combines UniFi Network and UniFi Protect on one device, eliminating the need for separate NVR hardware or gateways. If you're building a system and want room to grow, this is the controller to start with.


1 / 5
Real Storage, Real Performance
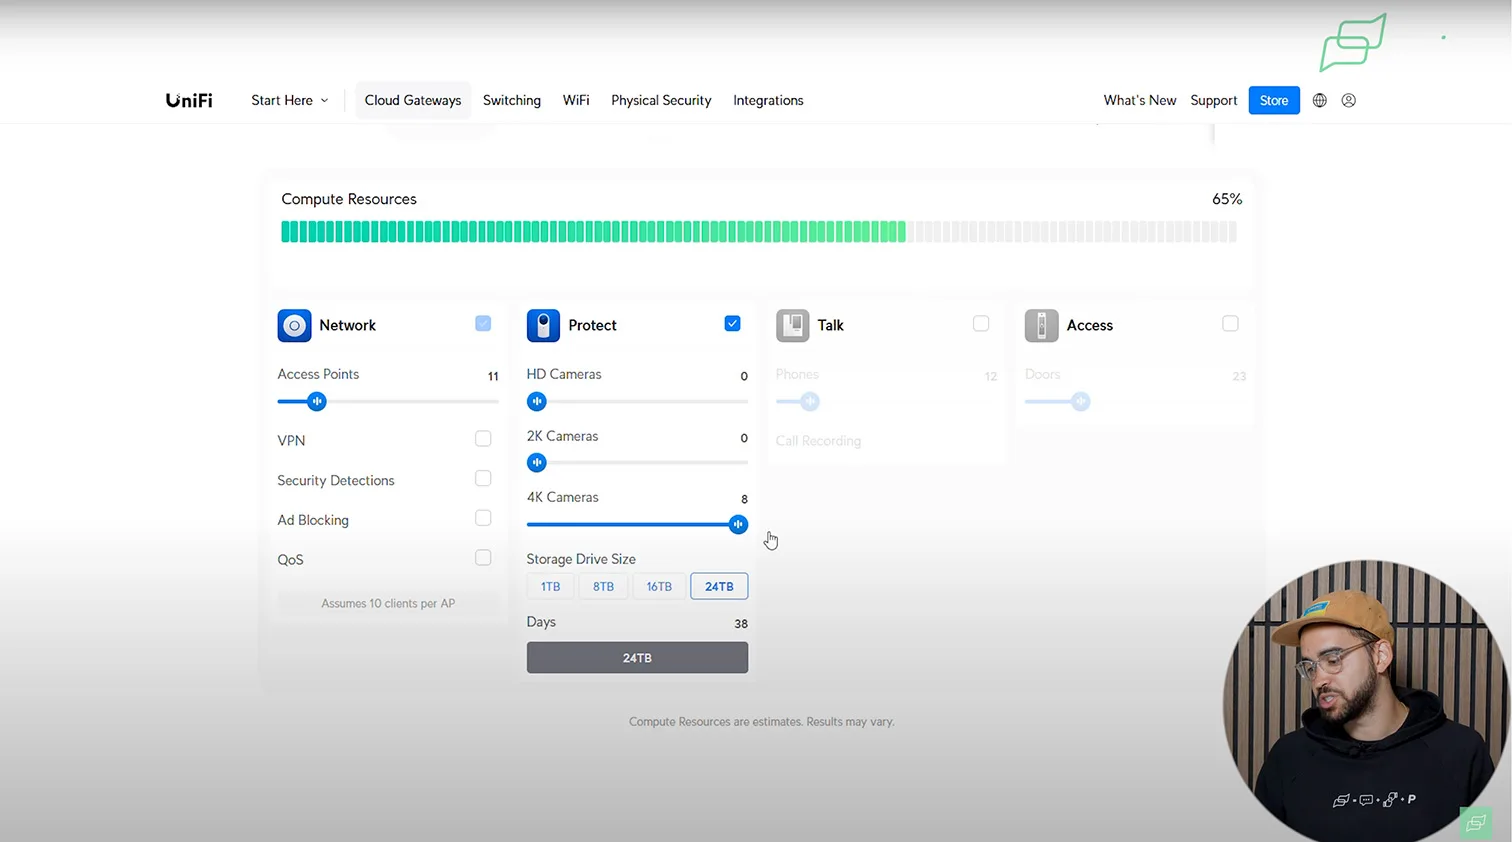
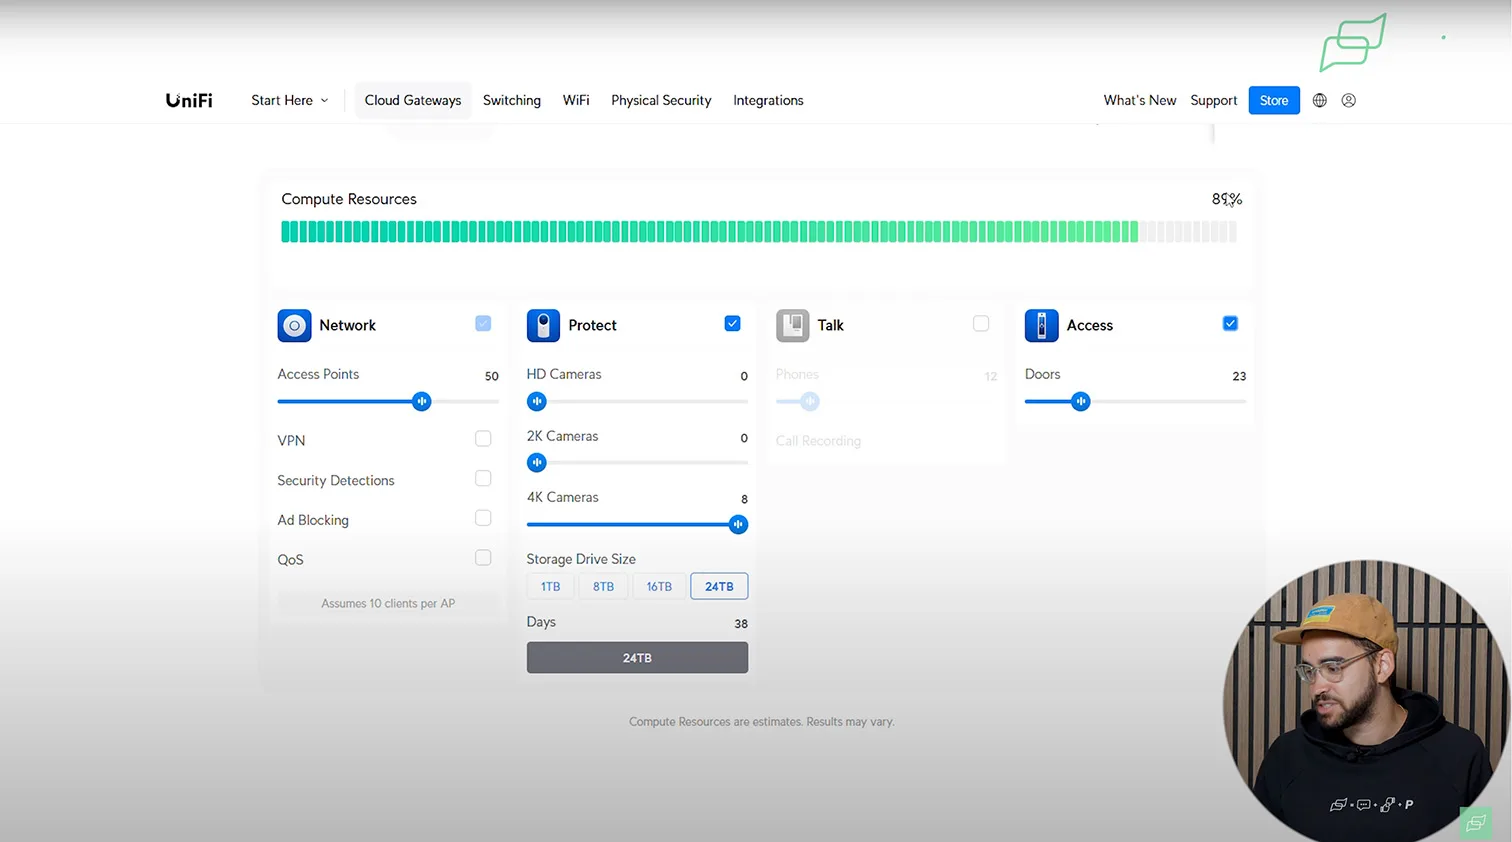
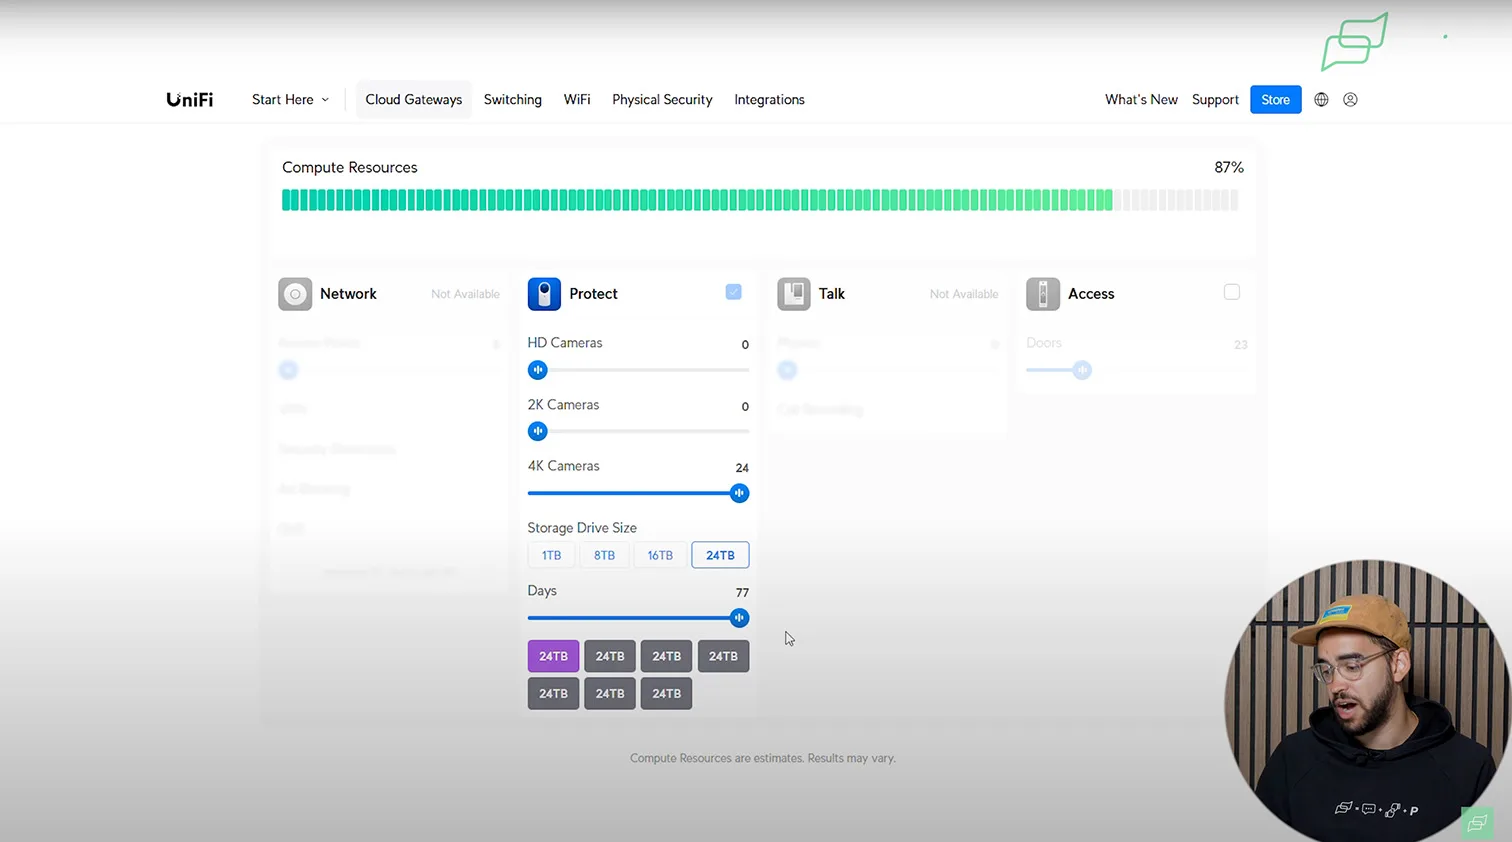
What makes the Dream Machine Pro stand out is its serious storage potential. It supports a 24TB hard drive – a substantial upgrade from entry-level consoles, which translates to about 38 days of recording for up to eight 4K UniFi Protect cameras. Even with high-resolution recording enabled, you still have compute headroom for dozens of access points and access control devices.
UDM-SE Adds Integrated PoE
The UDM-SE (Special Edition) takes the same architecture as the UDM-Pro and adds a built-in PoE switch. That means you can connect and power UniFi Protect cameras directly without needing a separate UniFi PoE switch. This is a big advantage for first-time installers or pros who want to minimize rack clutter and cable routing.

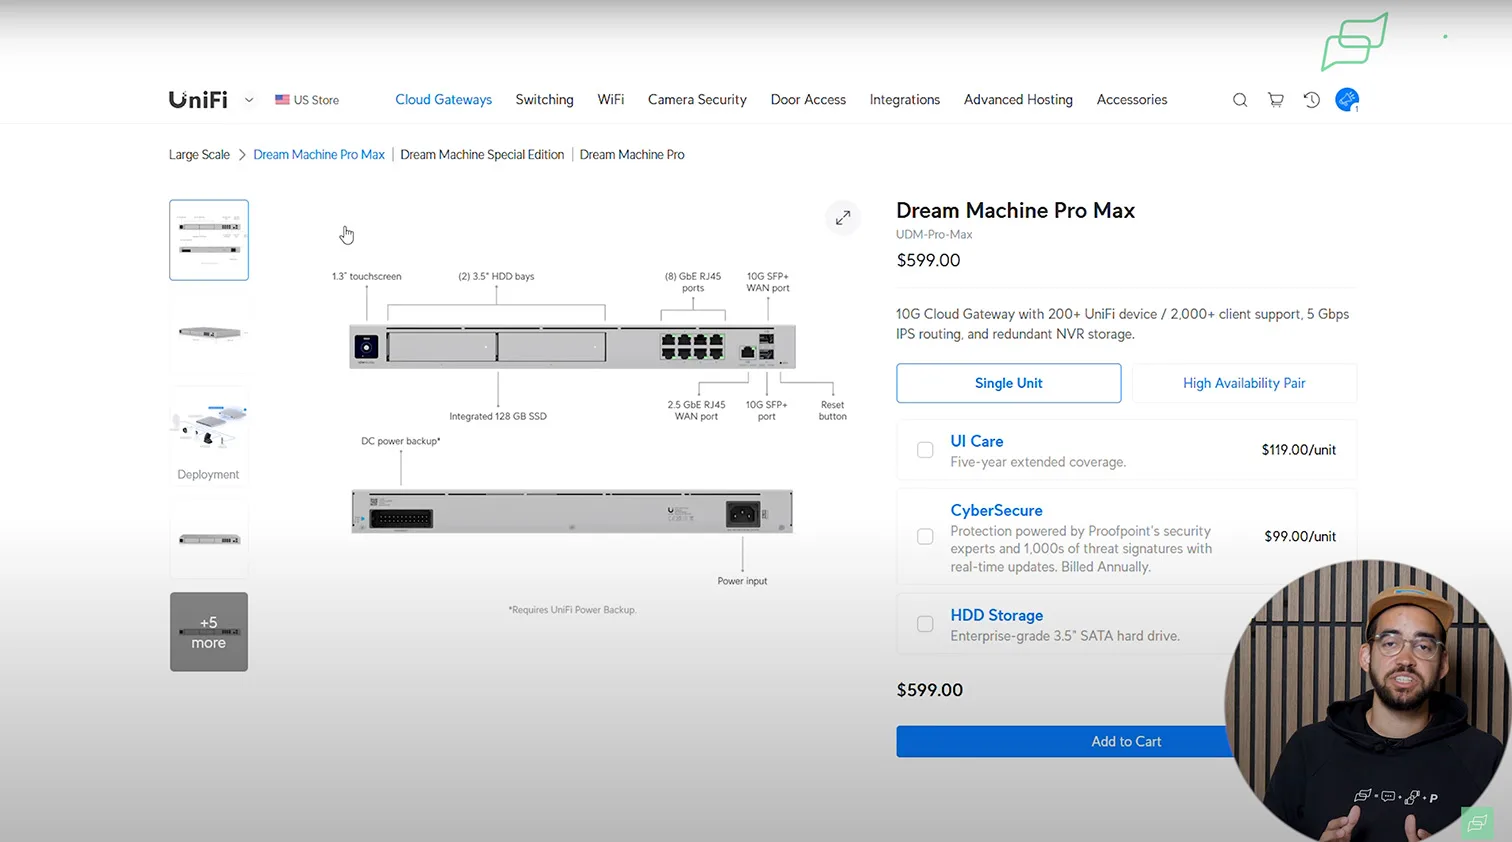
Dream Machine Pro Max: Serious Power for Serious Projects
Enterprise-Ready Storage and Compute in a Single Console
Built for Heavy Camera Loads
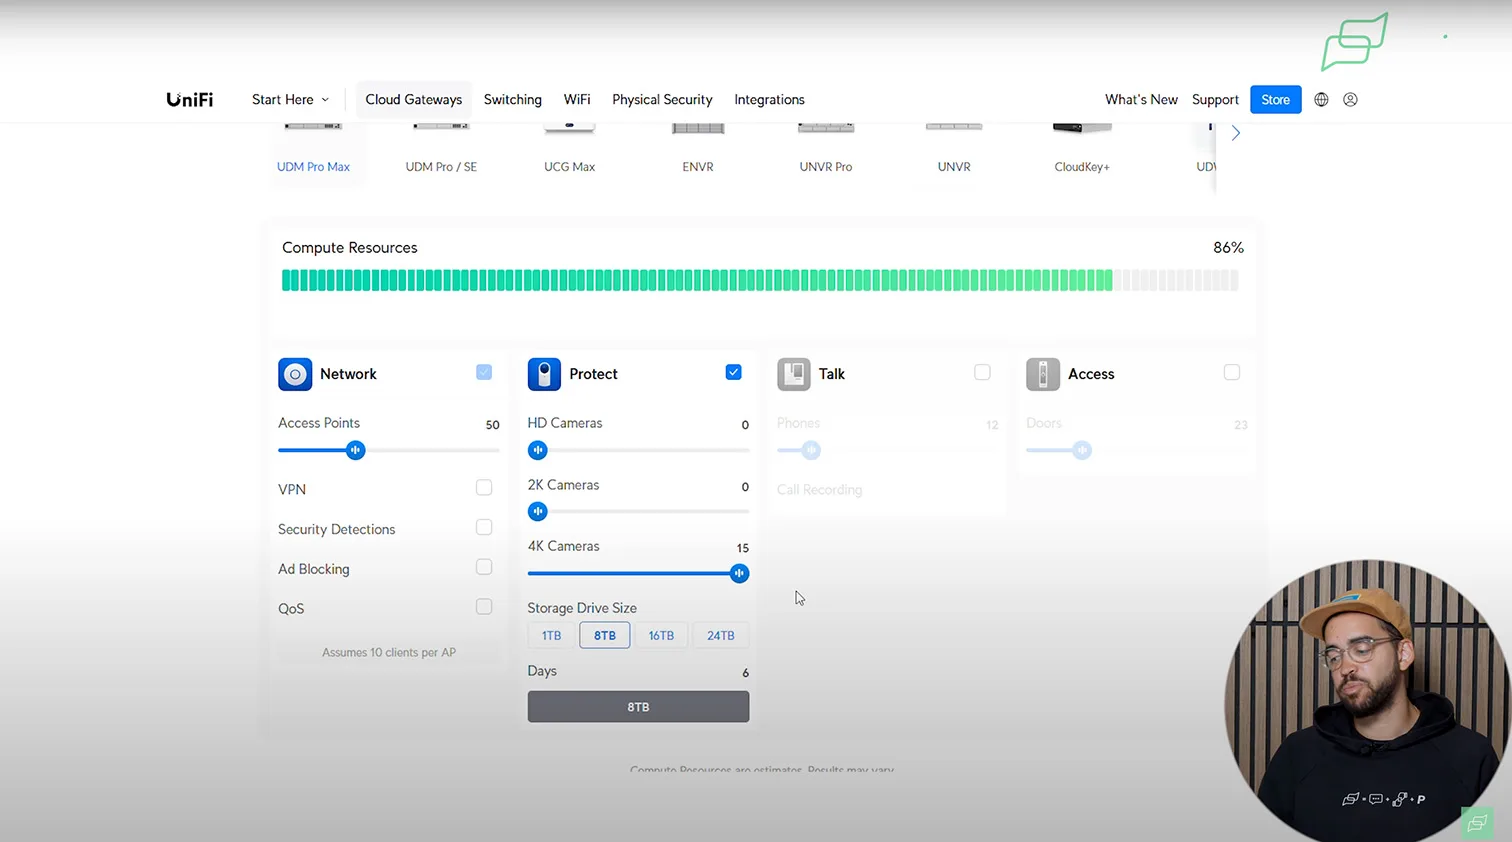
The UDM-Pro Max pushes beyond the already-impressive specs of the UDM-SE. It includes an integrated 128GB SSD for system operations and dual 3.5″ HDD bays dedicated to UniFi Protect recordings. This makes it a compelling solution for users planning to deploy large numbers of 4K security cameras – up to 15 of them, according to Ubiquiti’s official specs.
We consider this the first truly enterprise-class UniFi OS Console that still fits in standard home server racks. If you're building out a multi-site commercial property, logistics hub, or estate with dozens of camera zones, the UDM-Pro Max delivers the kind of retention and processing power that ensures uninterrupted, real-time AI detection.
1 / 2
Future-Proof for AI Security at Scale
What makes the Dream Machine Pro Max special isn't just raw storage – it’s the onboard compute. The UniFi Protect interface runs fluidly, even with high event frequency and simultaneous AI tracking across multiple streams. Whether you’re tagging license plates, tracking subjects across multiple lenses, or integrating access control with video verification, this system stays responsive.
If you're still unsure which UniFi OS Console is right for your project, this video will walk you through the decision. It covers all the latest 2025 models and offers clear recommendations for home setups, office use, and scalable deployments.
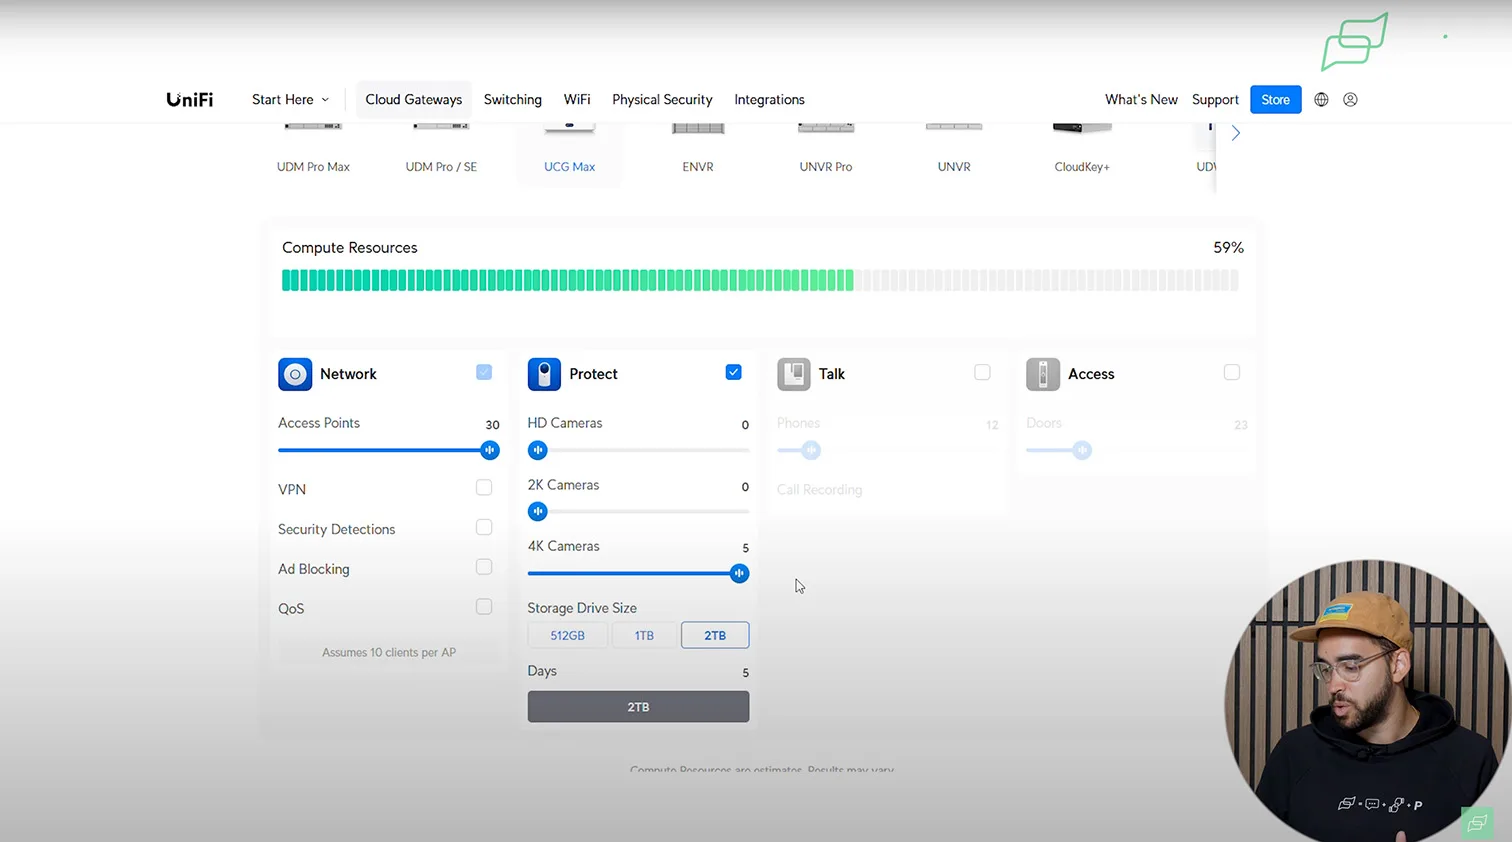
Cloud Gateway Max: Desktop Simplicity, Full System Control
All-in-One Powerhouse for Modern Home Setups
Sleek and Scalable
The Cloud Gateway Max (UCG-Max-NS) offers a rare combination of form and function. Designed in a clean desktop profile, this UniFi OS Console runs UniFi Protect, UniFi Network, and more – all while taking up minimal space on a shelf. For many users building their first AI-powered security system, it strikes the perfect balance between capability and convenience.
Despite its compact footprint, the UCG-Max packs serious compute power. It supports up to five UniFi Protect 4K cameras with five days of retention, plus 30 UniFi access points, all while using just 60% of its available resources. This leaves headroom for UniFi Access, UniFi Talk, and future expansion, without slowing down or requiring an upgrade.

1 / 2
Built-In SSD Storage and Touchscreen
One of the most useful features of the Cloud Gateway Max is its internal NVMe SSD storage, available up to 2TB. That means no external hard drives or racks are required. You get true plug-and-play simplicity with high-speed, low-latency storage that’s perfect for residential security.
We tested the UCG-Max in real-world scenarios and appreciated the built-in touchscreen for quick glance status updates and basic interaction. It’s one of the few UniFi Consoles that feels just as appropriate in a smart home living room as it does in a light commercial space.
When to Choose the UCG-Max
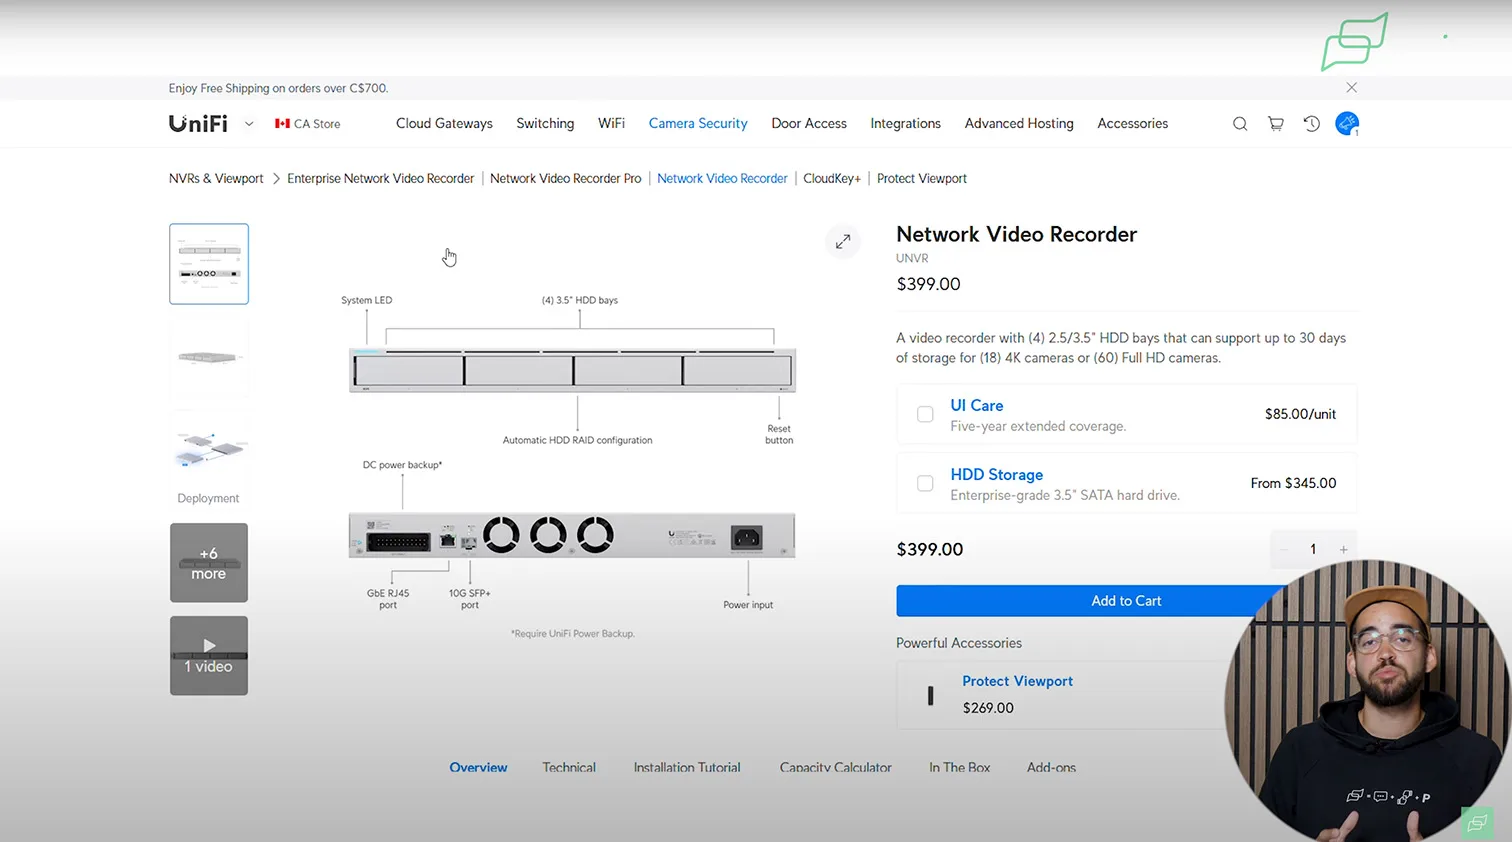
UNVR: Redundant Video Storage for Critical Security Projects
Enterprise-Grade NVR with RAID Protection
Designed for UniFi Protect, Built for Resilience
The UniFi Network Video Recorder (UNVR) is purpose-built for users who need robust video retention, high availability, and enterprise-class storage integrity. Unlike the all-in-one UniFi Consoles we’ve covered so far, the UNVR does not run UniFi Network – it’s a dedicated device for managing and storing video from UniFi Protect cameras.
The defining feature of the UNVR is its four 3.5″ HDD bays, which support RAID configuration. This allows you to mirror or stripe data across drives, ensuring that no footage is lost if a hard drive fails. In our testing, RAID functionality proved essential for mission-critical installs, especially in retail, logistics, or remote properties where losing video isn’t an option.
Understanding RAID vs. Backup
Let’s clarify something we often hear in consultations: RAID is not a backup. The RAID array in the UNVR helps recover from drive failures by rebuilding the lost data onto a new drive, but it doesn’t replace regular off-site or cloud backups. If you want full redundancy, we recommend pairing the UNVR with external backup protocols or scheduled footage export.
Still, for most security-conscious buyers, the redundancy RAID provides is a significant benefit. If your project requires guaranteed uptime or regulatory compliance, the UNVR’s storage flexibility and reliability give it a strong edge over basic NVRs.
When the UNVR Makes Sense
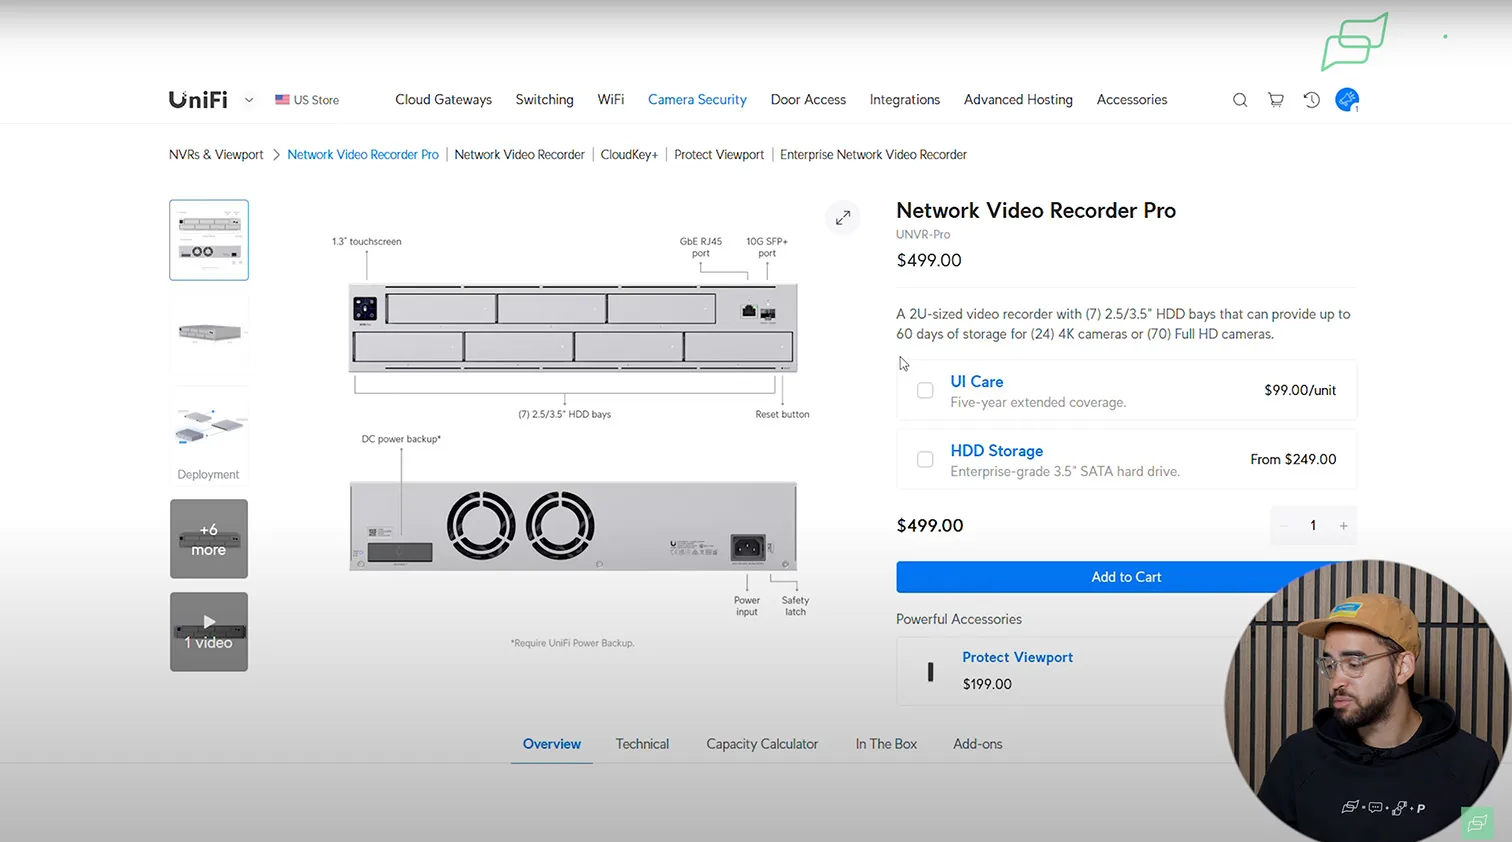
UNVR-Pro: Centralized Storage with Professional-Grade Retention
Scalable NVR for Mid-Sized to Large Deployments
High-Capacity Retention for 4K and HD Cameras
The UniFi Network Video Recorder Pro (UNVR-Pro) is a purpose-built solution designed specifically for UniFi Protect, not UniFi Network, and it excels in one area: storage. If you're running a growing surveillance project, the UNVR-Pro offers unmatched retention and camera capacity in a single rackmount unit.
Using Ubiquiti’s capacity calculator, the UNVR-Pro shows support for up to 24 4K cameras or 70 Full HD cameras, with up to 60 days of storage, depending on the hard drives you install. With all seven HDD bays populated and high-capacity drives selected, we’ve tested real-world retention exceeding 75 days in low-traffic environments.
This makes it ideal for commercial clients that need historical video access, regulatory footage compliance, or simply long-term archiving of high-resolution streams.
1 / 3
Customizable Drive Bay Configurations
One of the UNVR-Pro’s standout features is its flexibility. The unit includes seven 3.5″ HDD bays, giving you full control over RAID configuration and capacity scaling. Using the Protect interface, you can define how many drives to use, configure mirroring or parity, and instantly see how your retention timeline adjusts.
Just keep in mind: the calculator offers estimates. Real retention always depends on camera location, motion event frequency, and AI detection volume. Cameras pointed at busy intersections will fill drives faster than those on a quiet perimeter.
Still, for projects that demand reliable, high-capacity local recording – with no cloud dependence – the UNVR-Pro delivers outstanding long-term value.
Best Use Cases for the UNVR-Pro
ENVR: Enterprise Surveillance with Maximum Storage Potential
When You Need More Than a Rackmount NVR
Massive Camera and Drive Capacity
At the top of the UniFi Protect hardware hierarchy sits the Enterprise Network Video Recorder (ENVR). This is the platform you choose when your surveillance scope exceeds anything consumer or small-business-grade. With support for up to 70 UniFi Protect 4K cameras – or an astonishing 210 Full HD streams – the ENVR is built for security operations centers, enterprise campuses, or distributed installations with central retention.
Its 16 hot-swappable HDD bays provide unmatched flexibility. You can configure multi-level RAID arrays, segment storage by camera zone, or run mixed retention schedules depending on criticality. Whether it’s a gated industrial site or a municipality-wide camera grid, the ENVR has room to grow.

Optimized for Uptime and Scale
Like the UNVR-Pro, the ENVR focuses exclusively on UniFi Protect – it doesn’t include UniFi Network services. But for many enterprise users, that’s a benefit. You can pair it with a separate UniFi gateway, PoE switches, and an access control stack to distribute system load without compromise.
In high-availability scenarios, the ENVR supports failover drives, disk monitoring, and enterprise-ready RAID 5/6 setups. Combined with AI-based motion detection, UniFi cloud sync, and remote admin control, it gives organizations the tools they need to manage hundreds of streams without losing operational visibility.
Who Needs the ENVR?
Dream Wall UDW: All-in-One Elegance with 420W PoE
Wall-Mounted Power for Integrated Surveillance and Networking
UniFi OS + Protect + PoE in One Sleek Chassis
The Dream Wall UDW is UniFi’s most visually distinct console – a sleek, wall-mounted unit that combines a powerful UniFi OS controller, integrated PoE switching, and full UniFi Protect support. It’s built for users who want both aesthetics and serious functionality in a single device, without rackmounts or cluttered shelves.
Unlike the UNVR or Cloud Gateway Max, the Dream Wall supports both UniFi Network and UniFi Protect apps simultaneously, meaning you can manage cameras, access points, switches, and user permissions from one dashboard. With 420W of PoE budget available, it can directly power high-draw security cameras, including UniFi AI-powered PTZs or G6 models, without requiring external switches.
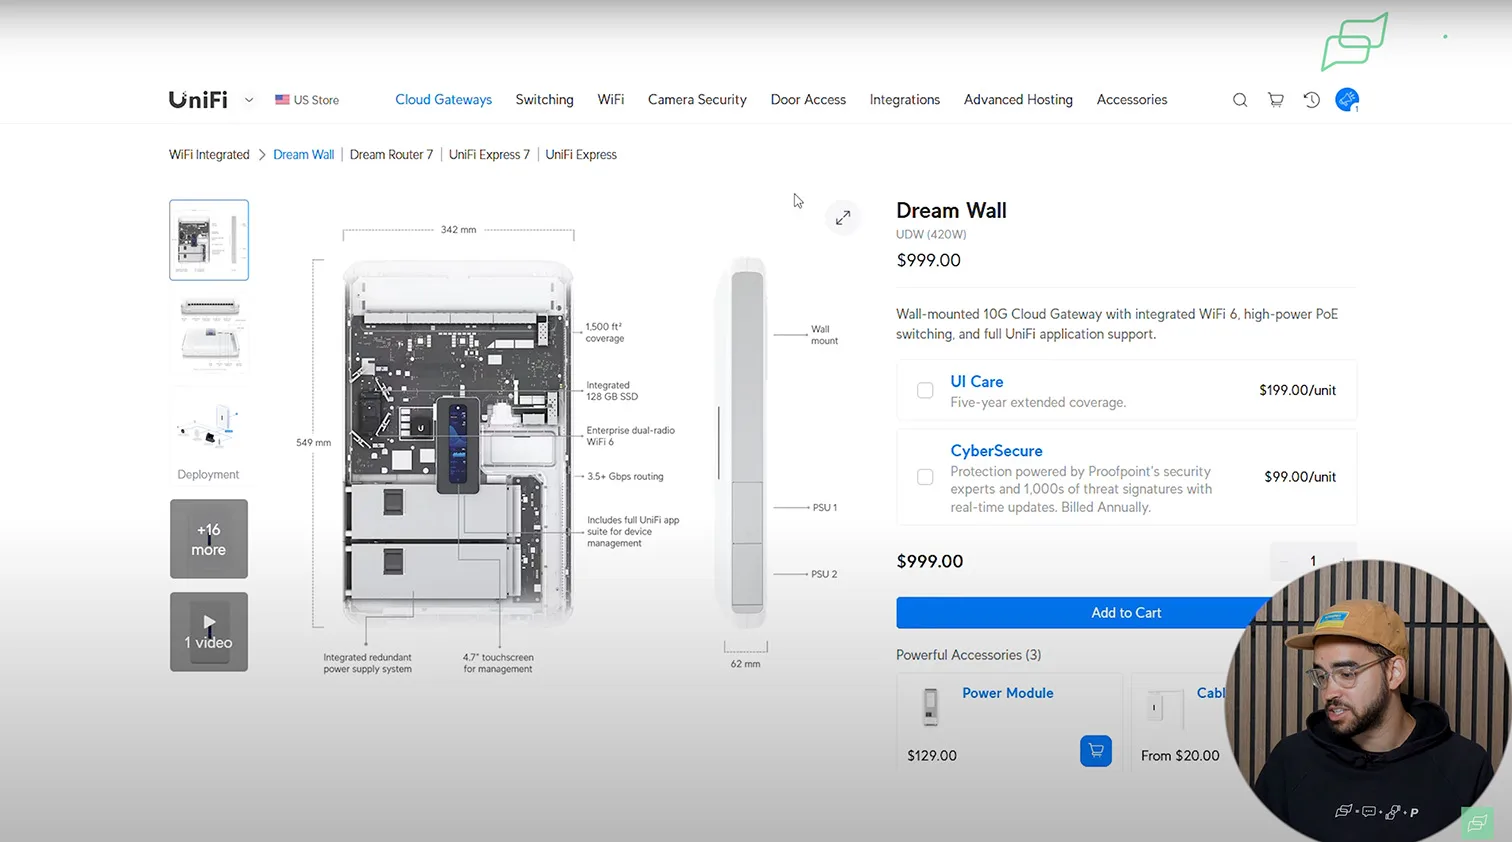
The design is unique: this unit is flush-mounted to a wall, ideal for clean installations in lobbies, server rooms, or smart homes with visible tech. If you want your UniFi setup to look as polished as it functions, the Dream Wall delivers both.
When Is the Dream Wall the Right Fit?
If you’re designing a modern residential system or a high-end business environment and want all-in-one functionality without sacrificing style, the UDW makes a compelling case. It’s especially useful for clean cable management scenarios where rack space is unavailable or undesirable.
Choosing the Right UniFi Protect Controller: Final Thoughts
Start Smart, But Think Ahead
Entry-Level or Scalable Core?
If you’re early in your UniFi Protect journey, it’s tempting to start with the most affordable console, like the Dream Router or Cloud Key Plus. And for simple residential setups, that can work well.
But think carefully about your growth path. If you plan to add more security cameras, smart door access, or multiple Wi-Fi zones, you’ll quickly run into the limitations of low-tier devices. In contrast, platforms like the UDM-Pro, UDM-SE, or UCG Max provide enough performance headroom and storage flexibility to scale without hardware replacements.
Best Value Consoles for Long-Term Growth
At Pipl Systems, we’ve tested every UniFi Protect console in real-world deployments – from small homes to warehouse perimeters. If you’re looking for the best mix of performance, value, and future scalability, two devices stand out:
- UDM-Pro / UDM-SE: Ideal for home and small business users who want powerful local control with optional PoE built in.
- Cloud Gateway Max (UCG-Max): A well-balanced desktop controller with excellent compute and NVMe storage capacity for growing projects.
These two controllers offer a great starting point without limiting your ability to expand, whether that means adding more AI-powered UniFi Protect cameras, unlocking access control, or increasing retention periods.
Choosing the Right UniFi Protect Camera
Matching Form Factor, Resolution, and AI Features to Your Needs
Not All Cameras Are Equal
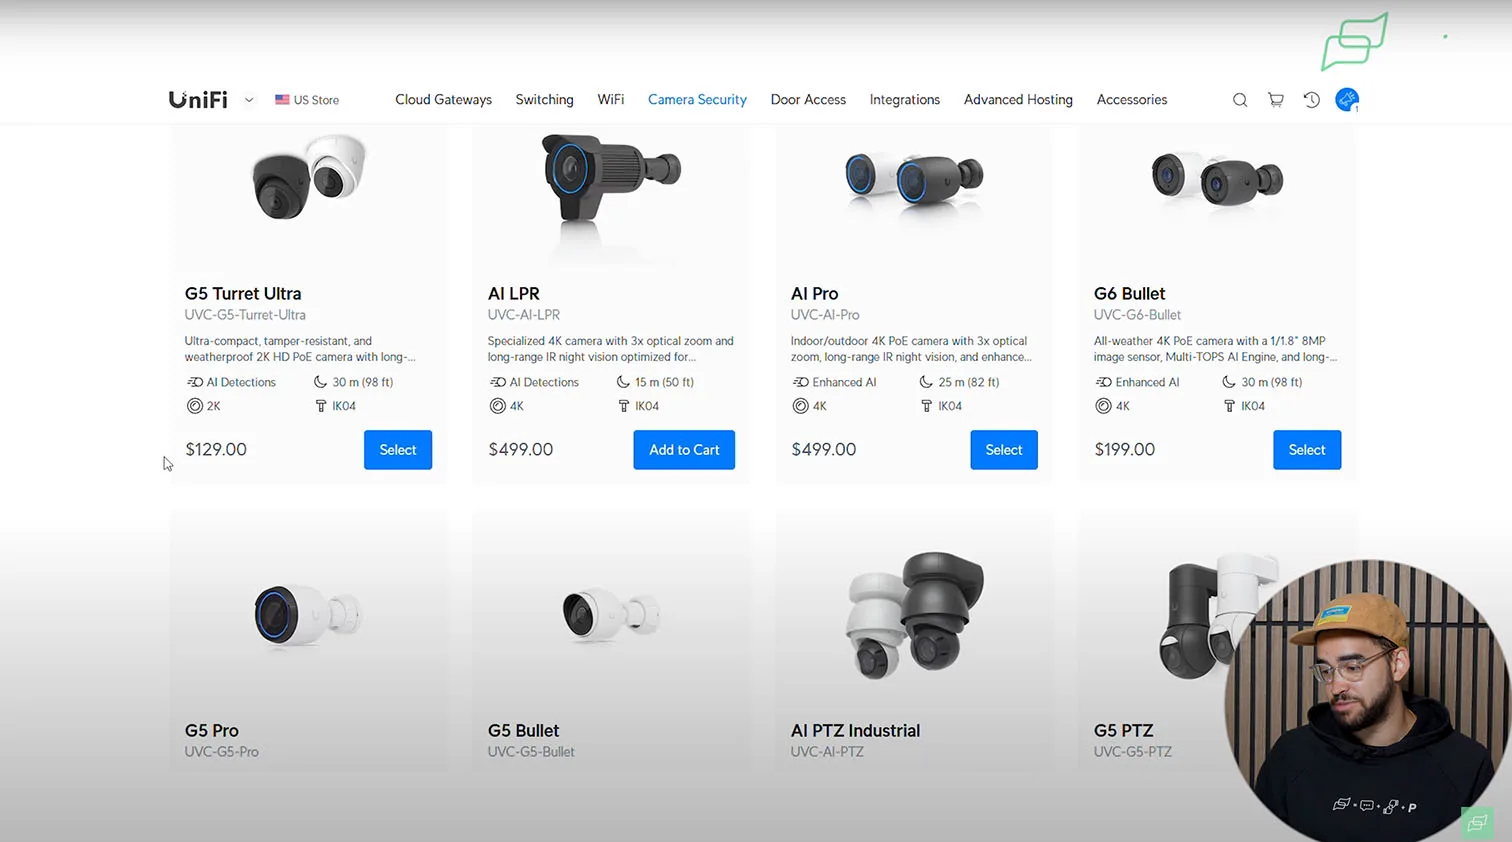
When building a UniFi Protect system, choosing the right UniFi camera is just as critical as picking the right console. Ubiquiti’s catalog includes dozens of models, from G5 and G6 series to AI-powered cameras and license plate recognition units. The sheer variety can feel overwhelming for new users.
To simplify this decision, we strongly recommend using Ubiquiti’s Capacity Calculator tool. It not only filters compatible cameras based on your chosen UniFi OS Console, but also alerts you when you exceed the processing or power limits, especially important when dealing with 4K models or AI-enhanced analytics.
Camera Families Explained
The UniFi Protect lineup falls into several tiers:
- G5 Series: Affordable and reliable, great for basic surveillance in HD or 2K.
- G6 Series: Newer 4K models offering better AI analytics and low-light performance, ideal for smart residential setups.
- AI Series: Includes powerful models like the AI Bullet, AI Theta, and AI Pro, which deliver advanced features like smart object tracking, facial recognition, and 22x optical zoom.
- AI LPR: Dedicated license plate recognition (LPR) camera optimized for day and night visibility – an essential for vehicle entry points.
Each line supports different analytics and resolution levels. If AI detection (people, vehicles, pets) or facial/plate recognition is a priority, you’ll want to stay within the AI or G6 families.
Curious how the UniFi AI LPR camera performs in real-world conditions? In this 30-day test, we put it through challenging license plate scenarios and explore its integration with the AI Horn Speaker for smart deterrence:
PTZ Series: Precision Tracking for Large-Scale Coverage
UniFi’s PTZ lineup is designed for dynamic environments where wide-area coverage and subject tracking are essential. These models are more than static recorders – they actively follow movement and adapt in real time.
- AI PTZ Precision: Industrial-grade PTZ camera with LiDAR-assisted autofocus, 31x optical zoom, and advanced AI object tracking. Ideal for perimeter defense and wide-area monitoring.
- AI PTZ Industrial: Ruggedized 4K PoE++ PTZ camera built for challenging conditions. Includes vehicle/person detection, programmable patrols, and 22x high-zoom surveillance.
- G6 PTZ: Dual-lens 4K weatherproof camera with 10x hybrid zoom, optimized for smart tracking and dual-angle views in residential and light commercial installs.
- G5 PTZ: Compact and budget-friendly PTZ option with full weatherproofing, useful for flexible coverage in homes or small businesses.
Form Factor: Dome, Bullet, Turret, or PTZ?
Choosing the right camera body depends on where and how you plan to install it:
- Bullet Cameras: Best for outdoor use – highly visible, acting as a natural deterrent. Typically wall-mounted.
- Dome Cameras: Designed for indoor or discreet spaces – subtle, corner-mounted, and less obtrusive.
- Turret Cameras: A hybrid between dome and bullet, often preferred for flexible mounting.
- PTZ Cameras: Feature motorized pan-tilt-zoom controls, ideal for large areas or tracking moving objects.
Each model also differs in power draw – an important consideration when building your PoE switch configuration, which we’ll explore in the next section.
To better understand which form factor fits your needs, we recommend watching the article and video "What Are The 15 Different Types Of Security Cameras? A Comprehensive Guide." It provides clear visual examples and real-world use cases to help you confidently choose between dome, bullet, turret, or PTZ models:
Expert Insight: Start with G6 for Balance
Choosing the Right UniFi PoE Switch
Matching Power Budget, Port Standards, and Ecosystem Benefits to Ensure Reliable Camera Uptime
Selecting the correct Power over Ethernet (PoE) switch isn’t just about the number of ports – it’s about ensuring reliable power and data delivery to every UniFi Protect camera in your system. Underestimating PoE requirements is one of the most common pitfalls for new users.
When configuring UniFi hardware, the PoE switch plays a critical role in powering all connected devices. In residential UniFi systems, where around 20–30 devices may be connected, choosing a switch with proper capacity ensures stable operation without interruptions.
What Does a PoE Switch Do in a UniFi Protect System?
The PoE switch powers your cameras and transfers data to your UniFi OS Console via a single Ethernet cable (Cat5e or Cat6). Each port simultaneously sends power and video footage back to your NVR, where it’s recorded and processed.
But here’s where things get technical: every PoE switch has a power budget. That’s the total amount of wattage it can distribute across all connected devices. If you exceed that budget – say by connecting too many high-wattage cameras – some devices will lose power, go offline, or drop footage.
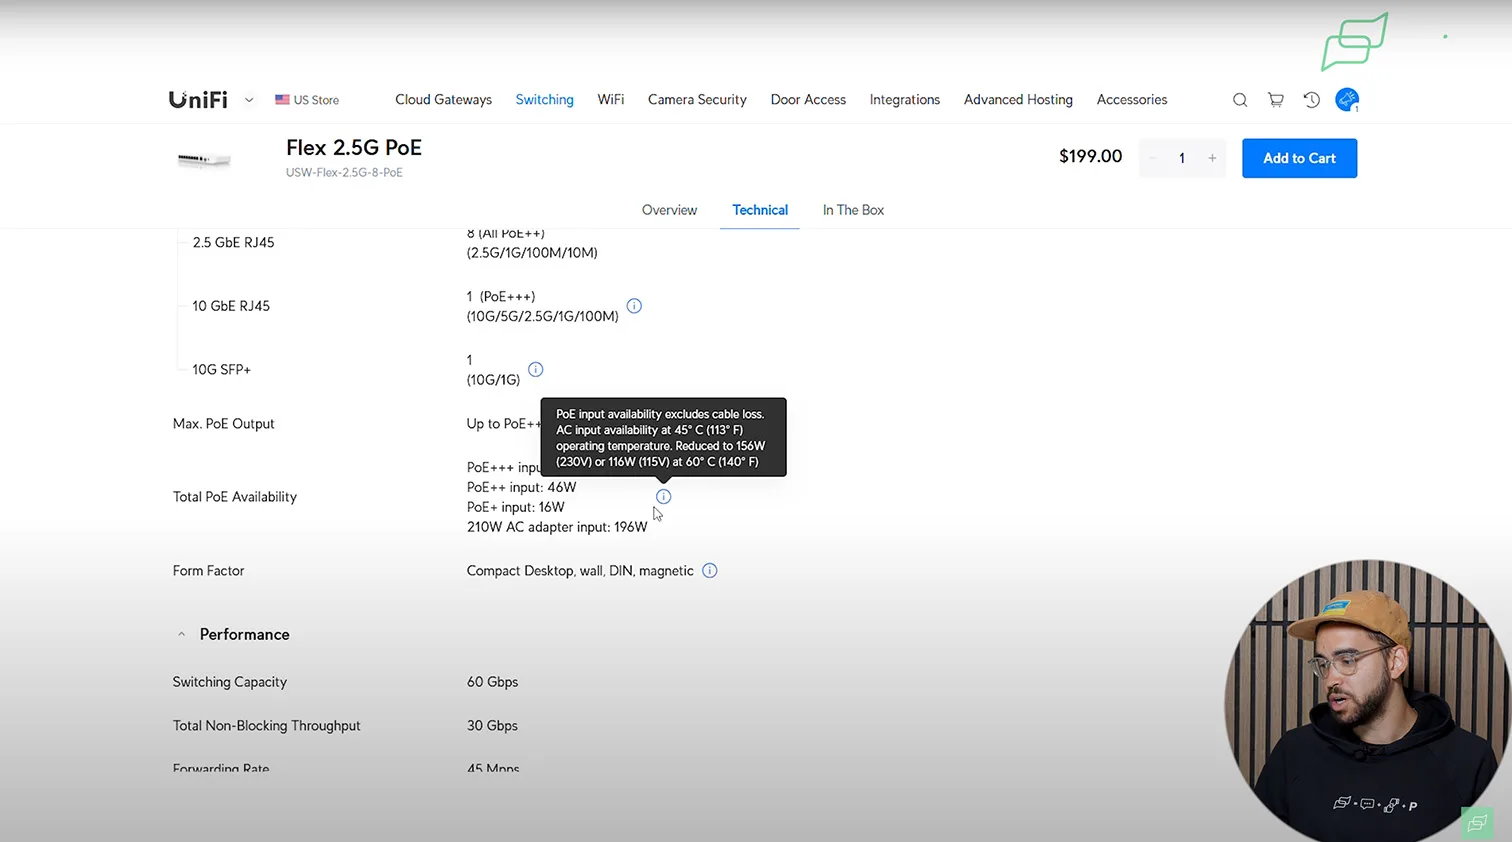
Understand Power Budgets and Port Standards
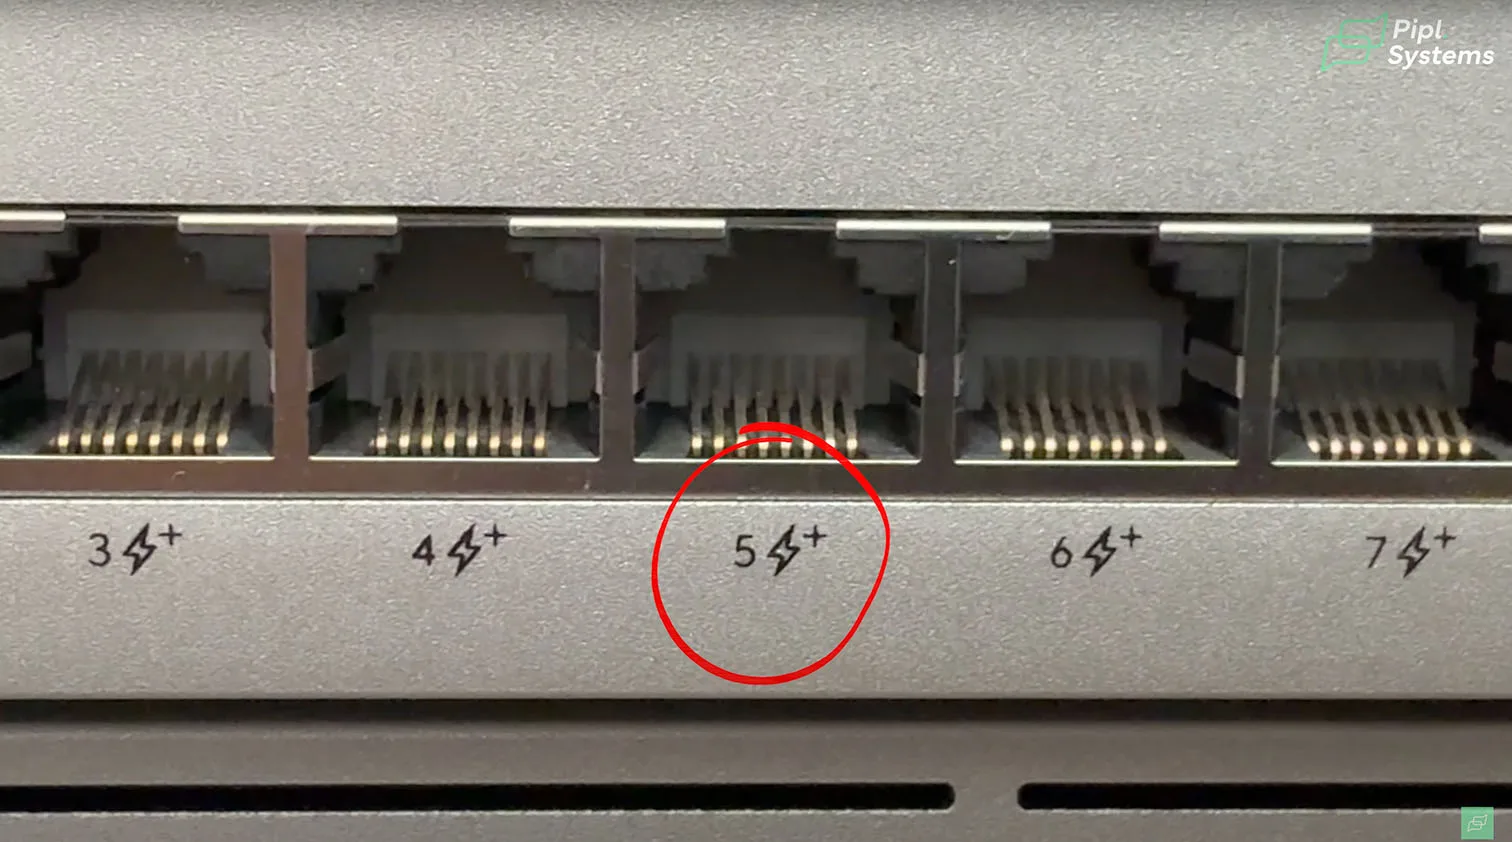
Not all PoE ports are created equal. Here's a quick breakdown of port types and their power output:
- PoE+ ~16W
- PoE++ ~46W
- PoE+++ ~76W+


1 / 3
High-performance cameras like the AI Pro or AI PTZ Industrial demand PoE++ or higher. For example, the G5 Bullet only needs ~4W, but an AI Pro draws up to 11W, and an AI PTZ Precision can require a full 76W per port.
If your switch doesn’t meet those requirements, cameras may intermittently fail or refuse to adopt into the Protect interface, especially under load.
Comparing Switch Power Budgets
Let’s consider two Ubiquiti switches:
- UniFi Lite 8 PoE: 52W total PoE budget – fine for a few G5 cameras, but will struggle with AI PTZ models.
- UniFi 24 PoE: 186W total – enough to run multiple AI-class cameras and access points without power failures.
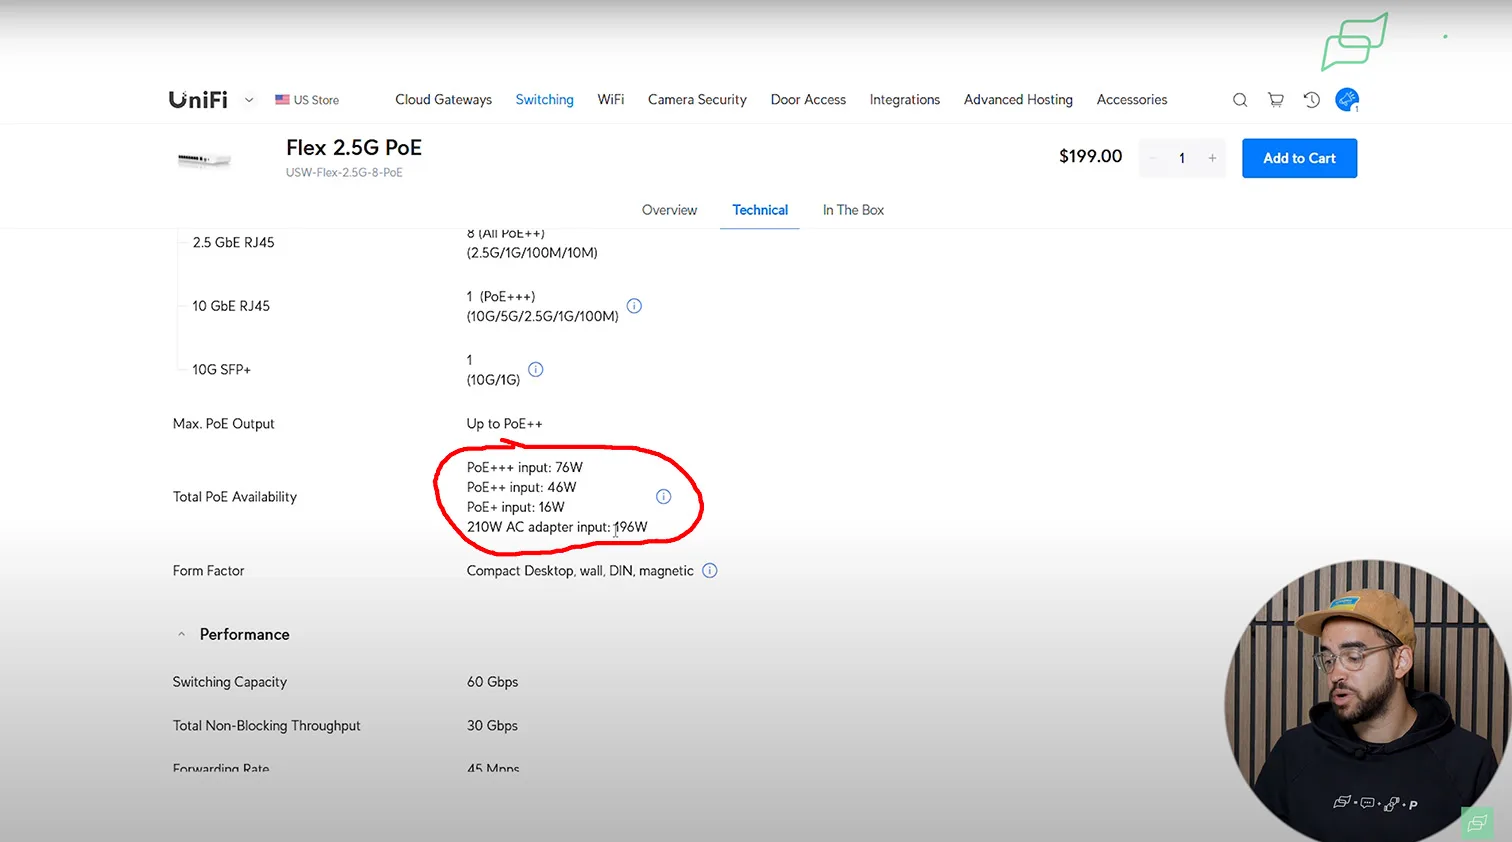

1 / 3
If you’re planning a full UniFi Protect deployment with smart analytics and 4K video, this step is not where you cut corners.
Do I Need a UniFi Switch for UniFi Protect?
Not necessarily. Any third-party PoE switch with sufficient wattage can power UniFi cameras. But using a UniFi-branded switch offers major advantages:
- Centralized Management: Control PoE settings, port power, and traffic via the same interface as UniFi Protect and UniFi Network.
- Auto Discovery and Adoption: Cameras and switches recognize each other natively within the UniFi ecosystem.
- Advanced Port Controls: Enable/disable ports, assign VLANs, and configure power modes per port without leaving the UniFi app.
Setting Up Your UniFi Protect System
Step-by-Step Deployment from Hardware to Smart Detection
The UniFi Protect setup process starts with physical installation and ends with full smart detection and remote access. This beginner's guide to UniFi walks through each step, from powering your hardware to configuring AI detection and managing storage.
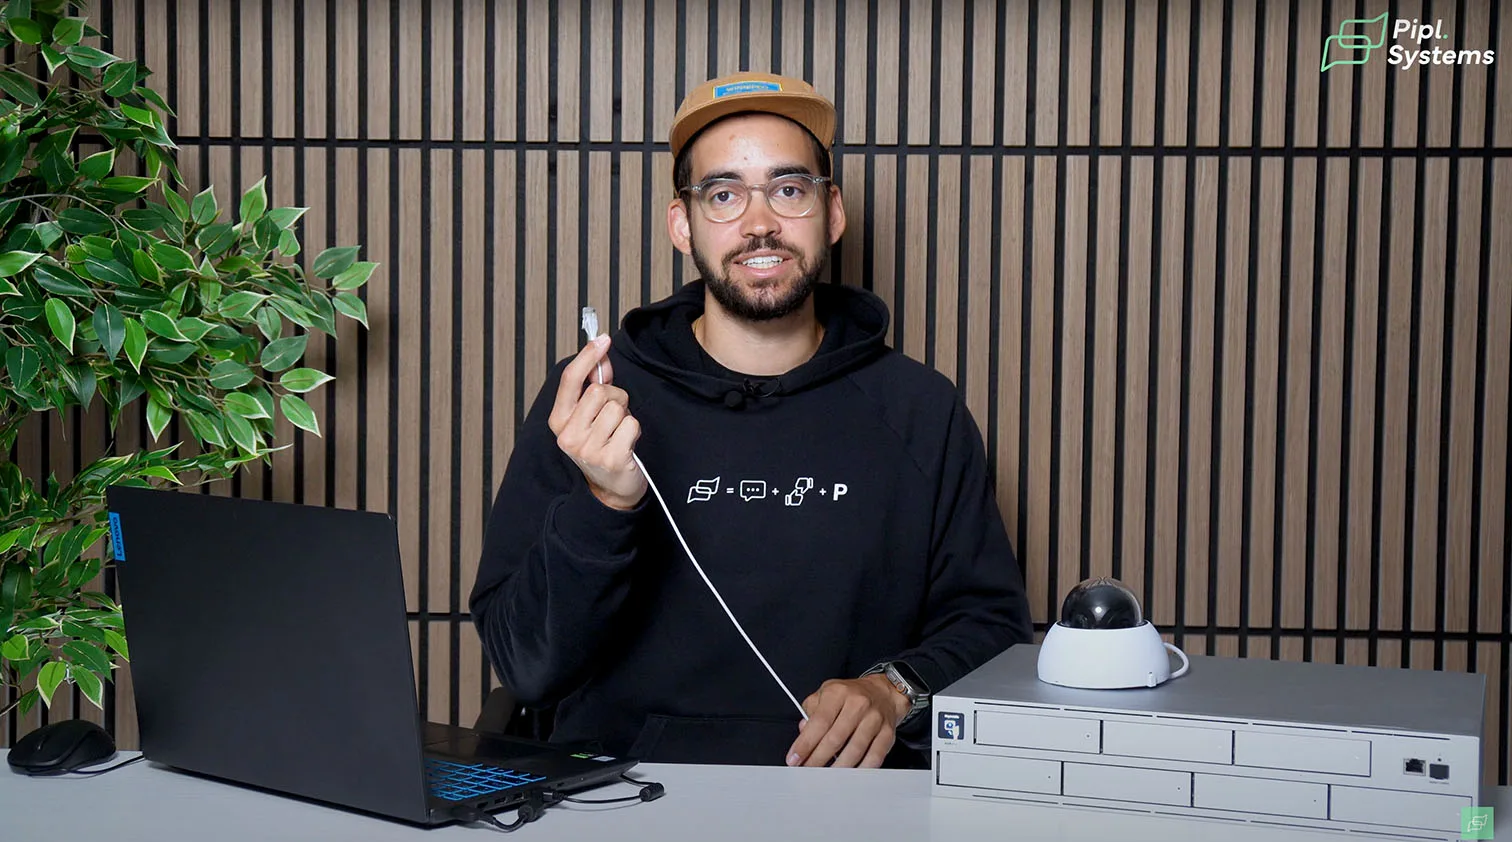
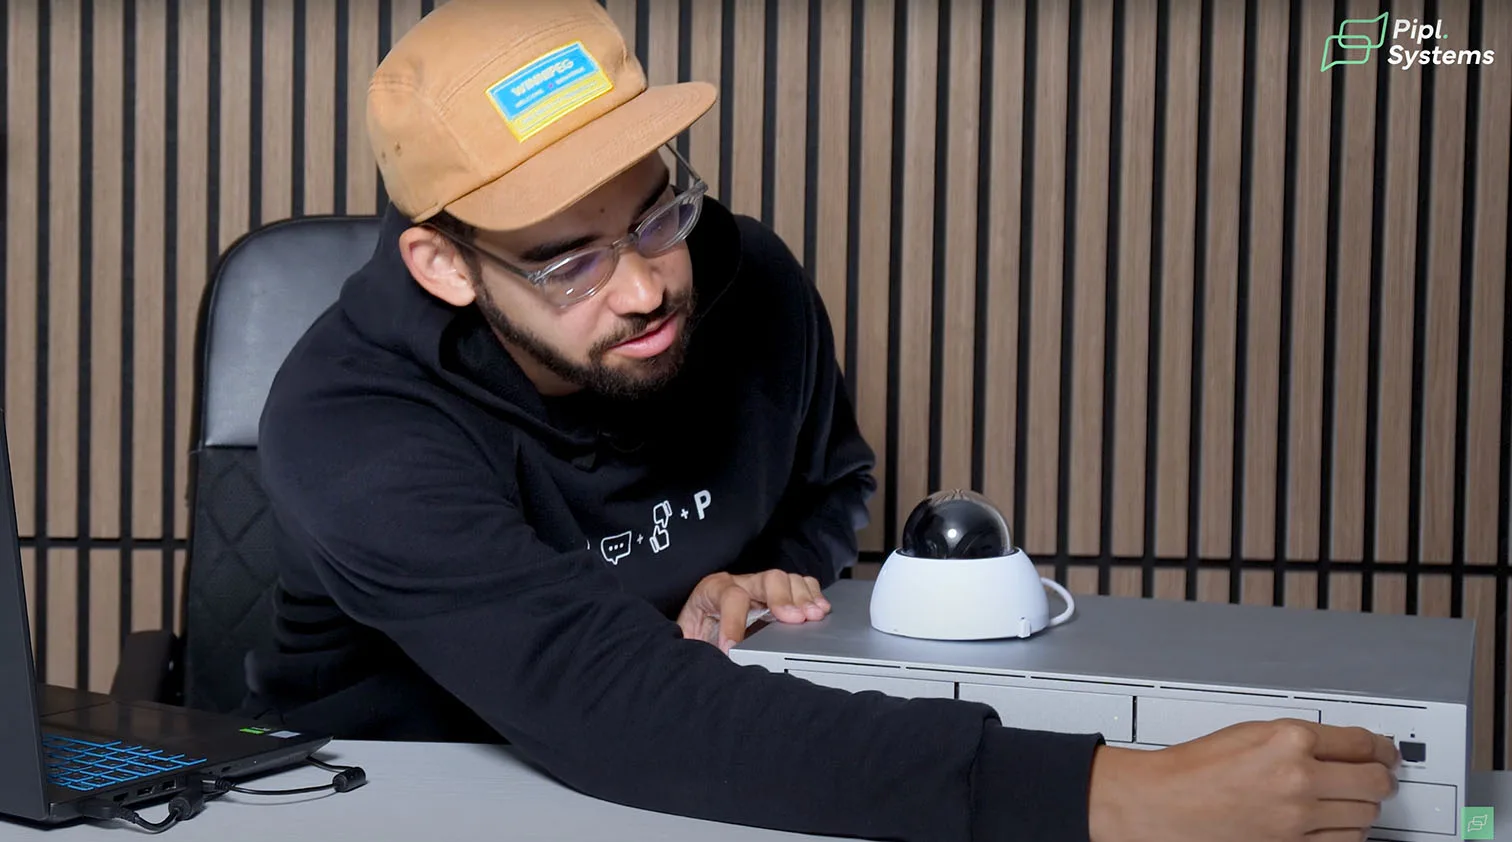
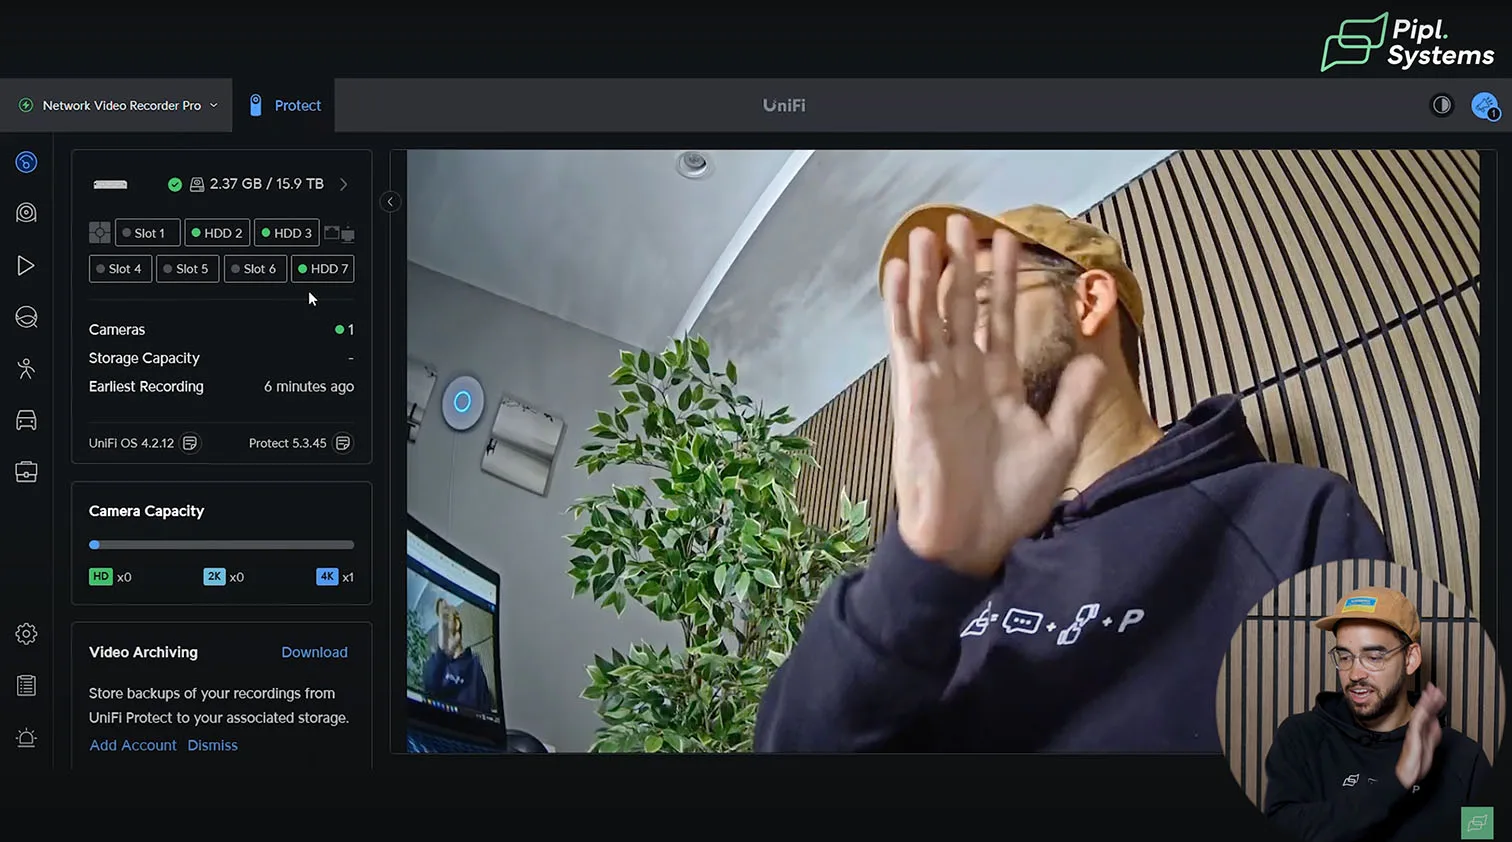
Hardware Initialization and Network Configuration
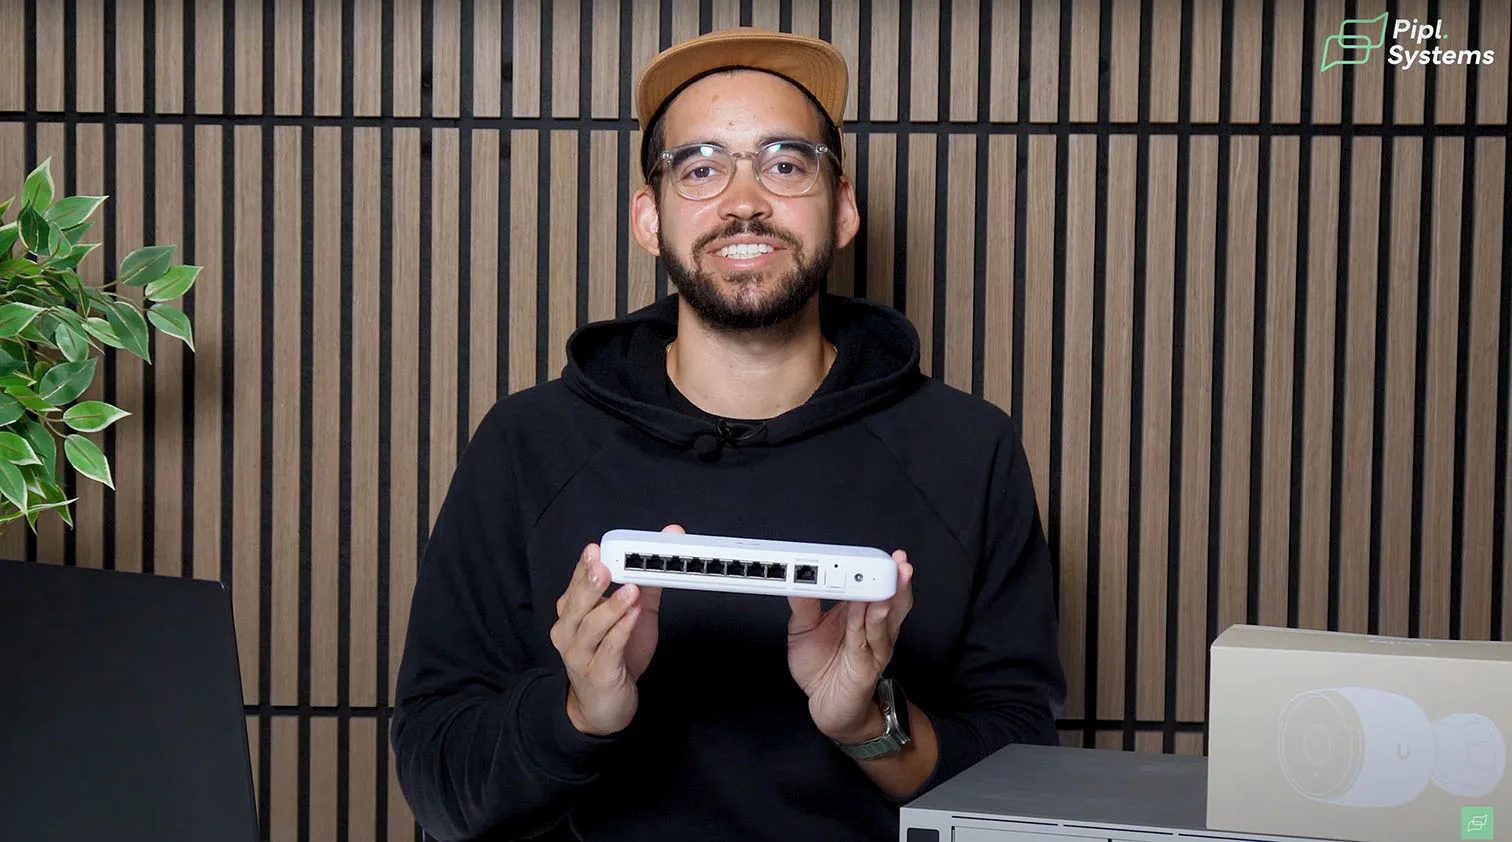
Begin by powering up your PoE switch and connecting it to the internet. All UniFi PoE switch ports support Gigabit Ethernet, so you can use them to connect your NVR and other UniFi OS Consoles. For this setup, we're using the UniFi Network Video Recorder Pro. Follow the on-screen onboarding instructions. When prompted, connect an Ethernet cable from the PoE switch to the NVR using a Cat 6 cable. This supplies both data and power.


1 / 9
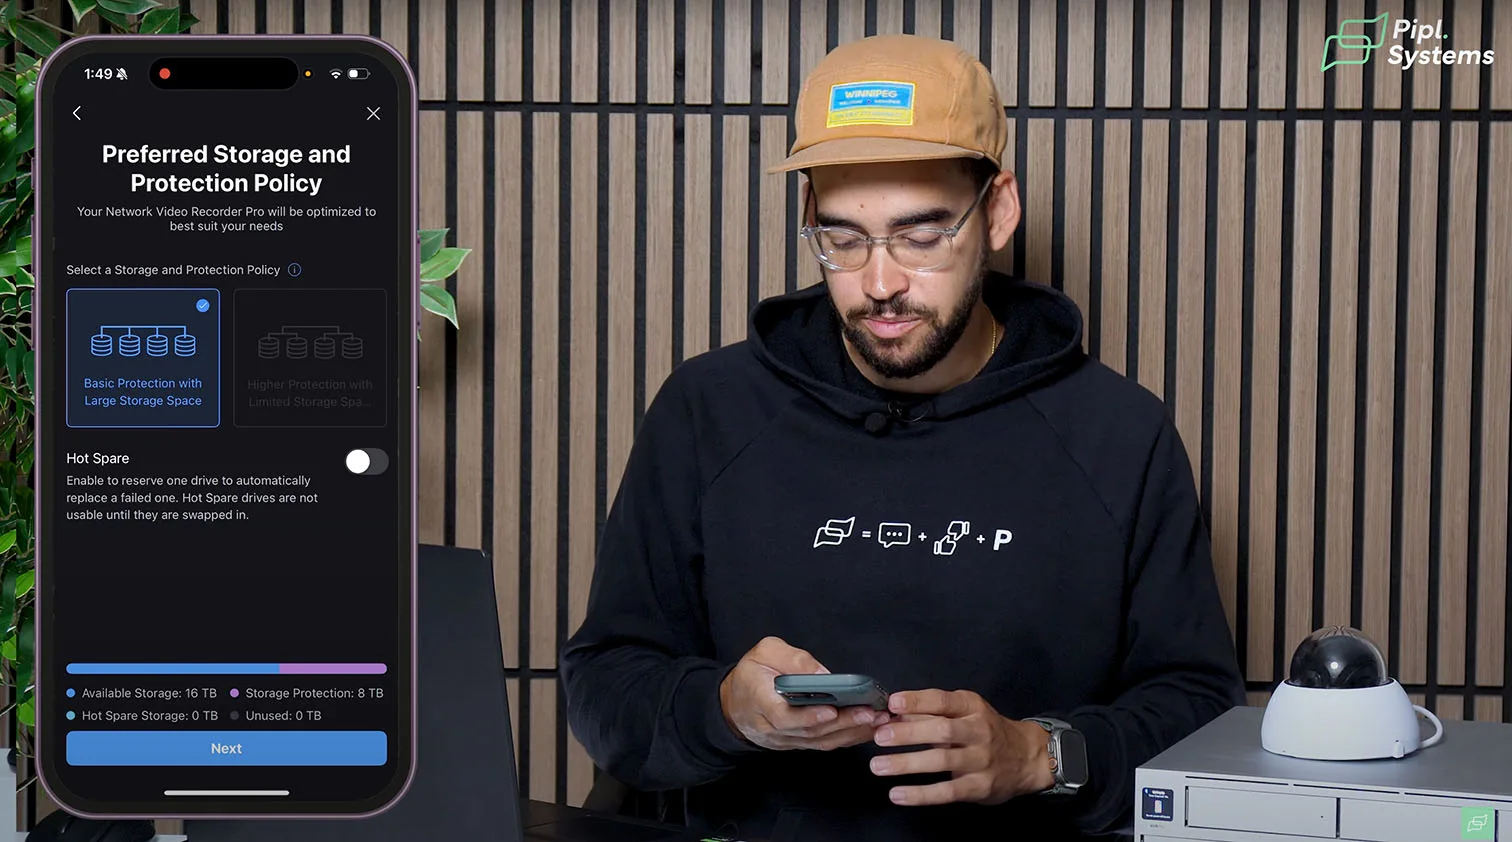
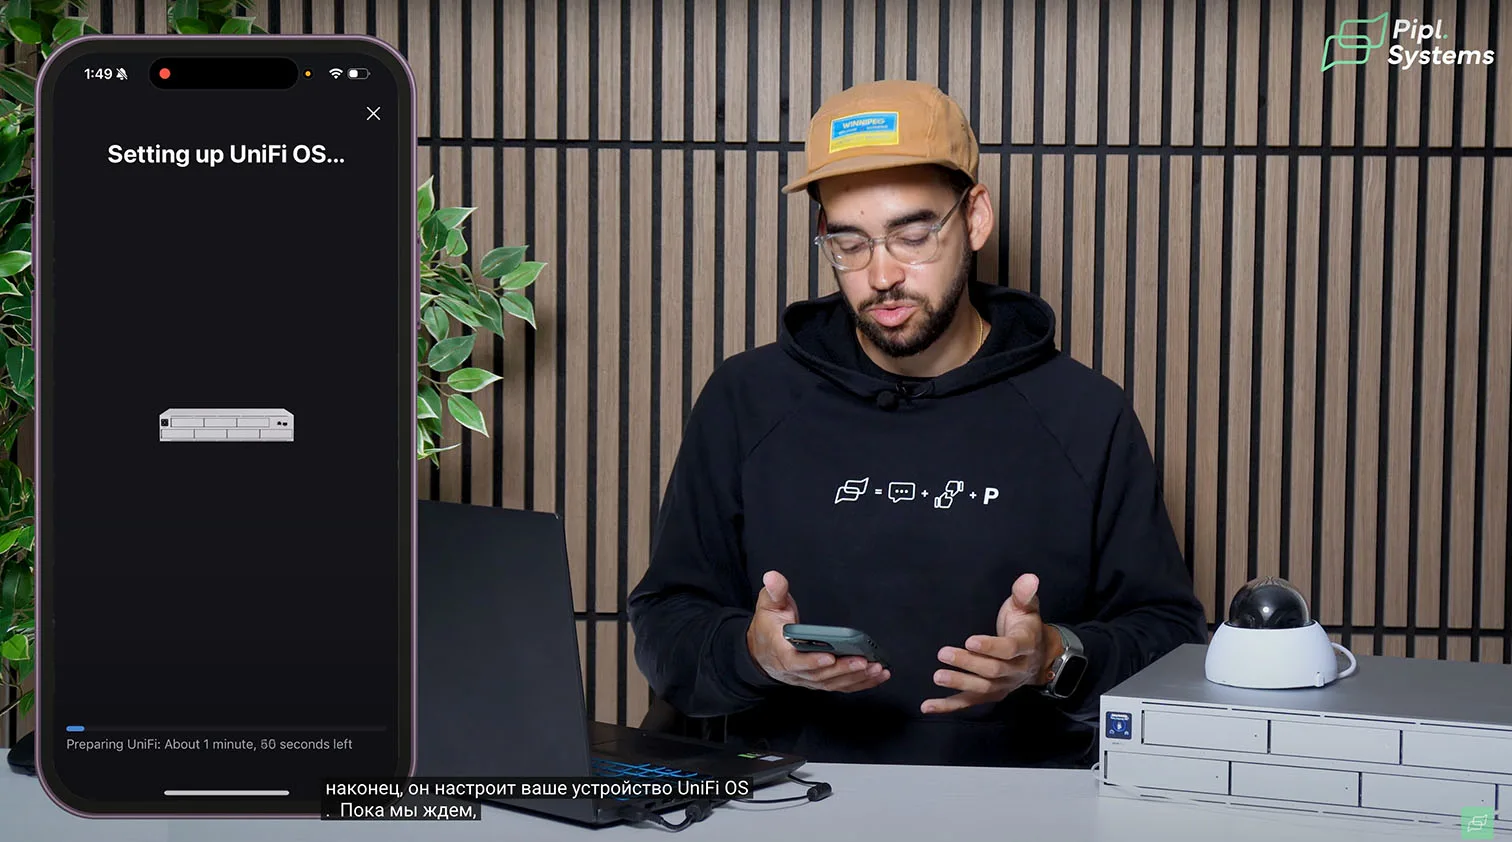
Once connected, the NVR's screen will prompt you to install the UniFi mobile app. Use the app to detect the NVR Pro and begin initial setup. Assign a name, review the installed drives, choose your storage and redundancy policy, and let the device finalize the OS installation.
Even for those in the non-IT crowd, drawing a UniFi network diagram helps visualize connections and plan VLAN setup. This simple step avoids future complexity and makes troubleshooting easier as your system grows.
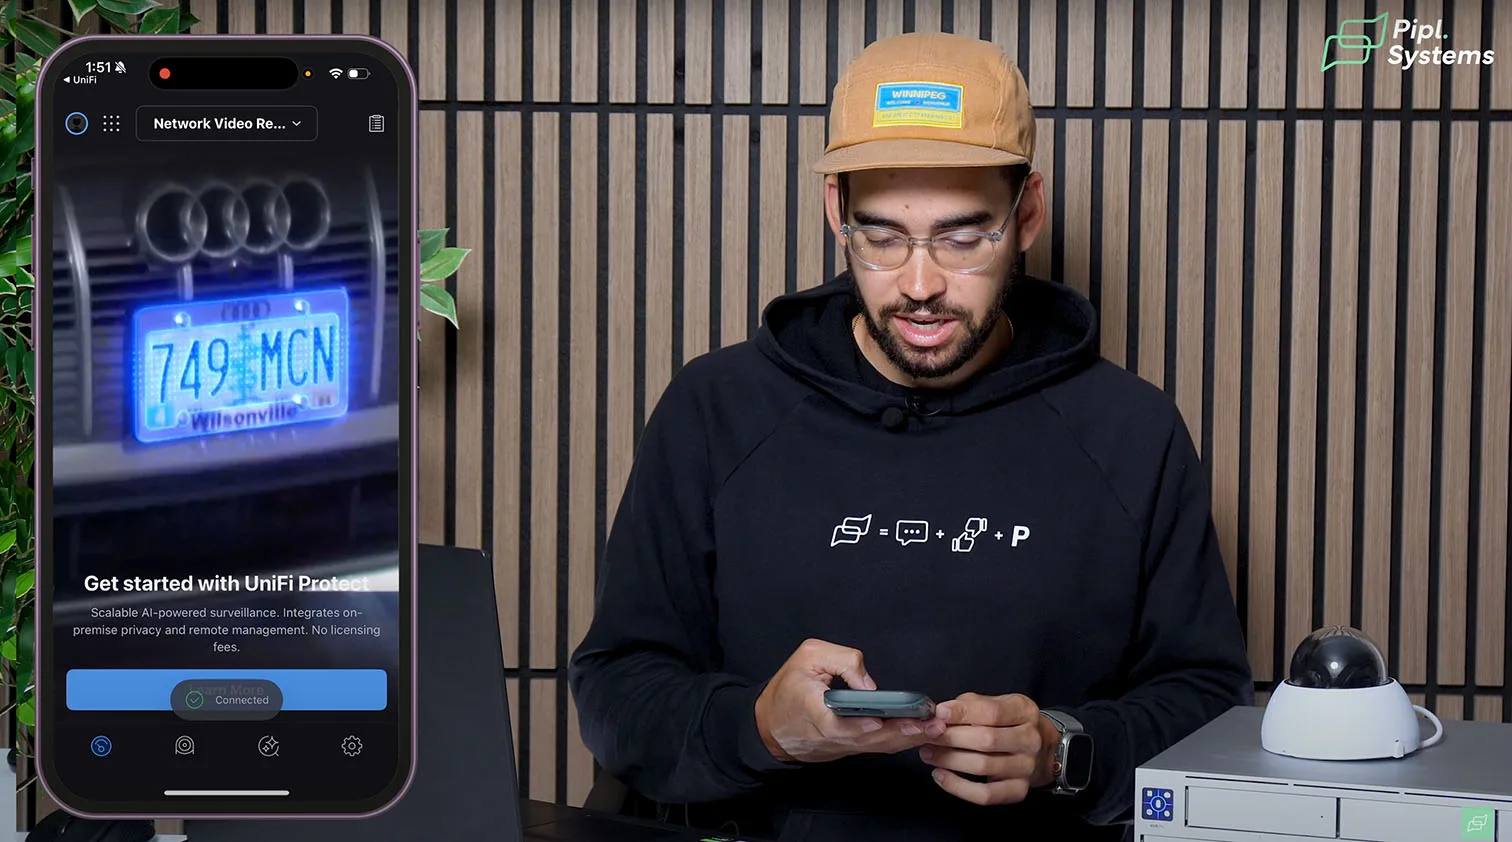
Installing and Accessing UniFi Protect
While the console finishes provisioning, install the UniFi Protect app from the App Store or Google Play. You’ll need to create a UI account, which grants access to both the mobile app and the full-featured web portal at unifi.ui.com.


1 / 4
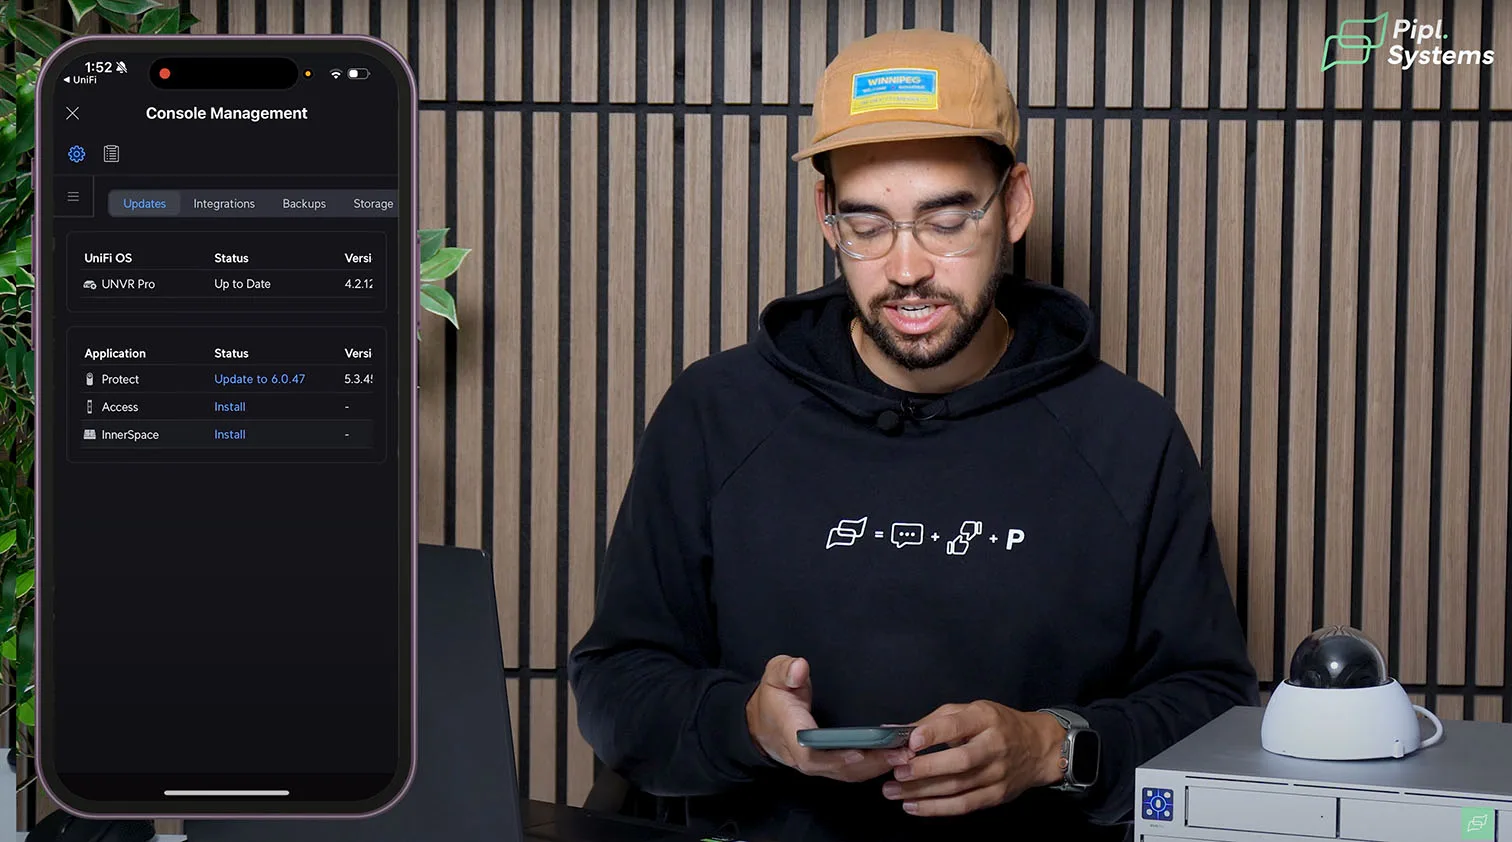
After setup completes, launch UniFi Protect. The first step is to enter console settings and check for firmware updates. Always update to the latest version before configuring your cameras or settings. The console menu also allows you to install other UniFi apps like Access or Talk, and manage firmware for each UniFi platform in one place.
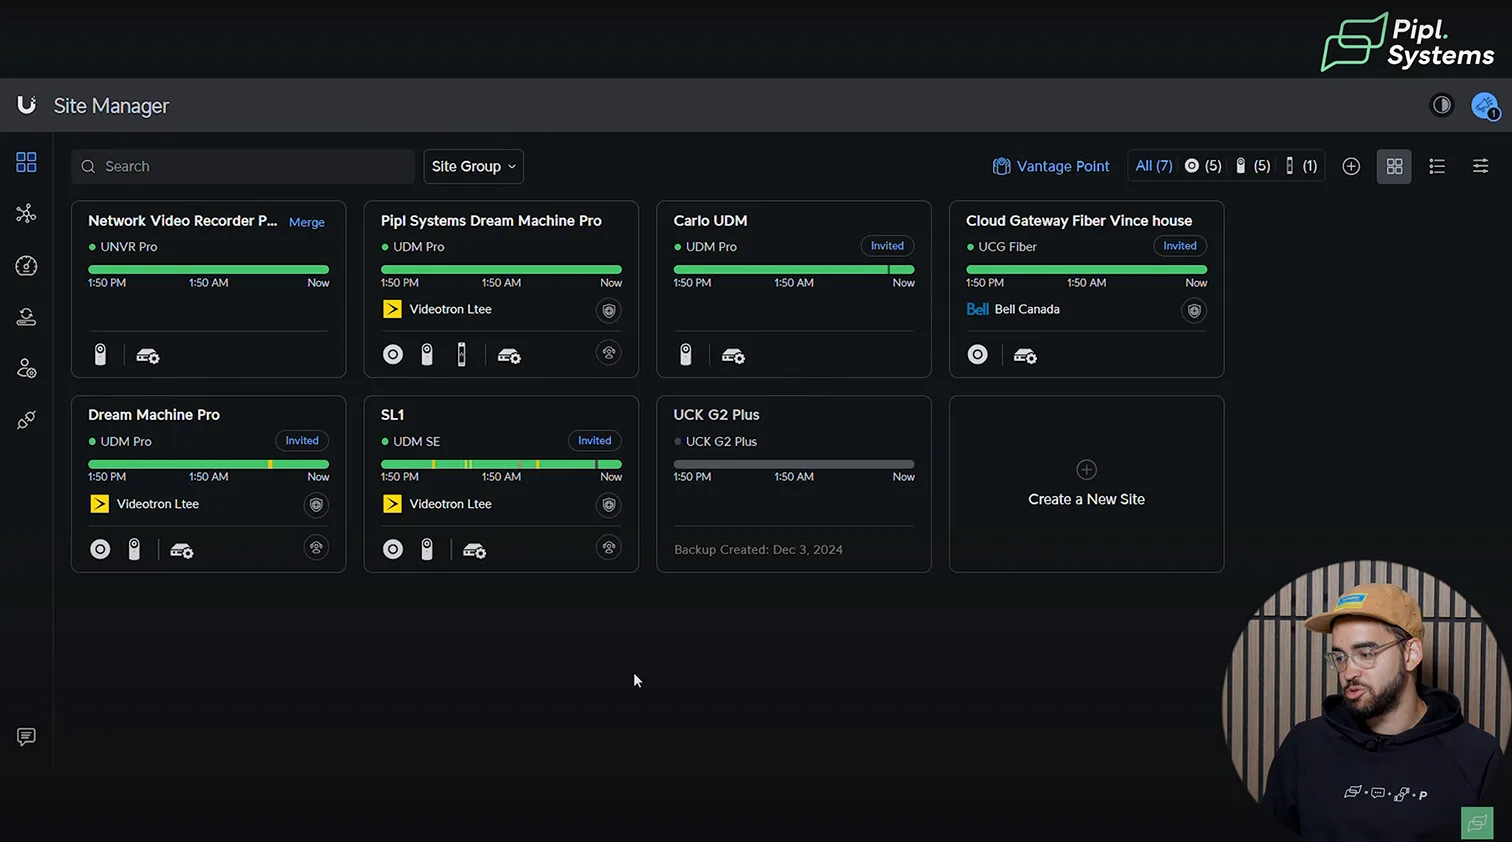
Web Portal and Multi-Site Management
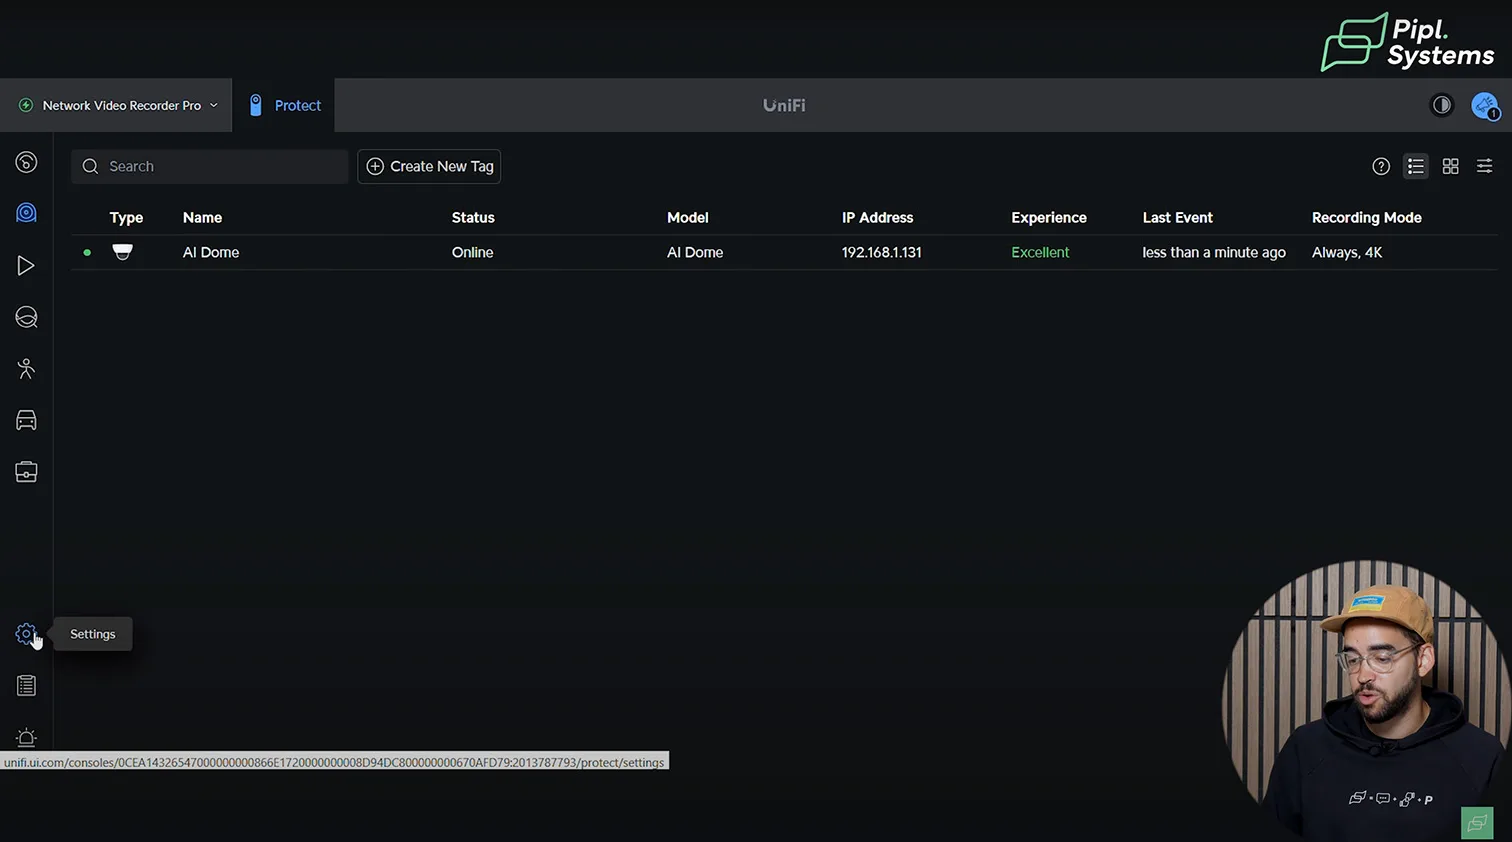
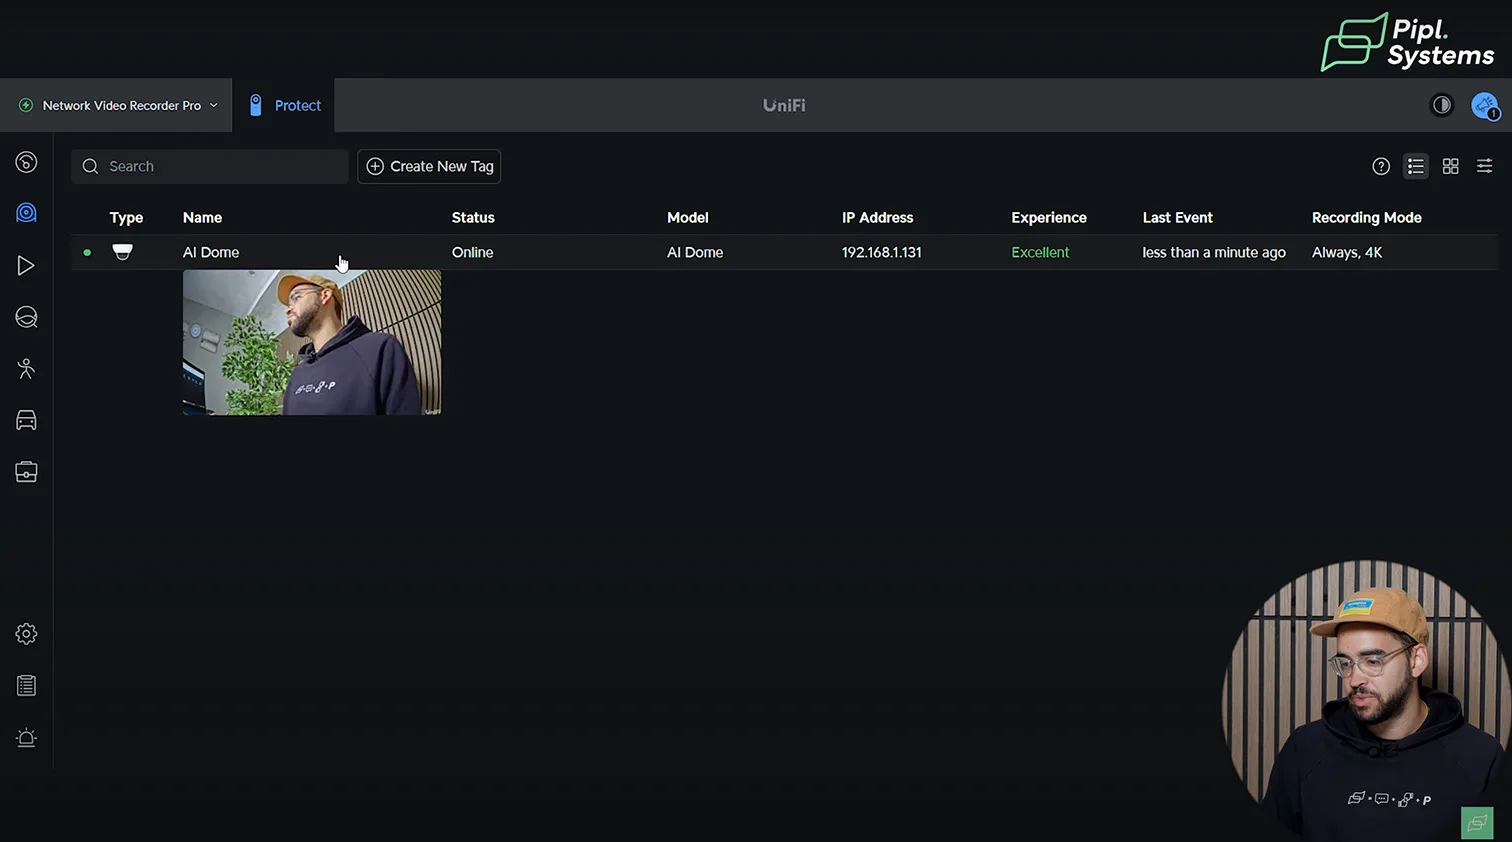
The UniFi web interface supports centralized management for multiple Protect deployments. After logging in, you'll see a dashboard listing all your UniFi OS Consoles. Selecting the NVR Pro opens the device-specific interface. If cameras aren’t connected yet, the list will be empty, but newly connected cameras will auto-discover as long as they share the same PoE switch.


1 / 3
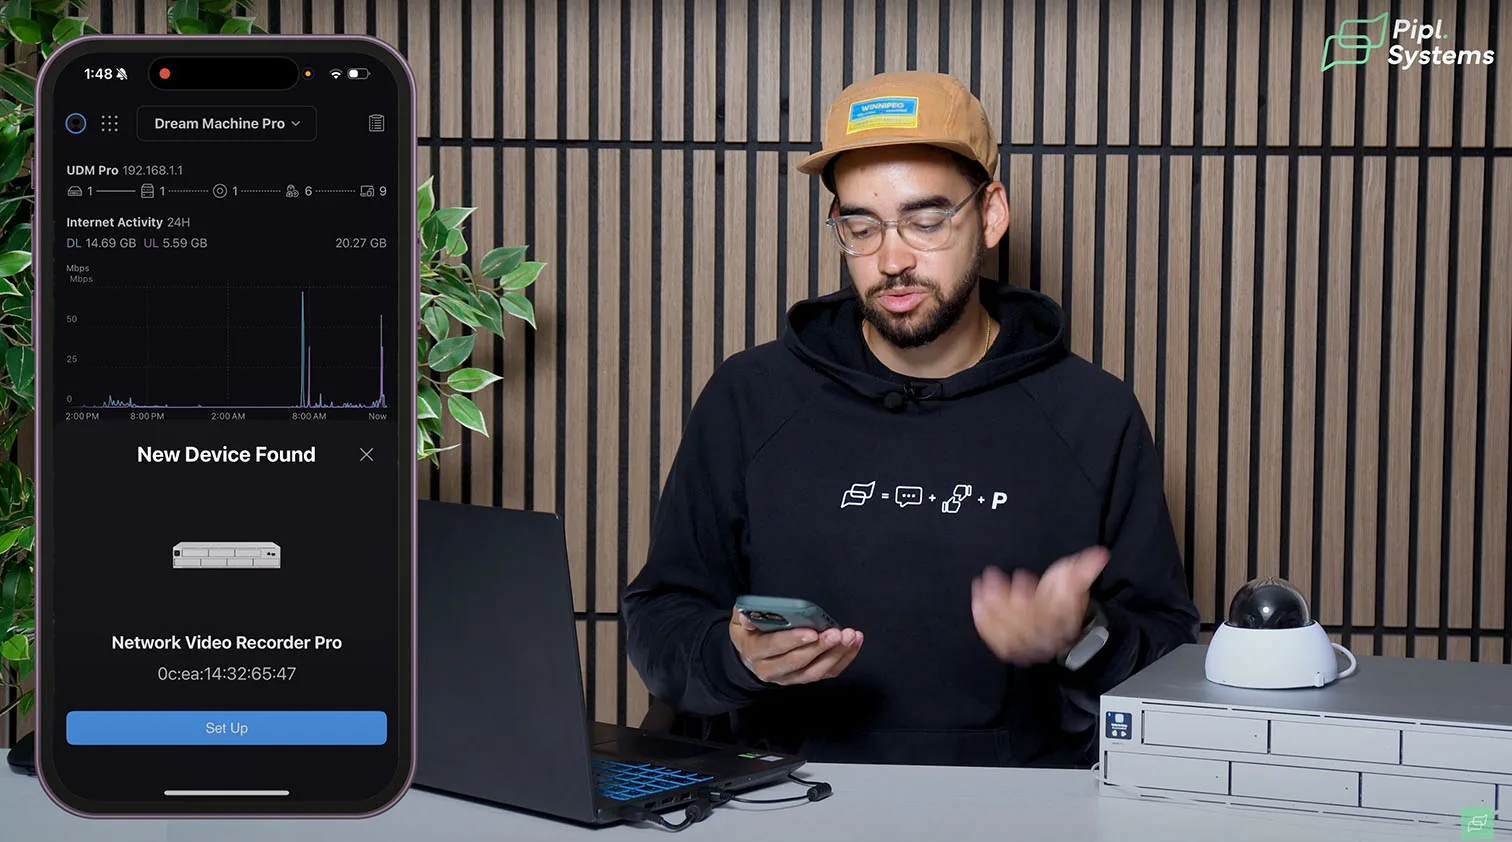
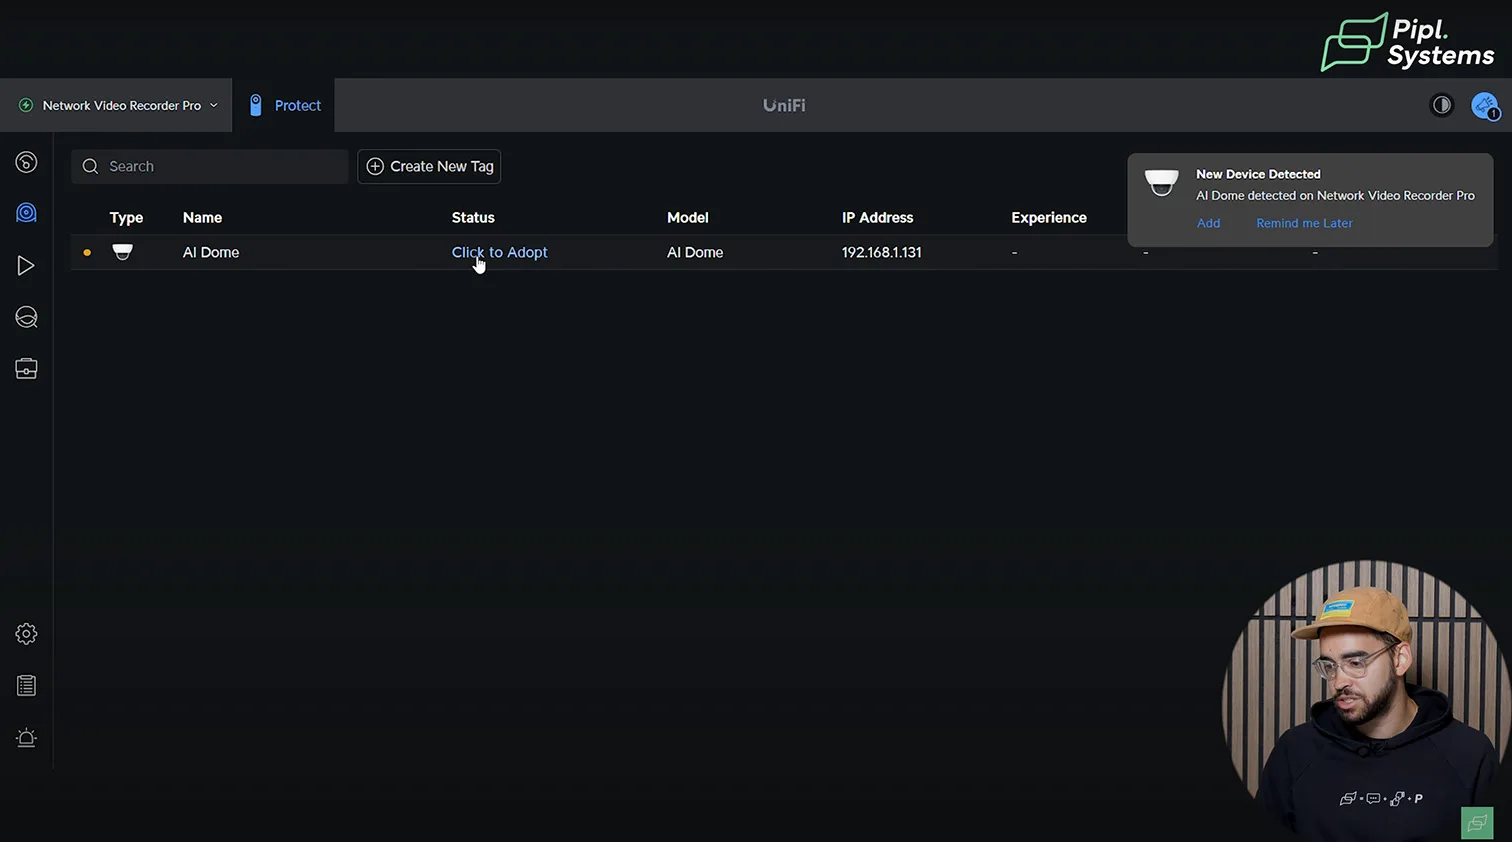
Adopting and Configuring UniFi Cameras
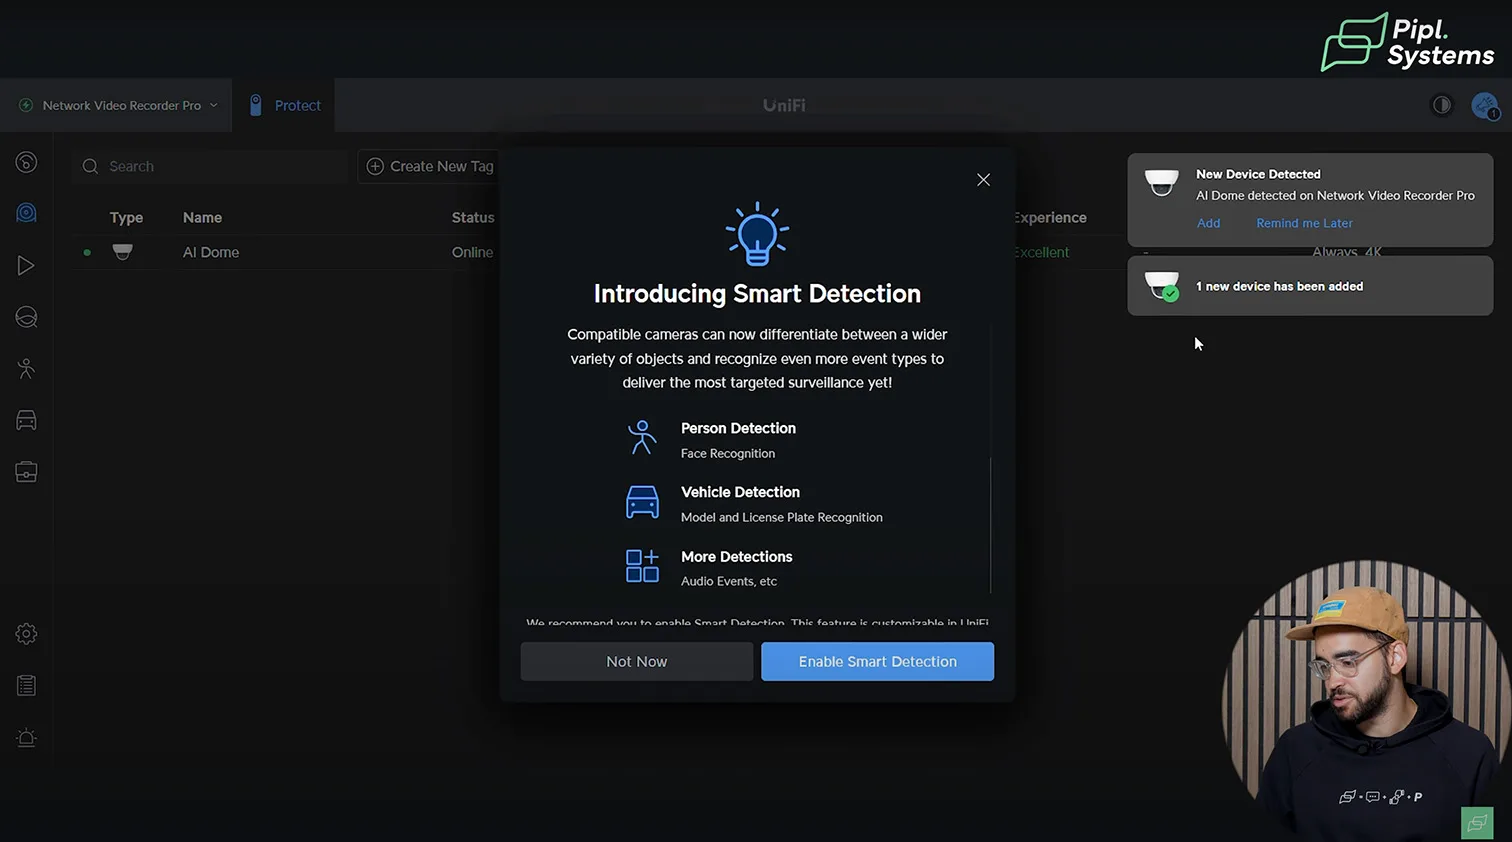
To adopt a new camera, simply connect it to the same PoE switch using a Cat 6 cable. The system will detect the device automatically, and a prompt will appear to adopt it to your NVR. After adoption, you can enable advanced features like Smart Detection – either immediately or later.

1 / 6
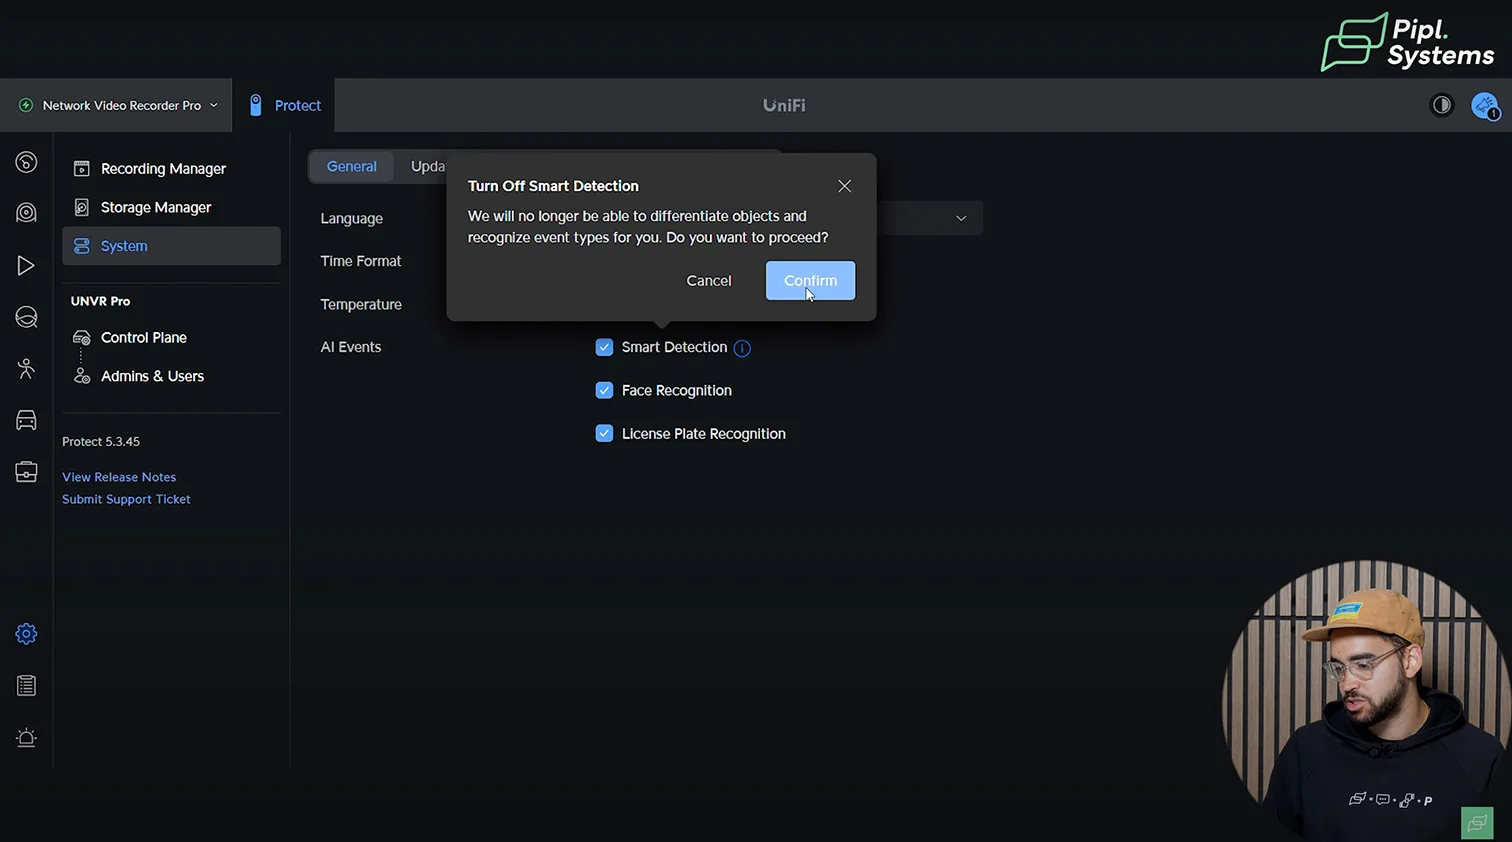
Smart Detection is enabled from the controller, not the camera. In the system settings, activate the AI analytics suite to unlock features like face recognition and license plate detection.
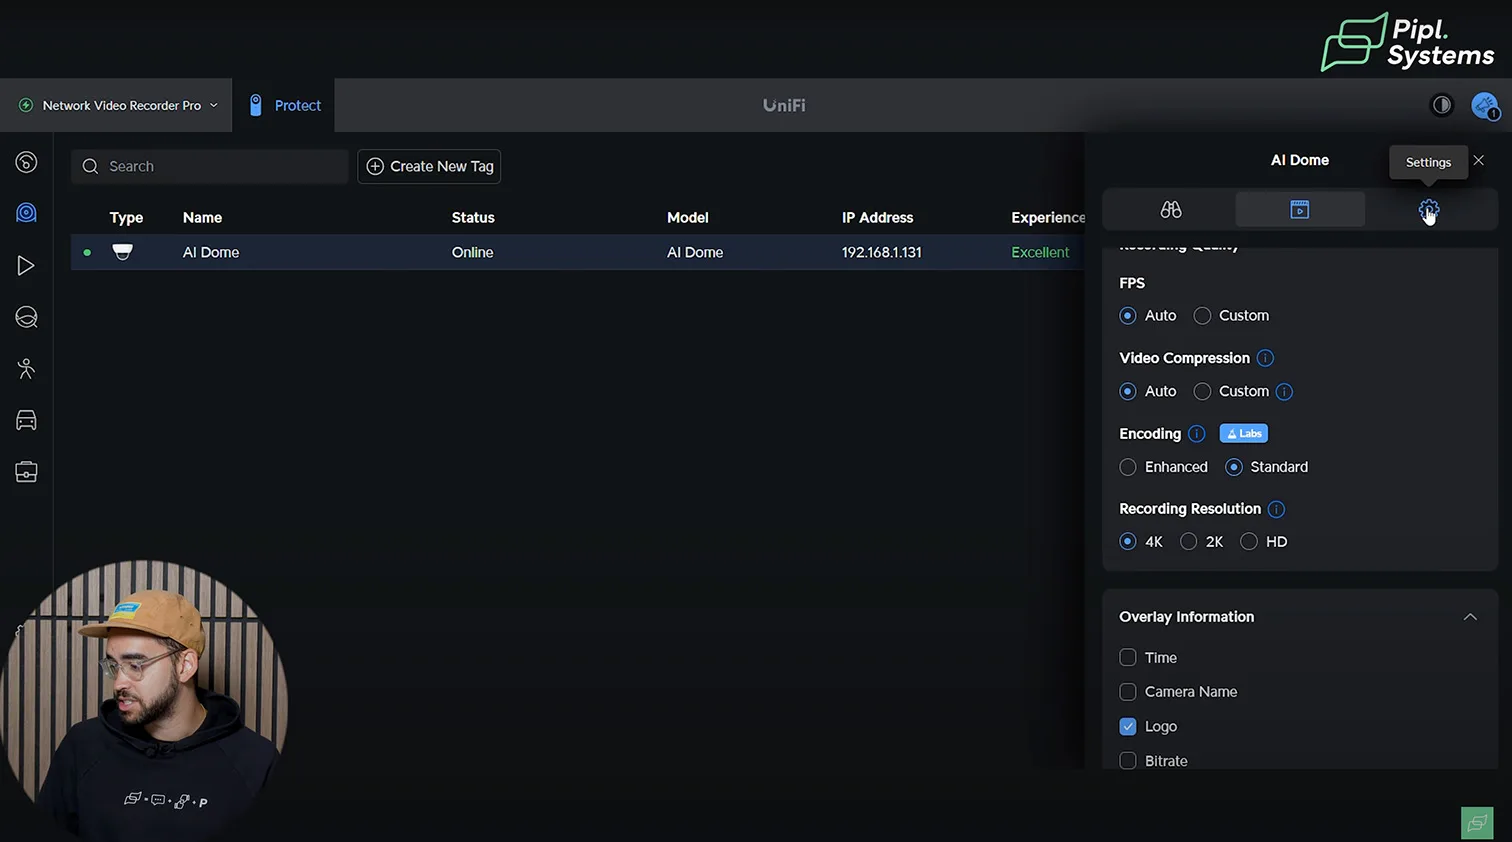
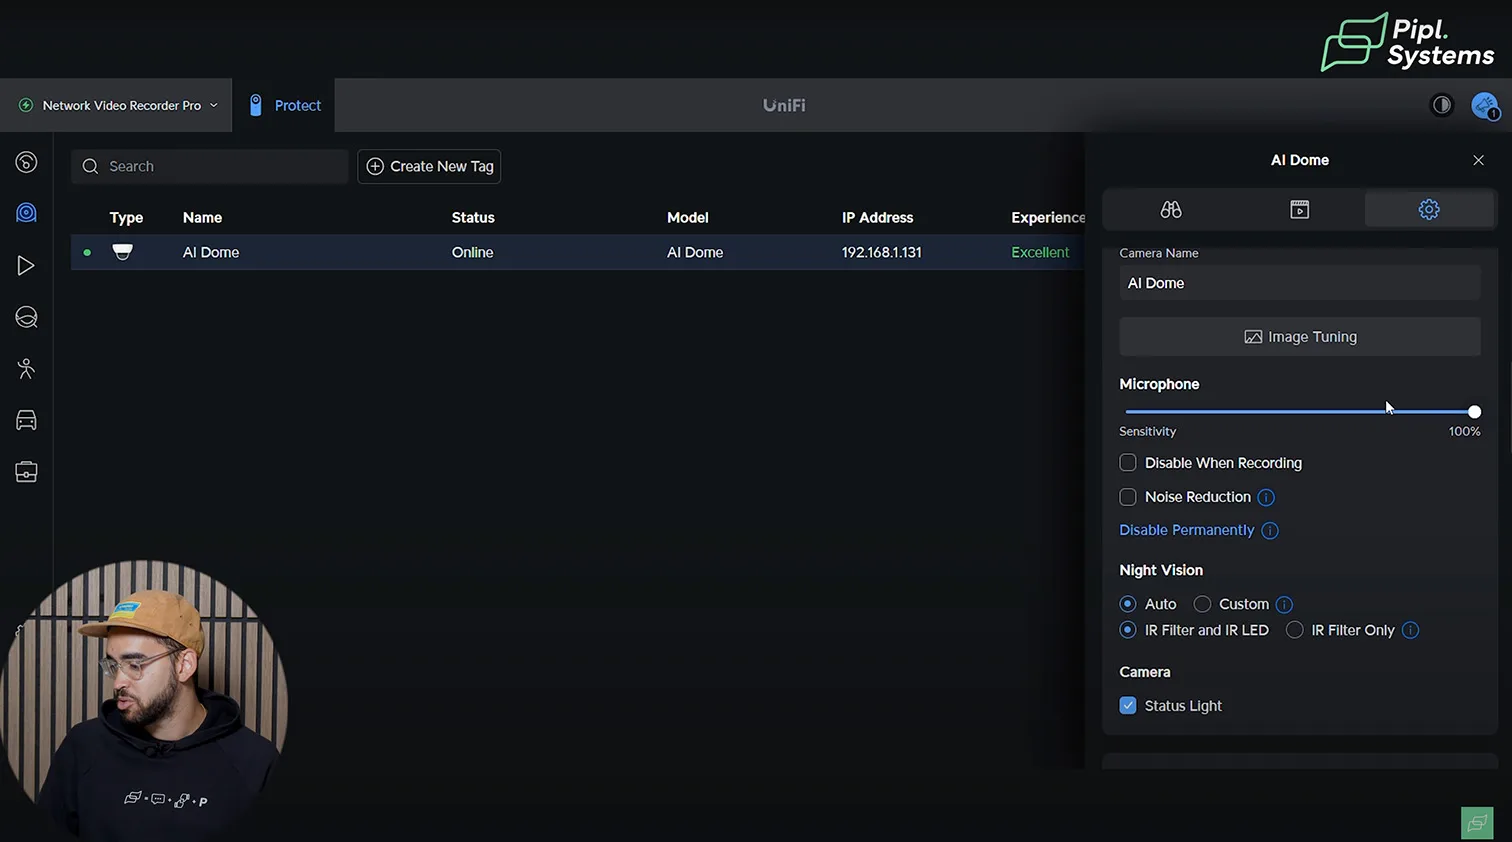
Camera Settings, Recording, and Retention
Each camera includes a detailed settings panel. You can adjust recording modes (continuous or event-based), enable specific AI event types (face, vehicle, pet, sound), and control bitrate, resolution, and compression. You can also toggle microphone input and night vision configurations.
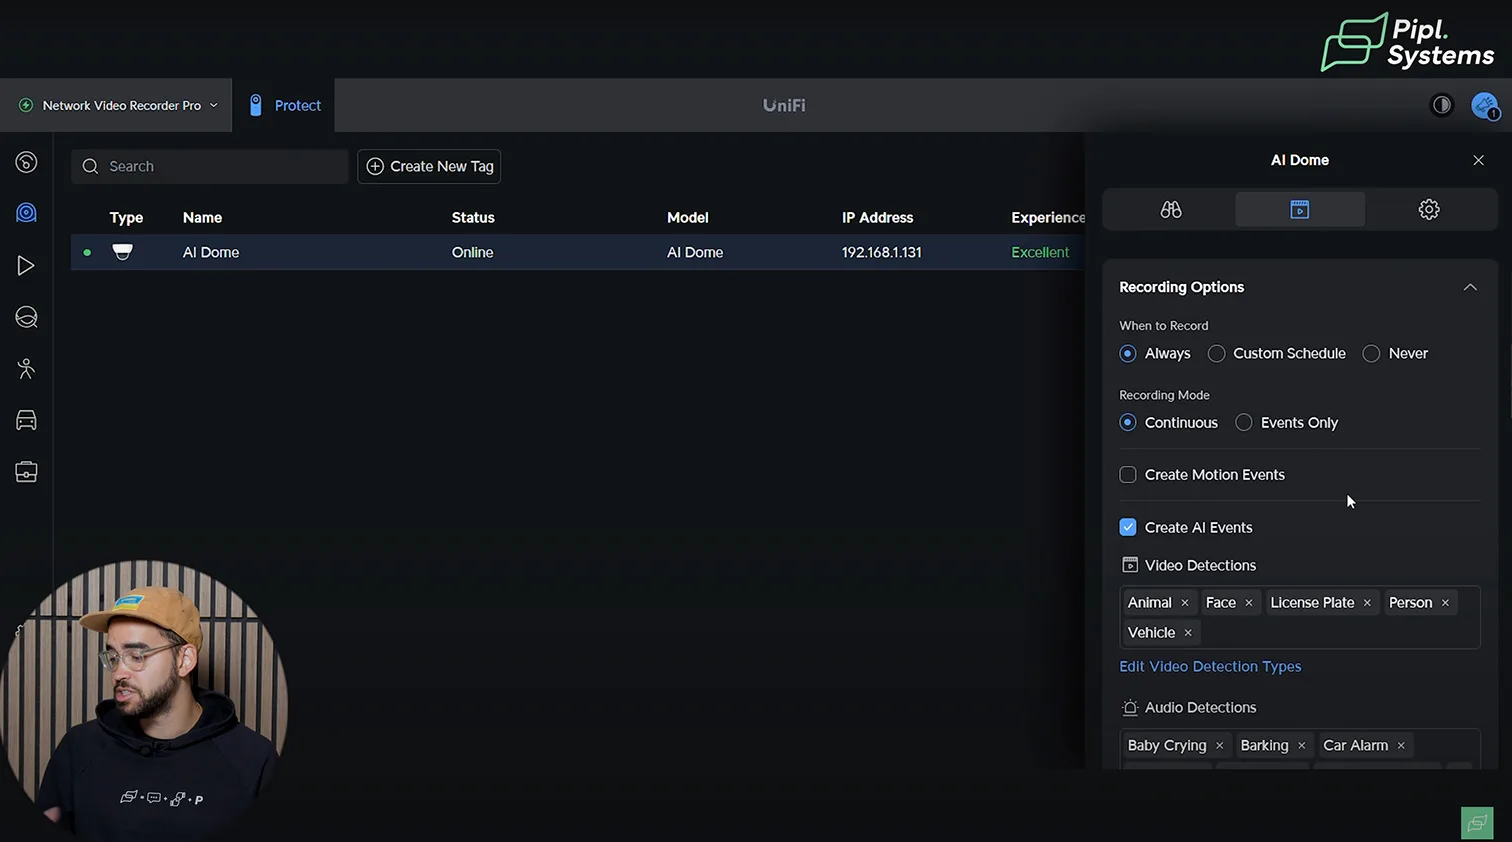


1 / 6
With NVR Pro’s ample storage, optimizing frame rate or bitrate for space savings becomes less critical. These systems are designed for high-capacity, long-retention storage without constant manual management.
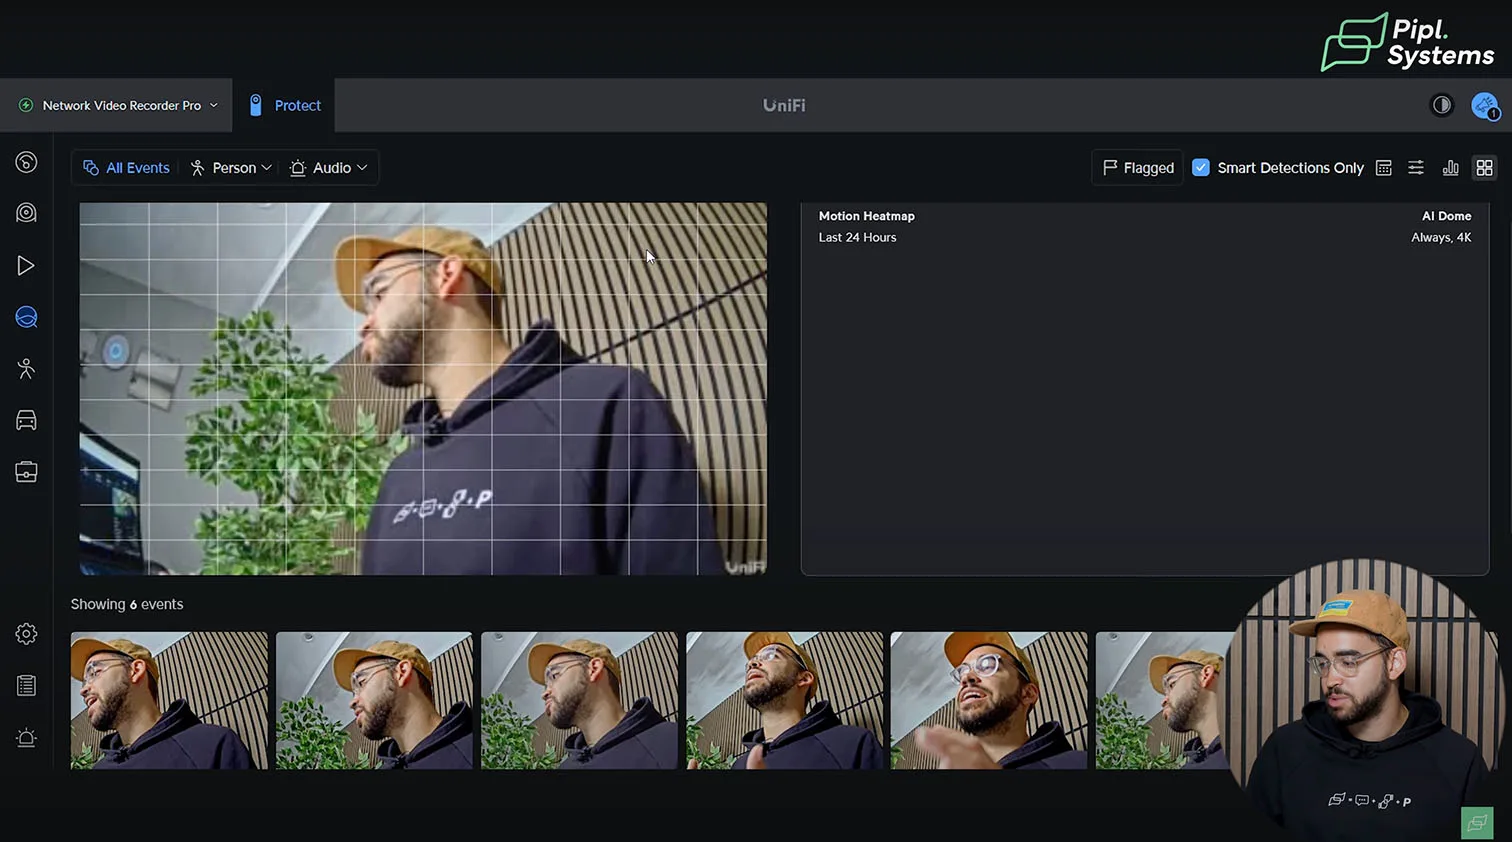
Timeline View, Playback, and Smart Filters
The playback interface displays a detailed timeline with AI-based event markers. You can search by event type – including person, face, vehicle, and audio – and quickly isolate relevant footage. The “Find Anything” tool filters footage by object type, facial recognition match, or license plate.
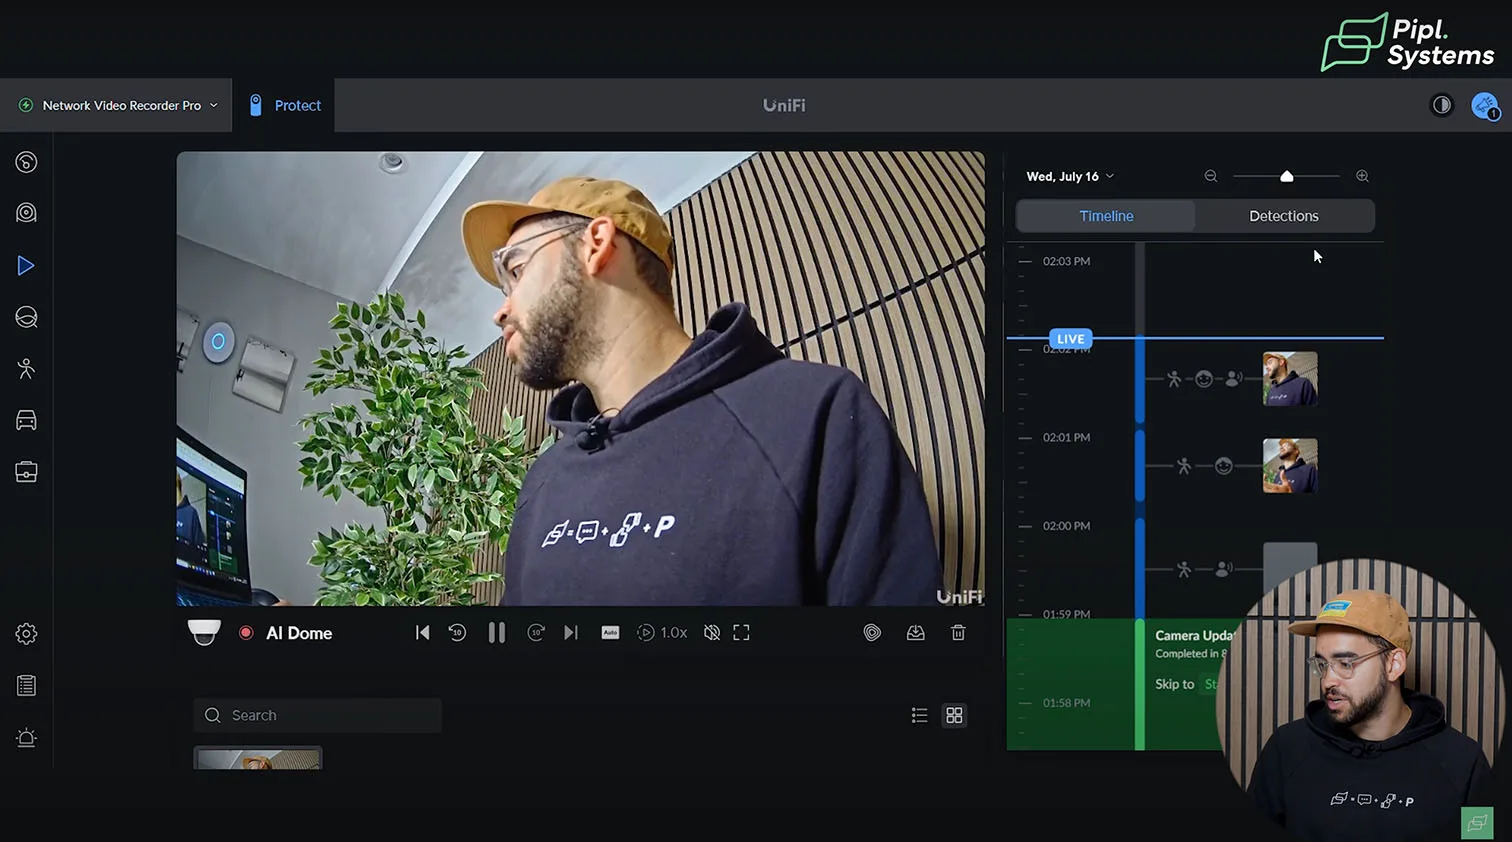
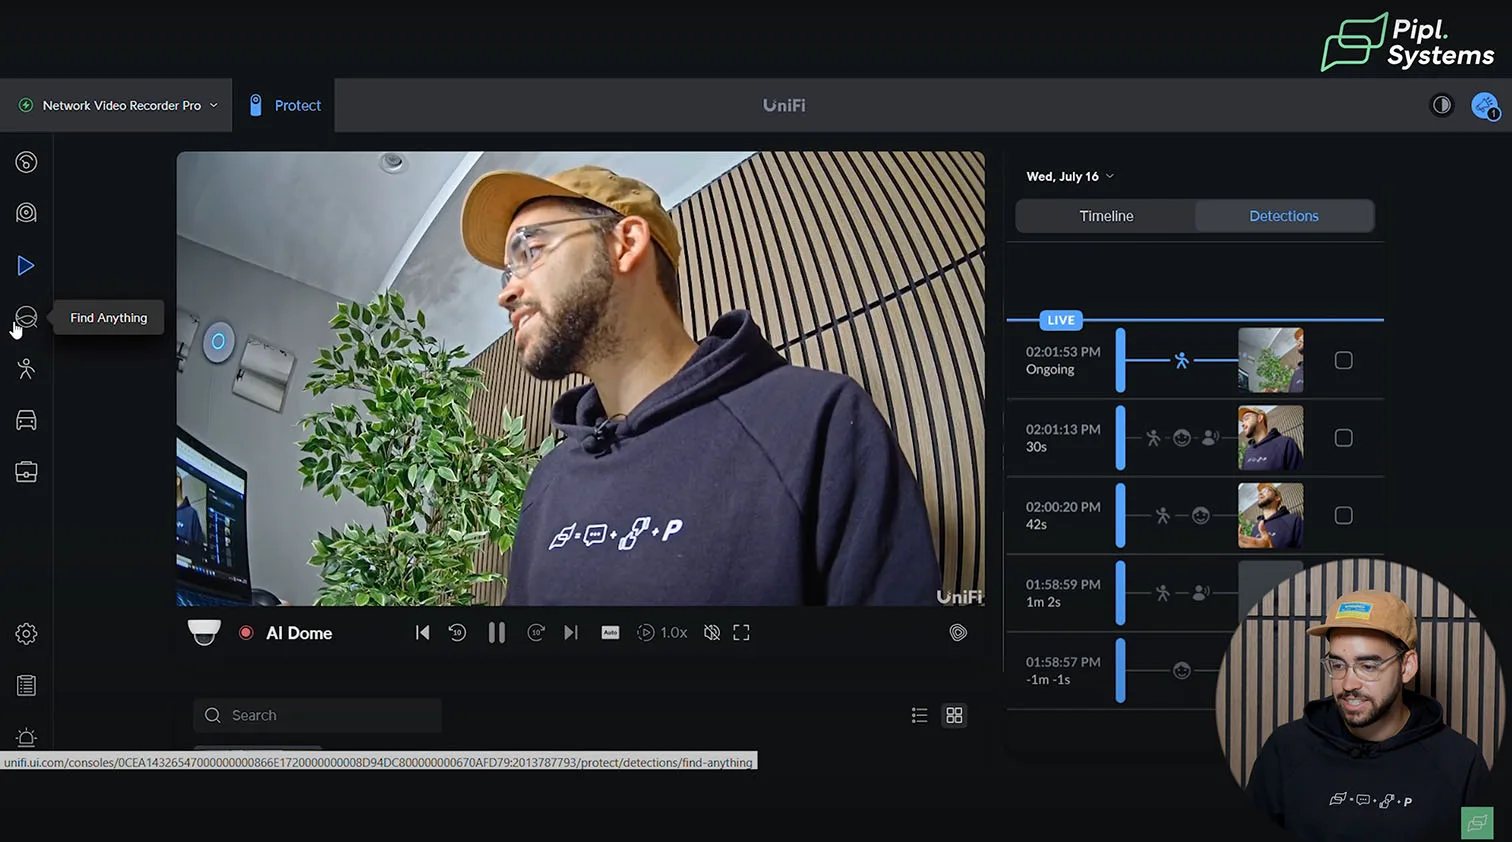

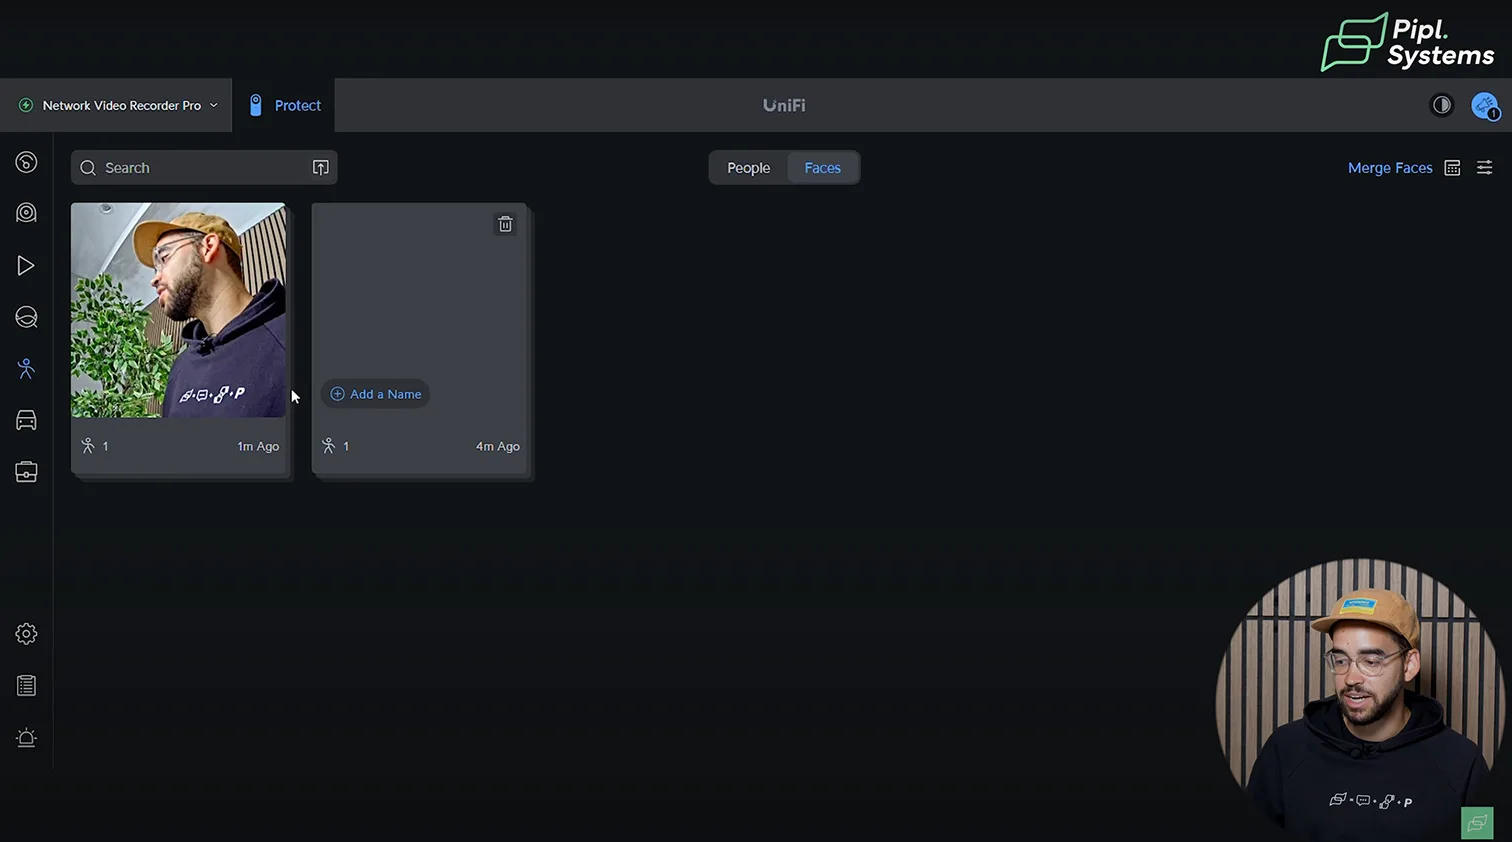
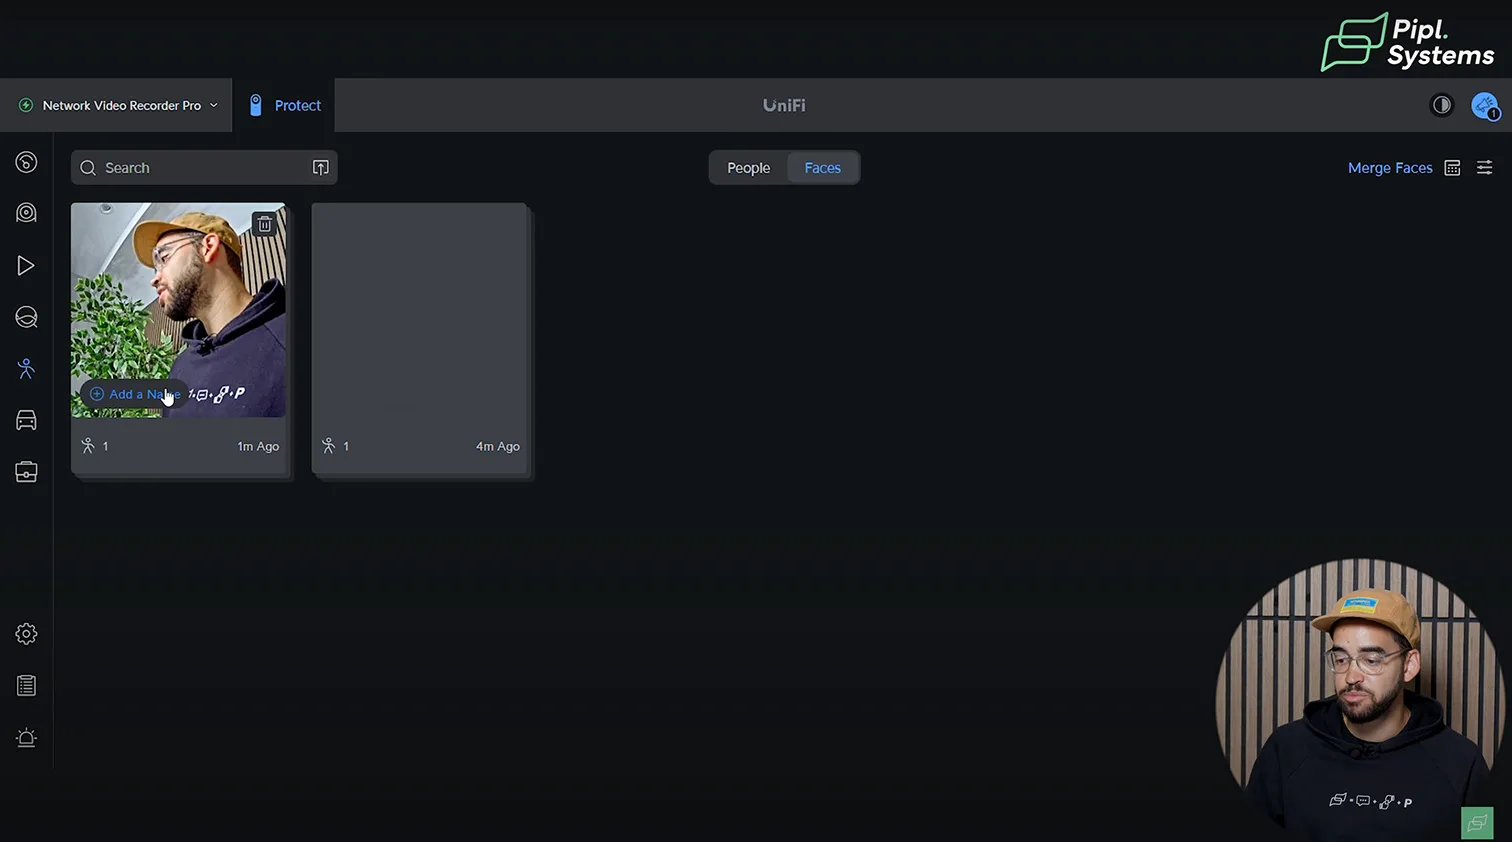
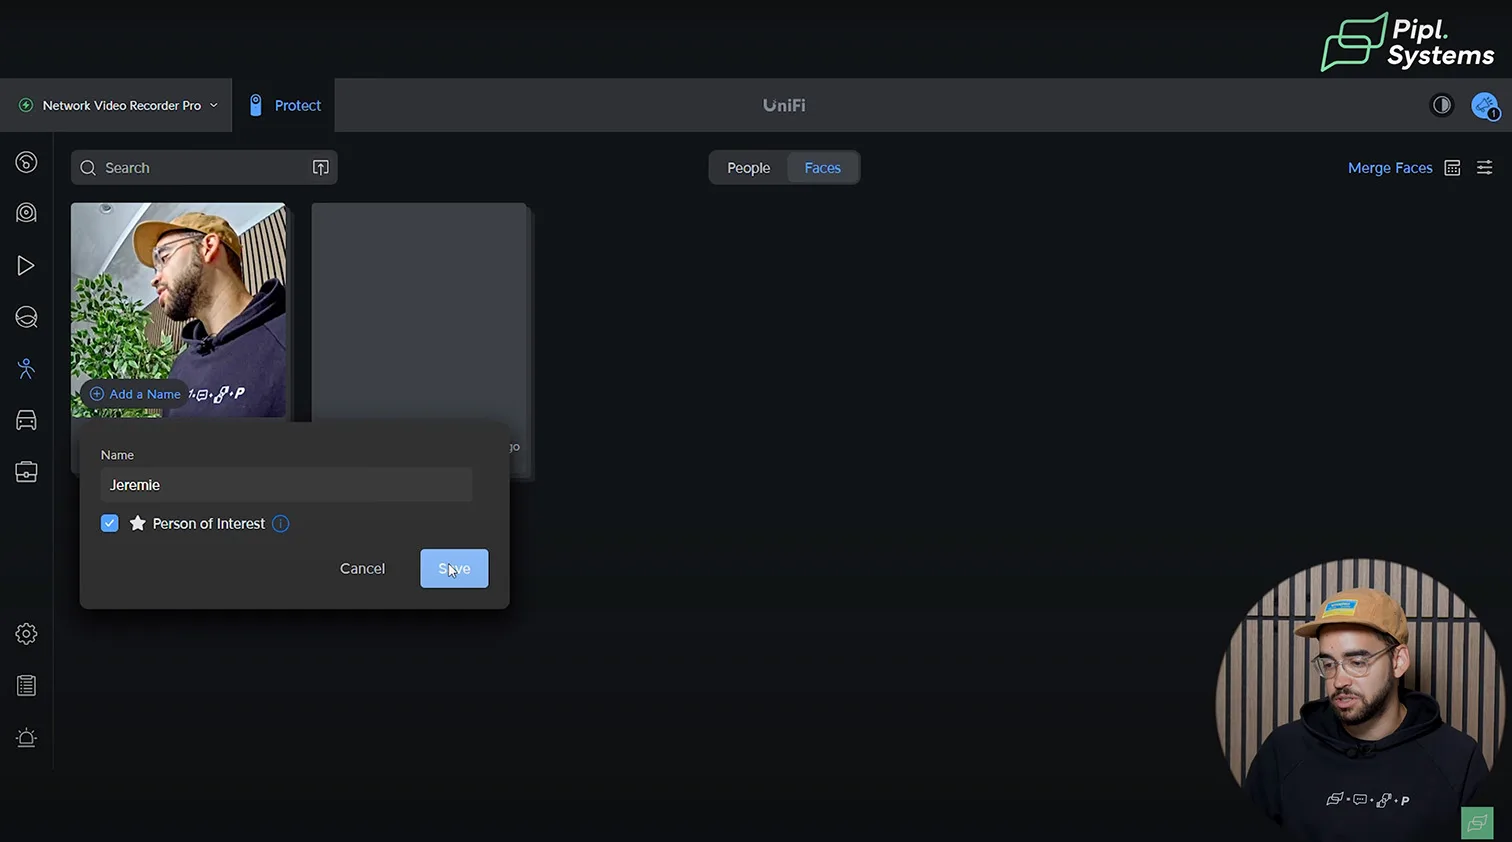

1 / 11
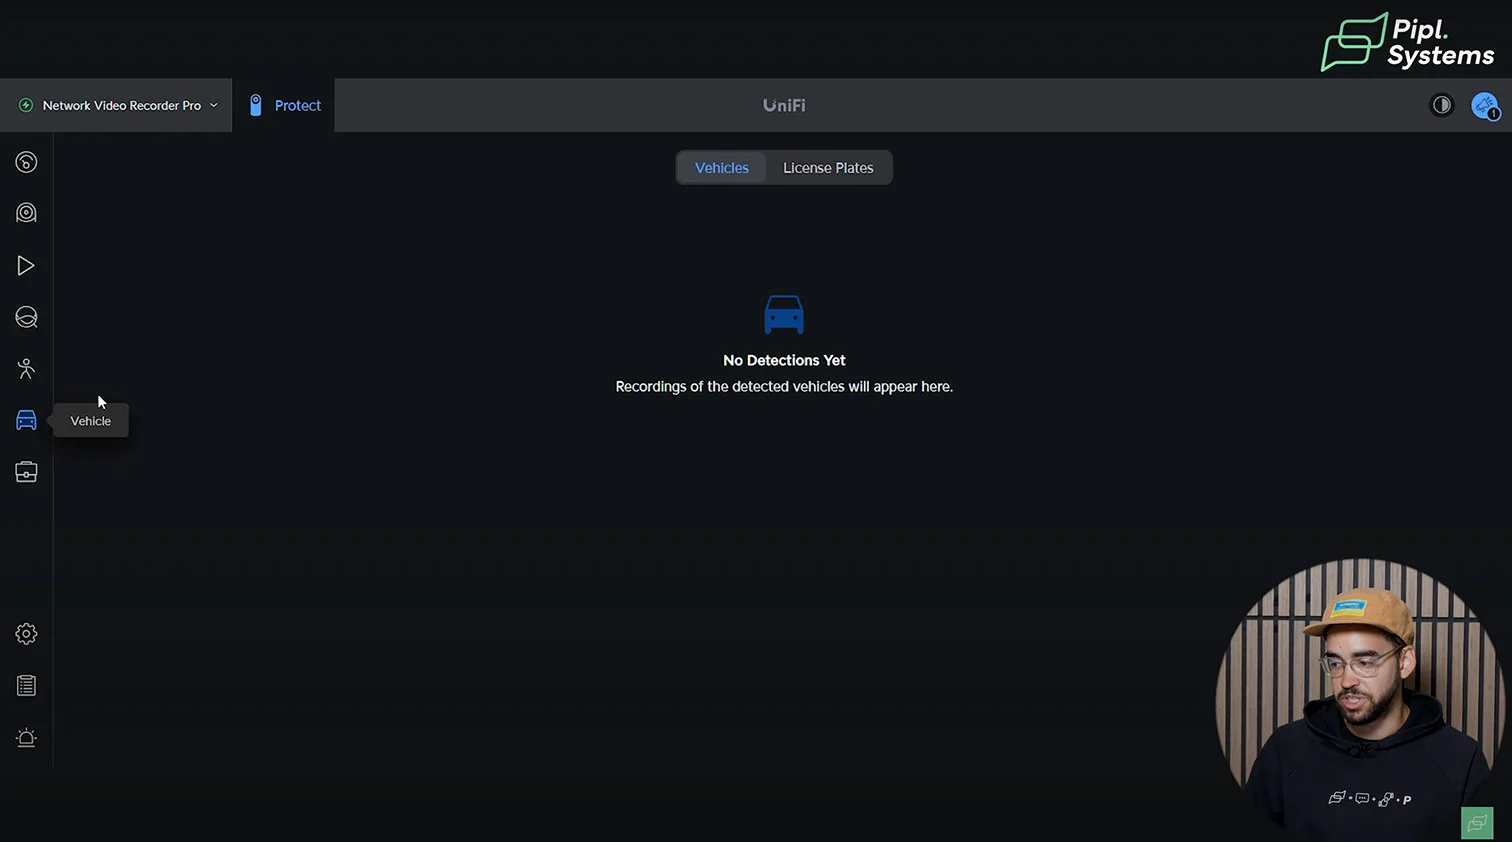
A separate “People” view allows you to tag detected faces with names and mark favorites. Vehicles can be similarly cataloged by license plate for easy tracking across events.
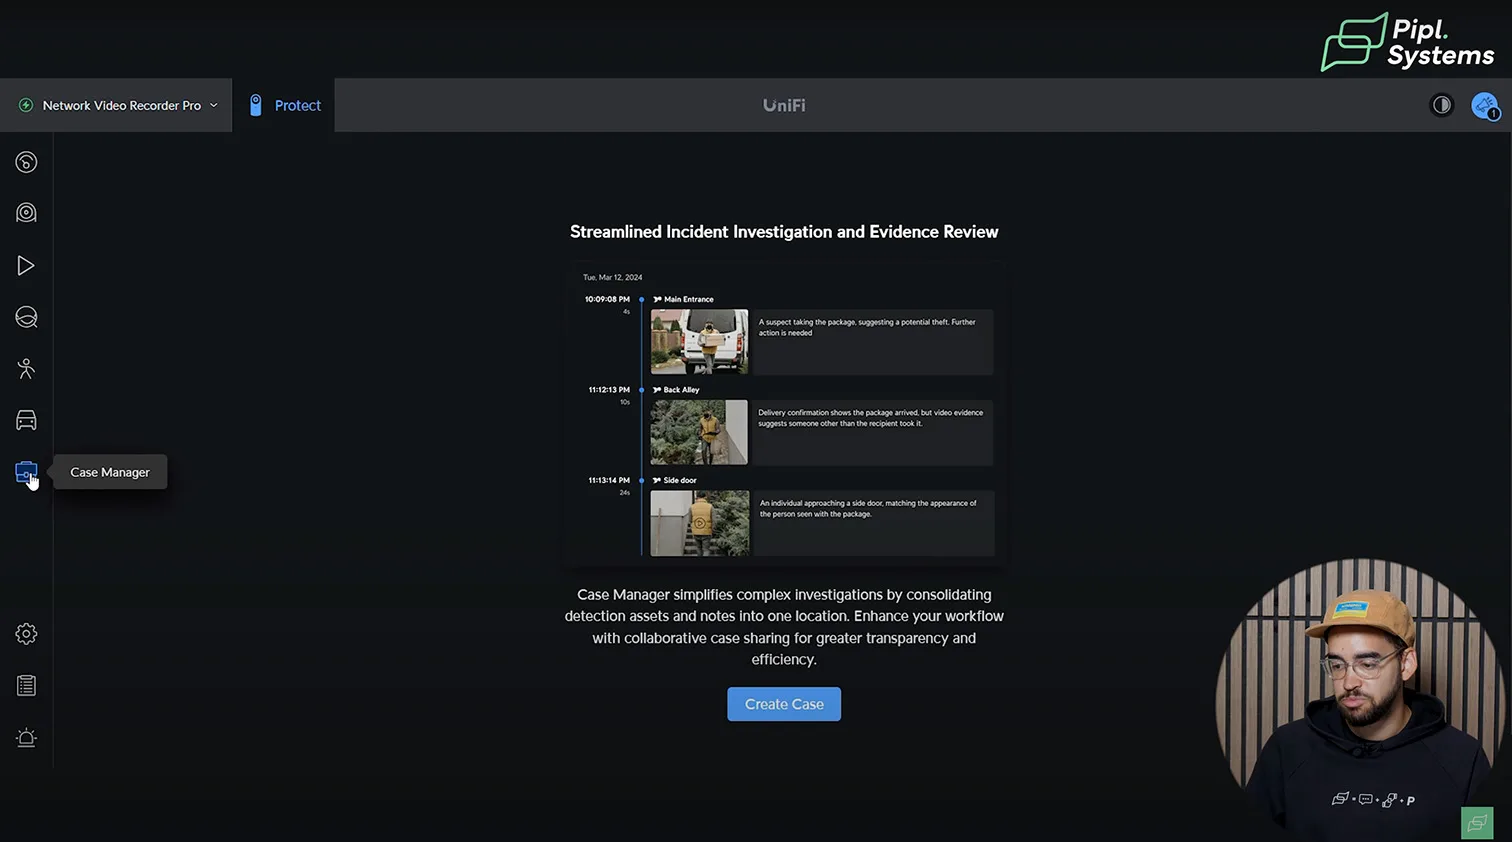
Case Management and Evidence Tools
The built-in Case Manager simplifies incident review and reporting. You can bundle footage, stills, and metadata into a downloadable package suitable for law enforcement or internal investigation workflows.
Recording Manager
Fine-Tuned Recording Settings for Each Camera and Scenario
The Recording Manager in UniFi Protect offers granular control over how and when each camera records, ensuring your storage is used efficiently while maintaining critical event coverage.
Per-Camera Recording Rules
Each connected camera can be individually configured with the following key parameters:
- When to Record: Choose between "Always," "Only When Motion Is Detected," or schedule-based triggers. This setting helps optimize storage in environments with varying activity levels.
- Recording Mode: Options include continuous recording or event-based recording. Continuous recording is best for high-security environments or legal compliance, while motion-based mode saves storage and bandwidth.
- Motion Events: You can enable or disable motion-based triggers independently of AI features. Disabling this helps reduce noise in analytics-heavy setups.
- AI Events: If smart detections (e.g., person, vehicle, face) are enabled system-wide, you can toggle them per camera here for better control.
- Overlay Info: Decide whether to show metadata like timecodes, logos, or camera names in video feeds or recordings.
- Recording Quality: Adjust resolution, frame rate, and compression settings to strike the right balance between quality and storage use.
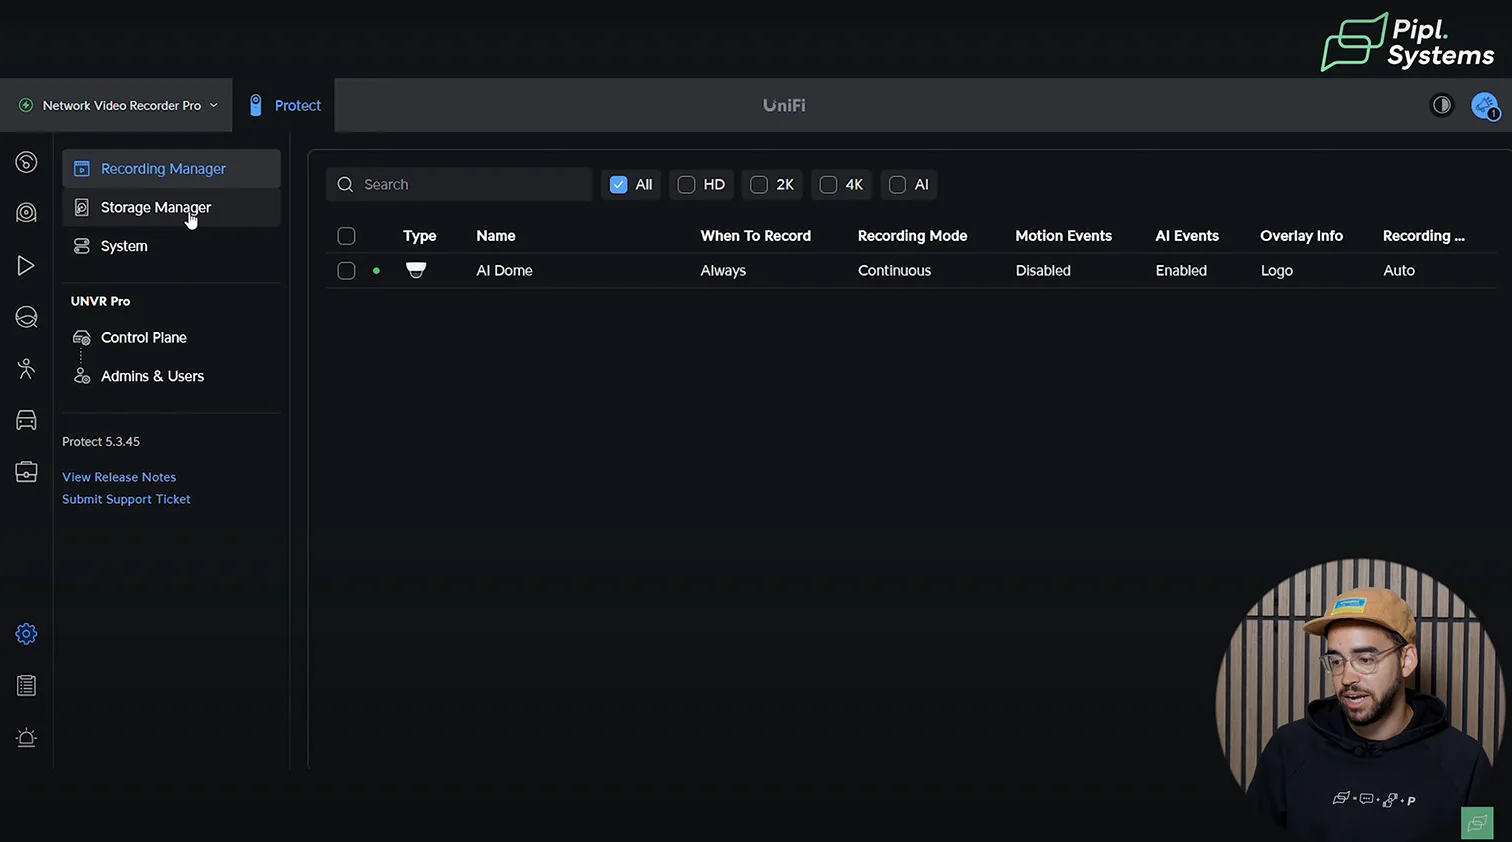
High-Precision Filters
At the top of the Recording Manager interface, you’ll find filtering options that let you quickly isolate cameras by:
- Resolution (HD, 2K, 4K)
- AI Capabilities
- Specific camera types or names
This allows administrators to monitor settings consistency and adjust large-scale deployments more efficiently.
Use Case: Storage Optimization vs. Continuous Coverage
For deployments using high-capacity NVRs like the UNVR Pro, continuous recording at full resolution may be preferred. However, for bandwidth-constrained or residential installations, tuning cameras to record on motion or AI detection only can significantly extend storage availability and reduce unnecessary writes.
By centralizing control over these critical parameters, the Recording Manager ensures that your UniFi Protect deployment remains aligned with your performance, legal, and operational priorities.
Storage Manager
Visibility and Control Over Your Surveillance Retention Strategy
The Storage Manager in UniFi Protect provides a centralized view of your storage infrastructure, letting you monitor space usage across all connected drives and adjust retention policies to meet operational requirements.
Capacity Overview
At the top of the interface, a visual bar graph gives an immediate breakdown of how your storage is being used:
- High Quality Recordings: The largest portion, especially when cameras are set to continuous 4K or AI event-based recording.
- Low Quality Recordings: Typically used for timeline previews or when bandwidth conservation is prioritized.
- Persistently Stored: Clips or footage manually saved by the user for archival or evidence purposes.
- Timeline Scrubbing: Temporary data that allows fast navigation in playback mode.
- System Reserved: Space allocated for the UniFi OS and database integrity.
- Unused: Remaining available capacity not yet allocated.
In this example, 2.37 GB is used out of 15.9 TB total, indicating a freshly installed or recently cleared system.
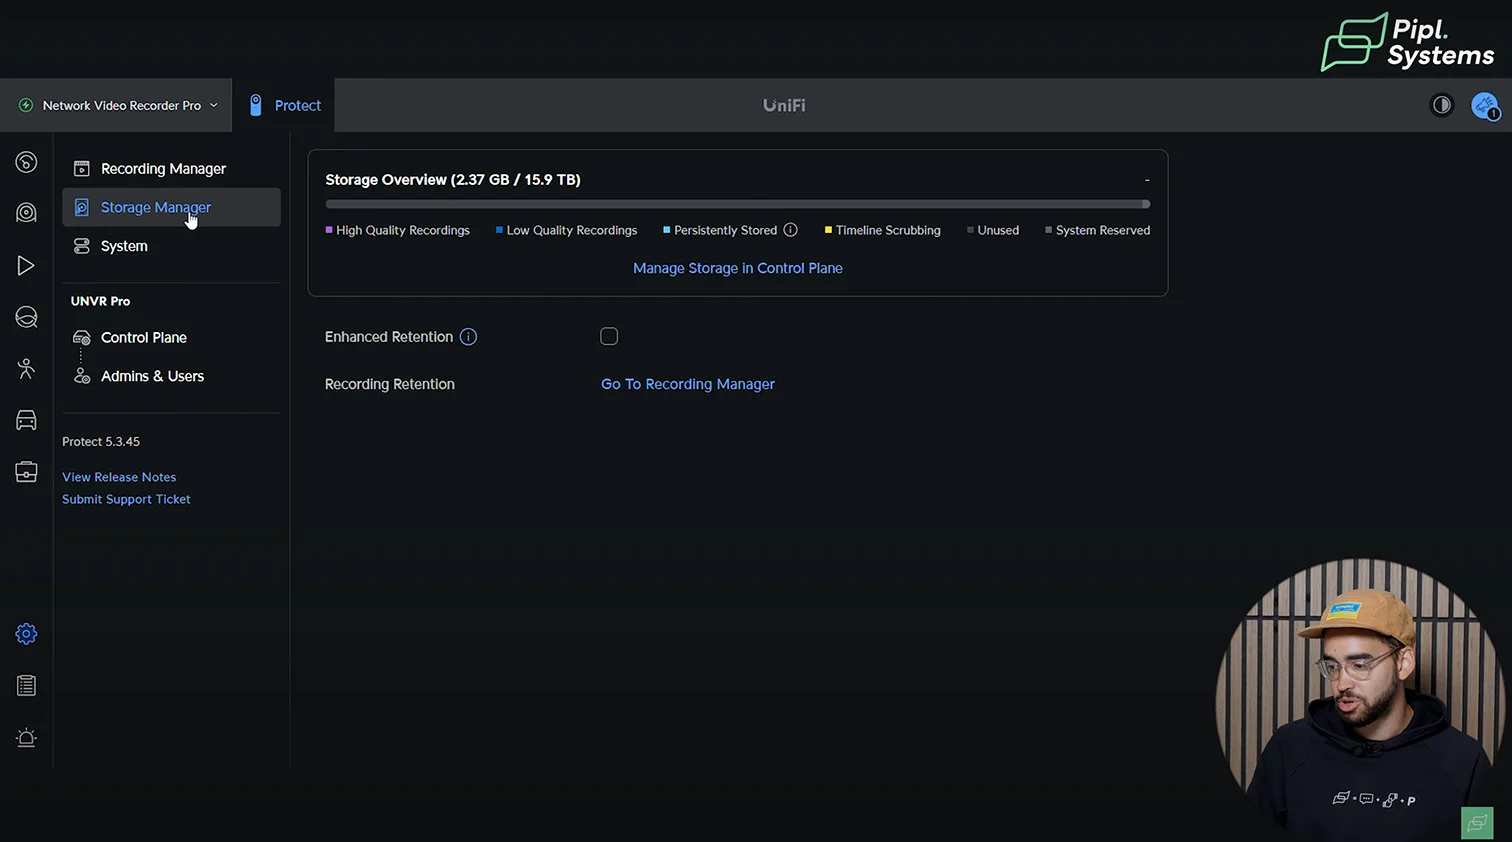
Enhanced Retention Option
A toggle labeled Enhanced Retention allows administrators to protect critical footage from being overwritten. This is particularly useful in regulated industries or investigative use cases where long-term retention is legally required.
When enabled, this option prioritizes storage allocation to persistent or event-flagged footage, ensuring key events are retained longer, even under high activity.
Recording Retention Configuration
This section allows you to define how long the system retains footage based on storage thresholds or specific timeframes. Fine-tuning this setting can balance disk space availability with operational surveillance needs. For example:
- Shorter retention (e.g., 48–72 hours) for high-activity environments with continuous recording.
- Longer retention (e.g., 14–30 days) when using event-based recording with smart AI triggers.
Integration with Control Plane
Administrators can access broader volume management tools via the Manage Storage in Control Plane link. This area enables actions such as:
- Adding or removing physical drives.
- Checking drive health (S.M.A.R.T. status).
- Allocating RAID redundancy policies (on supported NVRs like the UNVR Pro).
By combining visual clarity with granular controls, the Storage Manager is essential for maintaining performance and reliability across any UniFi Protect deployment – from small-scale home systems to multi-terabyte commercial infrastructures.
System Settings
Global Parameters That Define How Your Surveillance Platform Operates
The System tab provides a central location for configuring global behavior within UniFi Protect. These settings impact not just individual devices, but how your entire NVR or UniFi OS Console interacts with AI features, timekeeping, localization, and compliance protocols.
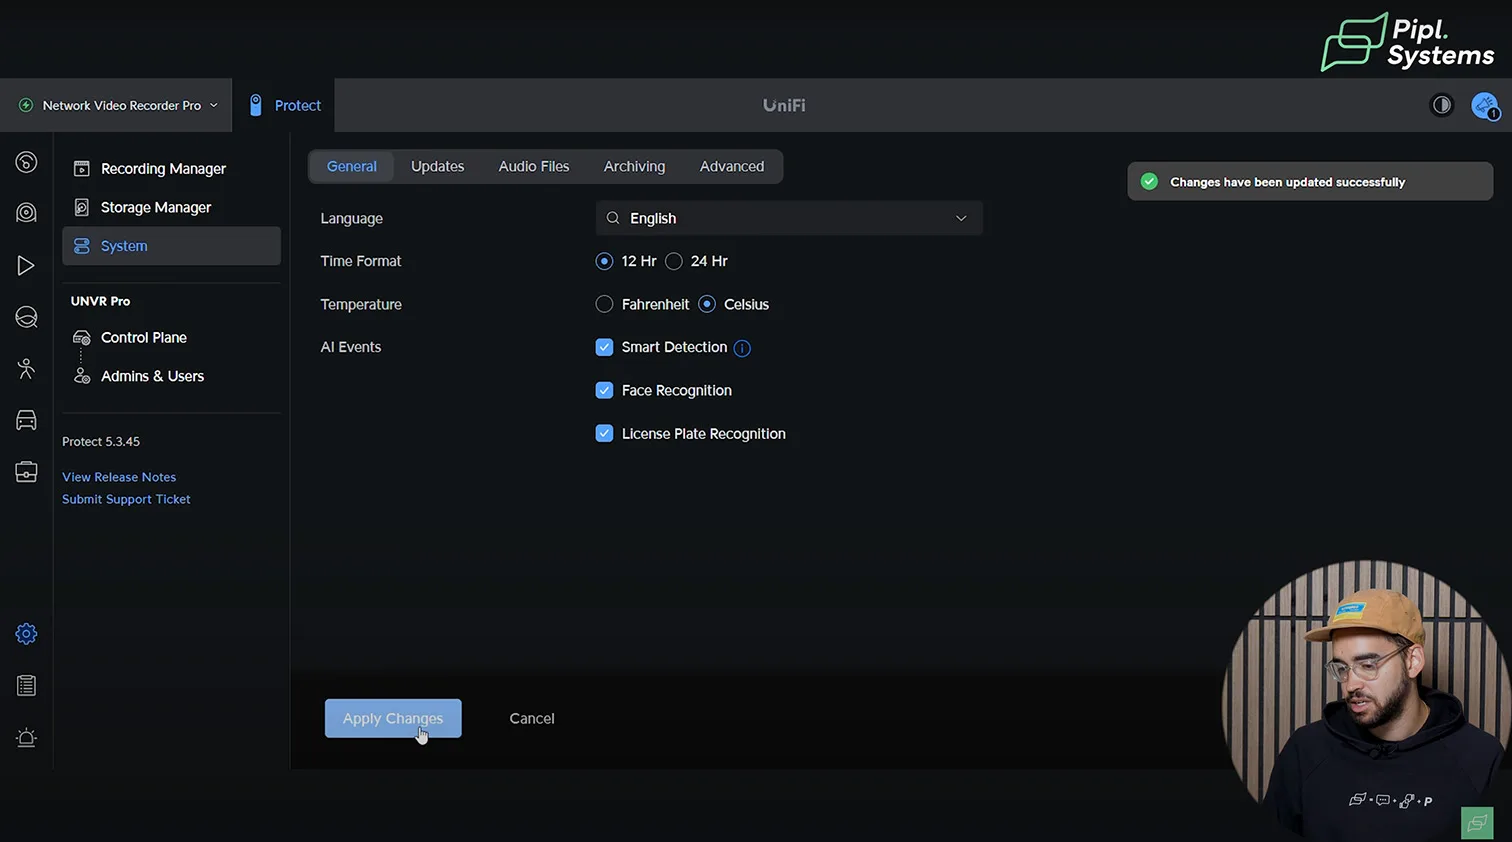
Language and Regional Formatting
The first group of settings covers interface localization and formatting preferences:
- Language selection determines the UI language throughout the UniFi Protect dashboard.
- Time format lets you toggle between 12-hour and 24-hour clocks, depending on regional norms or personal preference.
- The temperature unit (Fahrenheit or Celsius) is particularly relevant for temperature-triggered alerts or camera sensors with thermal readings.
These settings are mostly cosmetic but crucial for aligning the interface with the user’s expectations, especially in multi-user environments.

AI Event Configuration
Below the regional settings, you'll find global toggles for UniFi's advanced AI detection engines:
- Smart Detection activates UniFi’s object classification (person, vehicle, pet) across all supported AI cameras. This is required for enabling event-based recording and notifications tied to real activity rather than motion alone.
- Face Recognition enables system-wide facial identification when paired with cameras like the AI Theta or AI Pro. Footage tagged with recognized individuals can be filtered or prioritized.
- License Plate Recognition activates AI LPR features in supported cameras. When used with devices like the AI LPR, this setting allows for continuous vehicle monitoring at entry and exit points.
These AI features consume more processing resources, so enabling all of them should be balanced against your console’s capacity and camera count.
Tabs for Advanced Configuration
At the top of the System panel, there are four configuration tabs:
- General: Contains the options detailed above.
- Updates: Where firmware and application versioning are managed.
- Audio Files: For uploading custom announcement clips, useful in deterrent scenarios or intercom integrations.
- Archiving and Advanced: Manage system backup, log export, and long-term storage behavior.
Together, these global system settings are foundational for tailoring how UniFi Protect operates in daily use. While many users overlook this section after initial setup, revisiting it during system scaling or feature upgrades is recommended.
Admins and User Roles
Role-Based Access and Identity Management Across Your UniFi System
The Admins & Users panel allows you to control who has access to the UniFi Protect console, define permission levels, and assign identity endpoints. It’s critical for both organizational security and collaboration, especially in deployments with multiple administrators or contractors.
Managing Admin Accounts
Each admin is associated with a UI account email and can have their role and access rights:
- You can create new admins by entering their email address and selecting a predefined role.
- The interface allows restricting access to local-only if the admin should not be allowed remote login.
- Roles include predefined options such as Super Admin, Viewer, or custom roles configured via the role manager.
In the example above, a single active admin is shown – Jeremie Lusignan – with full system access.
Role-Based Access Control (RBAC)
The system supports predefined roles with granular control:
- Super Admins have unrestricted access to most console features.
- Other roles can be tailored with different combinations of permissions, depending on organizational needs.
- This helps prevent unauthorized changes while still allowing operational flexibility for support teams or external integrators.
Identity Endpoints and External Integrations
Under the Identity Endpoint tab, administrators can configure integration with third-party identity services or tie into UniFi’s Identity platform for advanced provisioning. This feature is especially relevant for larger commercial sites or campuses with federated login systems.
By properly managing user roles and limiting access to only what’s necessary, UniFi Protect deployments remain secure and compliant, even at scale. Regular audits of the user list and login history are recommended as part of your operational best practices.
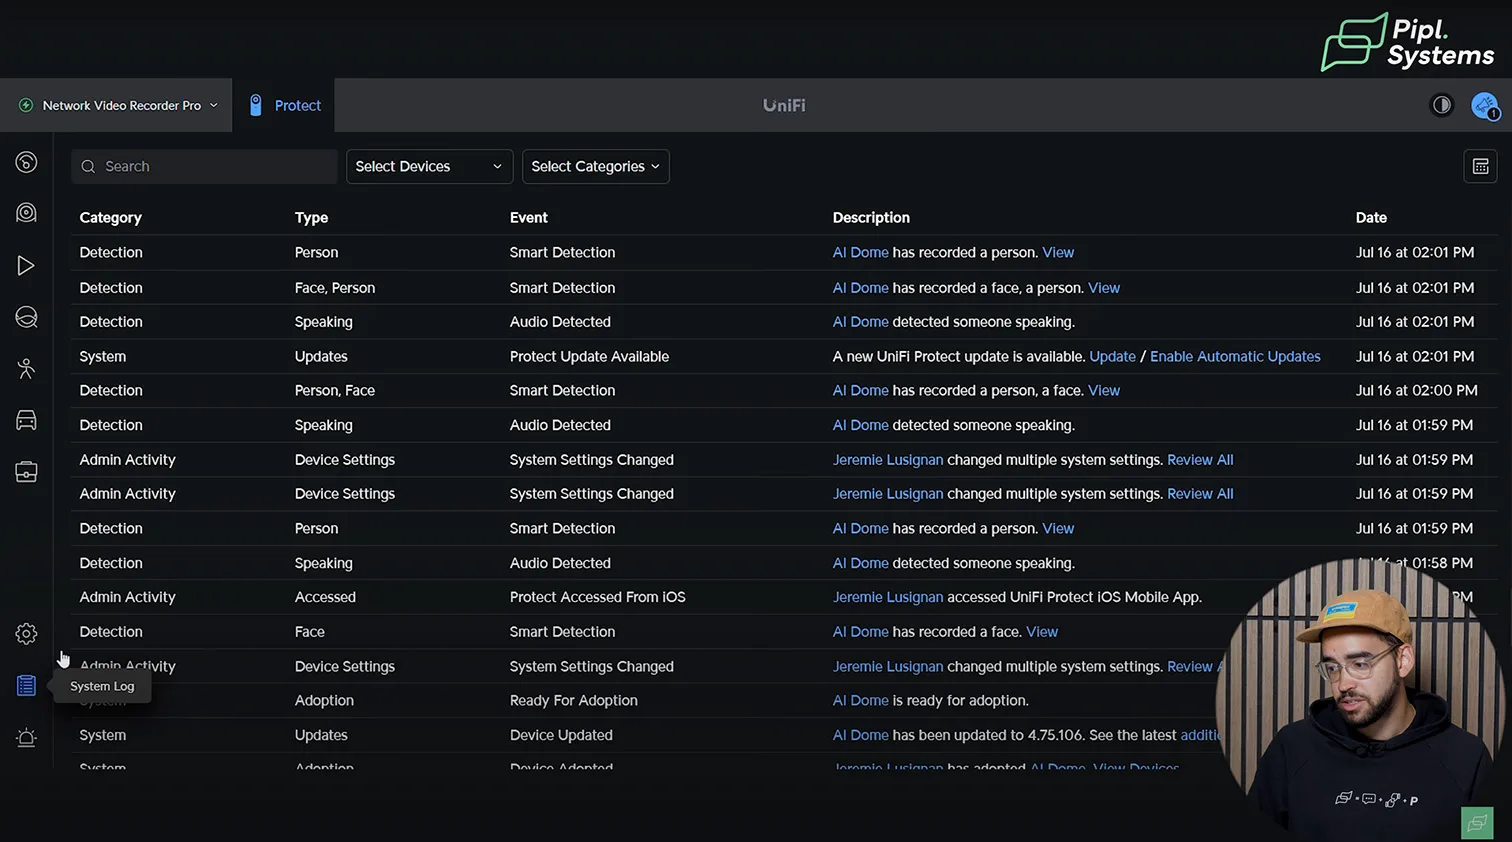
System Log
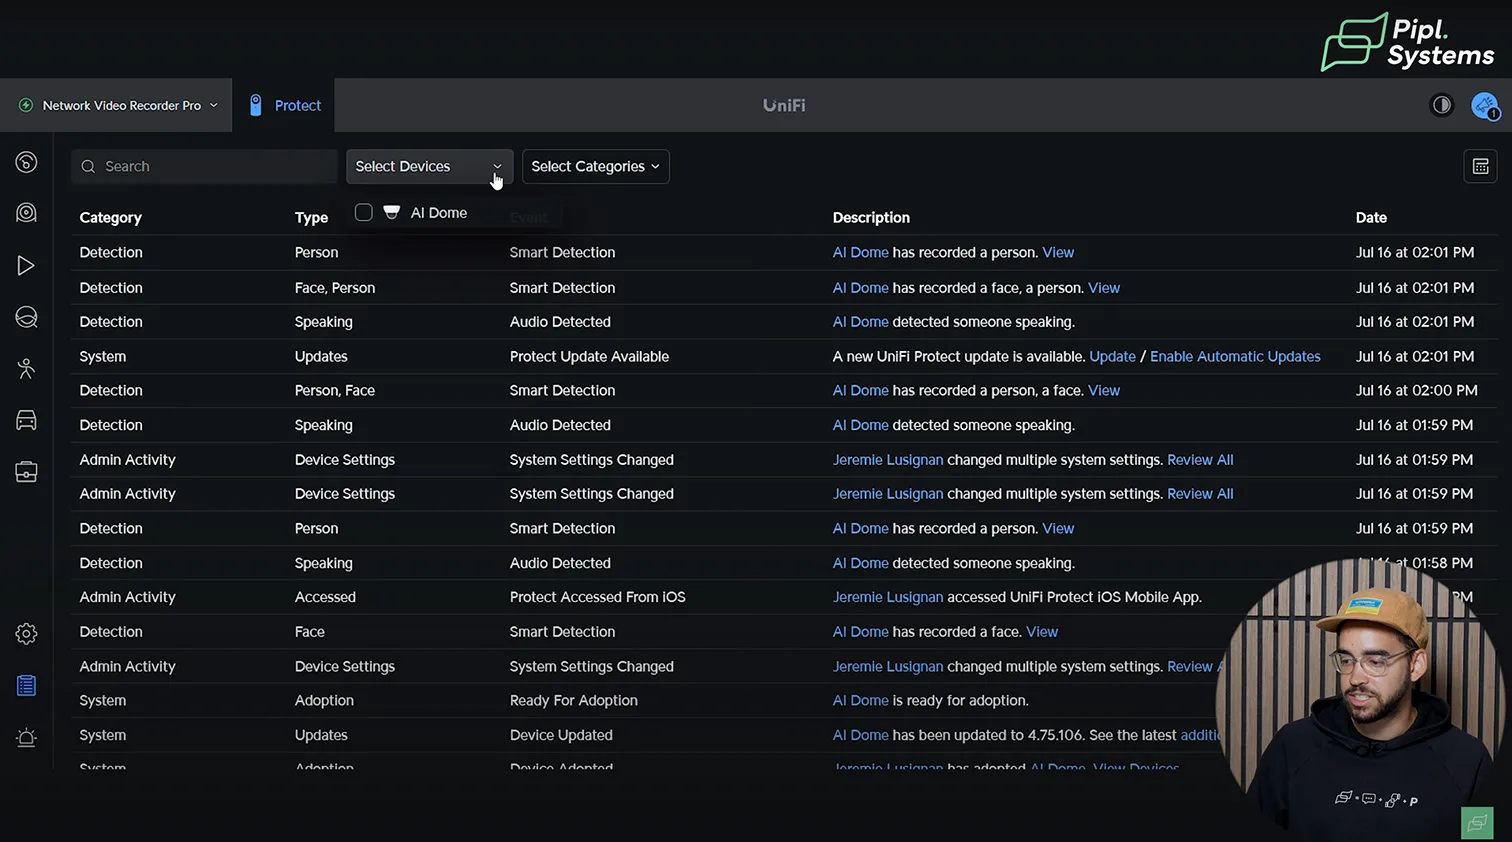
The System Log in UniFi Protect provides a real-time, searchable overview of all system activity across your surveillance infrastructure. It consolidates detection events, admin actions, system updates, and camera activity into a unified, filterable timeline.
Event Categories and Types
Each log entry is categorized for easy reference. Categories include Detection, Admin Activity, System, IoT, and Host events. The “Type” column adds granularity, identifying whether the trigger was motion, face recognition, license plate, sound, or system change.
Device and Category Filtering
The filtering interface allows users to narrow logs by specific cameras or event types. You can select from over 20 detection categories such as Person, Vehicle, Face, License Plate, Animal, or even specific audio events like Baby Crying, Barking, or Glass Breakage. This makes it easier to isolate critical events from general activity.
1 / 3
Description and Deep Linking
Each log entry includes a detailed description of what occurred, whether it’s AI detection ("AI Dome has recorded a person") or an admin action ("Jeremie Lusignan changed system settings"). Clicking “View” or “Review All” provides direct access to the associated video clip or settings page, streamlining incident verification.
Timestamp and Chronology
All events are timestamped with precise time and date, ensuring accurate reconstruction of sequences and a complete audit trail. The log refreshes in real time and stores a comprehensive history that scales with your storage capacity.
Use Cases and Importance
The System Log is critical for forensic review, performance audits, and admin accountability. Whether you're investigating unauthorized access, tuning AI sensitivity, or troubleshooting device behavior, this log serves as the primary source of truth across your UniFi Protect environment.
Alarm Manager
The Alarm Manager in UniFi Protect provides centralized control over alerts, actions, and automation based on custom triggers. It’s designed for flexibility and precision in how your system responds to specific events.
Trigger Structure
Each alarm is based on a defined trigger, such as person detection, vehicle detection, noise (like barking or a siren), water leaks, or sensor status changes. The system supports both standard and custom event types.
Actions and Automation
The action panel supports three response types:
- Notification: push, email, or both
- Webhook: integration with third-party platforms (like Slack)
- Automation: system-level responses like activating a siren or starting a recording
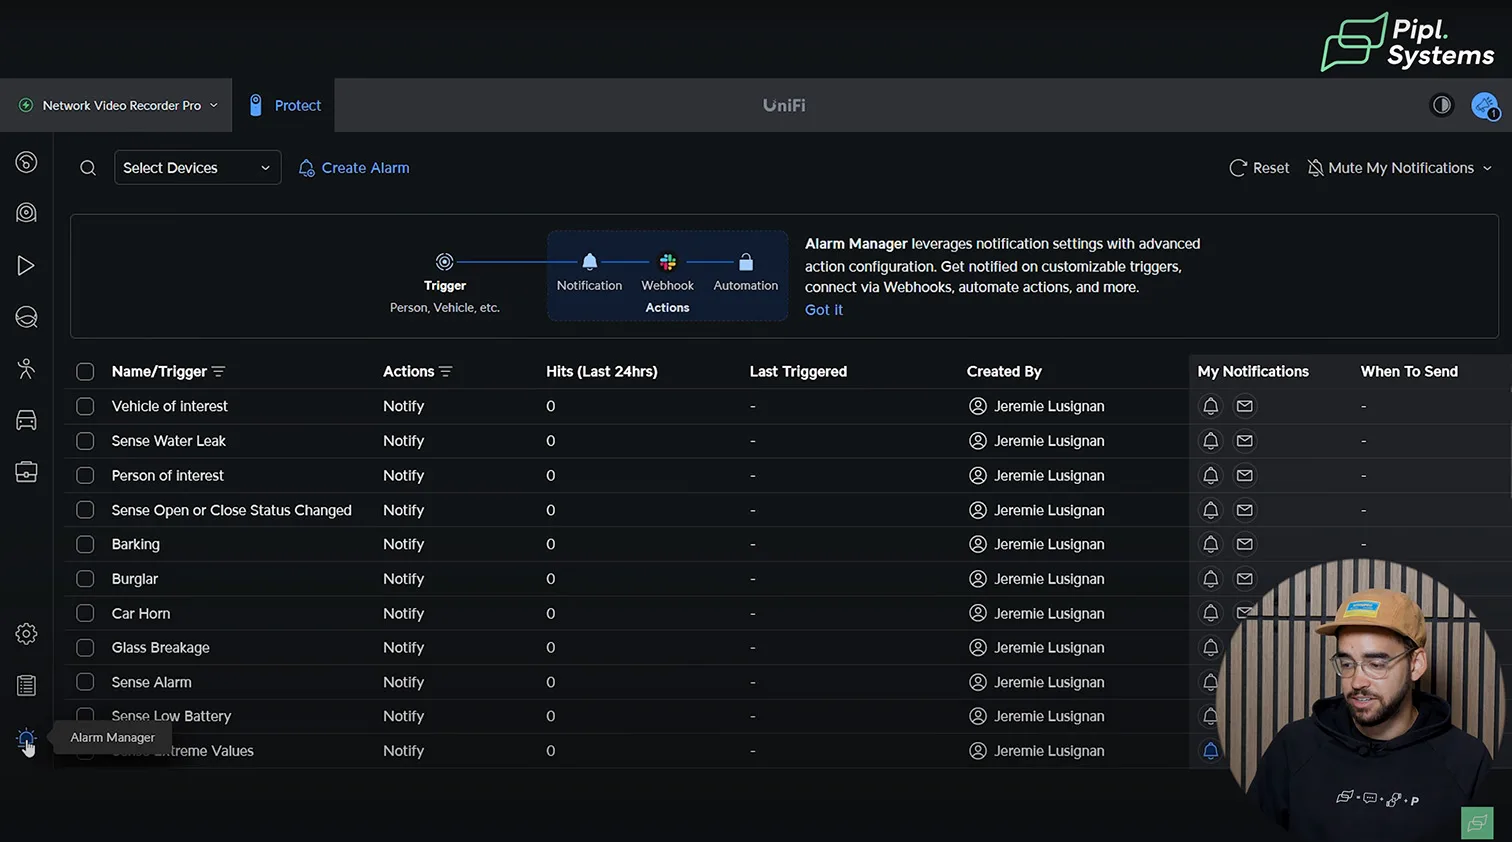
Event Log Overview
Each rule entry shows:
- Number of hits in the past 24 hours
- Last triggered time
- Creator of the rule
- Notification type (icons indicate push, email, or app alerts)
Filtering Capabilities
At the top, device filters allow you to narrow down alarm rules by specific cameras or sensors. This is helpful when segmenting alerts by building zones or locations.
Use Case Scenarios
Alarm Manager is especially useful for:
- Automating urgent responses (e.g., break-ins or fire alerts)
- Connecting to external security workflows via Webhooks
- Receiving real-time notifications within specific timeframes
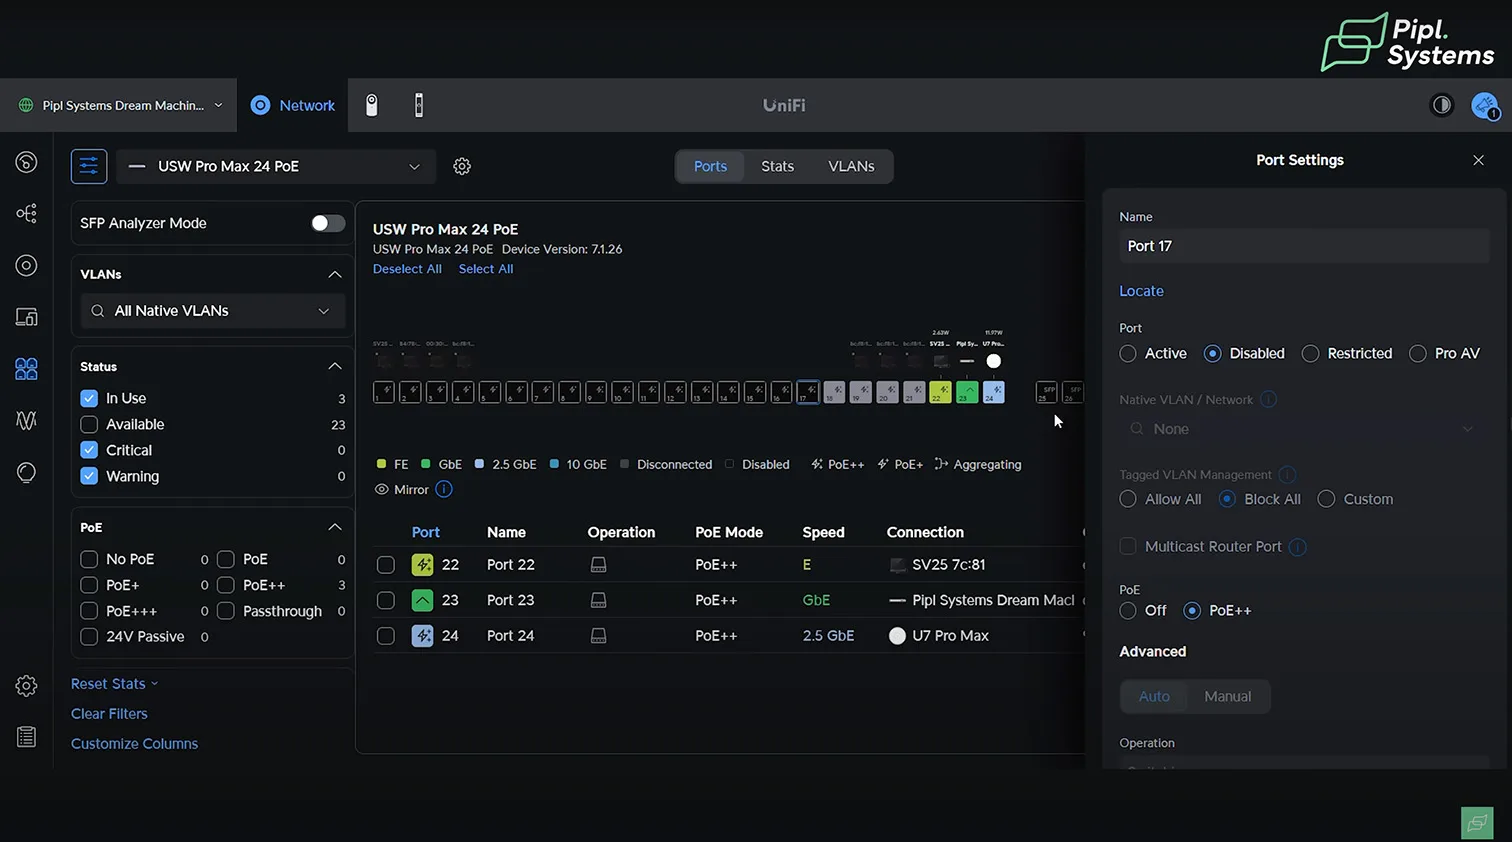
Configuring PoE Settings in UniFi Network
Power Optimization and Port Control for UniFi Switches
If you're using an official UniFi PoE switch, you unlock full control over your power distribution settings. Within the UniFi Network interface, each PoE port can be managed individually, including naming, toggling power, and monitoring usage in real time.
This level of control is only available with UniFi-branded switches. Third-party PoE switches can power your cameras, but they don’t offer port-level customization or integration within the UniFi ecosystem. For full visibility across Protect, Access, and Network platforms, a native UniFi switch is strongly recommended.
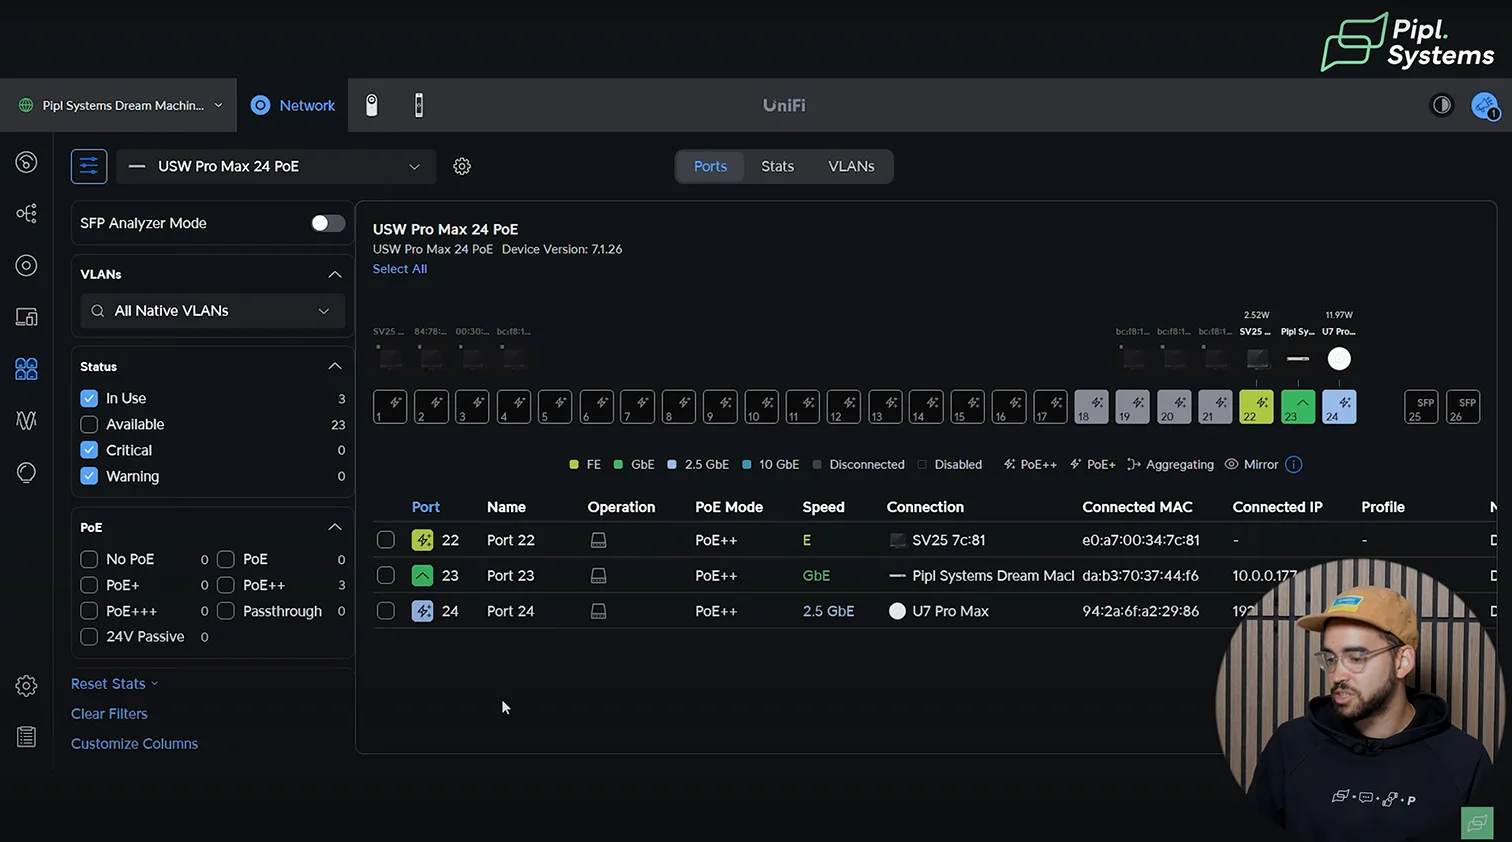

1 / 2
From the console dashboard, users can manage power delivery types (PoE, PoE+, or PoE++), view real-time wattage per device, and configure ports for specific roles in the system. This becomes particularly valuable when managing high-power devices like PTZ cameras or Access Readers that require precise power allocation.
Final Thoughts: Building a Reliable UniFi Protect Setup
From Planning to Deployment, Every Choice Matters
By following this UniFi guide for beginners, you’ll not only understand the basics of setting up UniFi but also learn best practices for both residential and business environments. Whether you’re working with a UDM-Pro setup, planning VLANs, or expanding into outdoor APs, the key is to balance hardware and software configuration for long-term stability.
A successful UniFi Protect deployment depends on selecting the right UniFi OS Console, pairing it with cameras that match your use case, and choosing a PoE switch that can reliably power the entire system. Whether you're setting up a small residential system or a multi-site business-grade installation, each component plays a critical role, and following a trusted UniFi guide ensures you make the right choices for long-term performance.
Native UniFi hardware not only ensures power reliability and seamless integration but also unlocks advanced features like port-level control, centralized firmware management, and ecosystem-wide visibility. Even if you're just starting your UniFi journey, aligning your controller, cameras, and PoE infrastructure from the beginning will future-proof your investment.
If you're uncertain about what PoE switch is needed for your camera configuration or which UniFi OS Console is best suited for your application, our team at Pipl Systems is available to help you plan the right architecture for your environment.
Frequently Asked Questions
Straightforward Answers to Common UniFi Protect Setup Questions
Can I use a third-party PoE switch with UniFi Protect?
Yes, but you will lose UniFi’s advanced switch integration, such as per-port management, remote PoE toggling, and power monitoring. These functions only work with UniFi switches through the UniFi Controller. A third-party PoE switch can still power UniFi cameras reliably as long as it supports the correct PoE standard for your models.
For larger deployments, you must check the power budget carefully. Some AI and PTZ cameras draw PoE+ or PoE++ levels of power, and budget mismatches are the most common cause of camera drops when using third-party switches.
Do I need internet access to use UniFi Protect?
An internet connection is required for initial setup, remote access through the UniFi Protect app, and firmware updates. Without the internet, you cannot access Protect remotely or receive push notifications.
However, UniFi Protect is designed to continue functioning locally. Cameras will still record to the NVR or UniFi OS Console, and live feeds remain accessible through the local network even if your WAN connection is down.
What’s the minimum UniFi OS Console required for UniFi Protect?
Protect runs on any UniFi OS Console that supports the app, including the CloudKey Gen2+, UDM Pro, UDM SE, UNVR, and UNVR Pro. All models provide the same Protect software features but differ in processing power and storage capacity.
As a general rule, CloudKey Gen2+ handles up to a dozen light-load cameras, while UNVR or UNVR Pro can scale to enterprise deployments with RAID storage and dozens of AI-enabled cameras. Always size your console based on both camera count and AI load.
Can I mix different camera models in one UniFi Protect system?
Yes, UniFi Protect supports mixing camera generations and types, such as G4, G5, G6, AI, and PTZ models, within the same deployment. All cameras can be managed from a single Protect dashboard.
The only limitation is the system’s overall resource capacity. High-resolution PTZs and AI cameras consume more bandwidth, storage, and PoE power. As long as the UniFi OS Console and switches meet those demands, mixed deployments run without issue.
How do I get alerts for person or vehicle detection?
UniFi Protect cameras with built-in AI chips handle smart detections locally, without relying on cloud processing. Person and vehicle detection can be enabled per camera or defined zones through the Protect settings menu.
Notifications are then sent in real time to the Protect mobile or web app. Because inference happens on-device, alerts are private, low-latency, and not dependent on internet connectivity.
What is the difference between PoE, PoE+, PoE++, and PoE+++ for UniFi cameras?
PoE (802.3af) provides up to 15W per port and powers most entry-level fixed UniFi cameras. PoE+ (802.3at) increases output to around 25W, which is required by larger 4K or multi-sensor models. PoE++ (802.3bt Type 3) delivers 45–60W, supporting power-hungry PTZs.
High-Power PoE+++ (802.3bt Type 4) can exceed 75W and is essential for UniFi AI PTZ Industrial cameras and other advanced models. Always match the camera’s spec sheet to your switch’s PoE standard to avoid underpowering and stability issues.