
Welcome to the Pipl Systems Media Portal!
As an independent expert contributing to Pipl Systems, I'm excited to provide you with a comprehensive, expert-level guide on maintaining one of the most important aspects of your home security system - the Qolsys IQ Panel 4. This article is designed to speak directly to professional installers and integrators, providing them with the detailed steps necessary to replace the battery in this advanced security device. Whether you’re a seasoned pro or someone relatively new to the field, this guide will help you handle the process efficiently and effectively.
Is your Qolsys IQ Panel 4 notifying you that the battery needs to be changed? Don’t worry; you don’t have much time to figure it out, but with the right guidance, you can quickly resolve the issue. This guide walks you through the battery replacement process for the Qolsys IQ Panel 4, ensuring that your property’s security remains uncompromised. Our expert, Jeremie Lusignan, will guide you through each step - from shutting down the system to safely replacing the battery - so you can maintain the operational efficiency of your alarm system.

For those interested in learning more about the Qolsys IQ Panel 4 and its advanced features, including the IQ Lux and IQ Smart Sockets, be sure to check out our detailed video review.
Shutting Down the System Through Advanced Settings
When your Qolsys IQ Panel 4 shows a low battery warning on the main screen, your first step should be to properly power down the system to ensure a safe battery replacement process. Here’s how you do it:
- Start by swiping down from the top of your IQ Panel 4’s screen to reveal the settings menu.
- Once in settings, locate and tap on the "Advanced Settings" option.

- You will be prompted to enter your password to proceed. If your system still uses the default password, it should be 1111.
- Enter the password, and you’ll be granted access to more in-depth settings for your device.
- Scroll to find the "Power Down" option, located at the bottom left of the screen. This step is crucial for safely replacing the battery without causing any damage to the system.
- Confirm by clicking “OK” when prompted. The system will then proceed to shut down, signaling that the first step toward changing your battery is complete.
Unplug IQ Panel 4 from the Power Supply
After powering down the system, the next critical step is to physically disconnect your IQ Panel 4 from its power source. Here’s how you proceed:

- Unplugging the Device:
- Carefully unplug the panel from the wall outlet. The device should be removed and placed on a flat, stable surface like a table to avoid any mishandling during the battery replacement process.
- With the system now fully powered down and disconnected from its power source, you’re ready to proceed to the actual battery replacement.
Replacing the battery in the Qolsys IQ Panel 4 may seem like a straightforward task, but it’s essential to follow each step meticulously to ensure the integrity of the device. With the system safely powered down and disconnected, the process of replacing the battery becomes a smooth and secure procedure.
Unscrew the Back Panel

To access the battery compartment of the Qolsys IQ Panel 4, you must first remove the back panel. This is a critical step that requires careful attention to avoid damaging the unit.
- Turn the IQ Panel 4 over to reveal its back side. Here, you’ll notice a small screw that secures the back panel to the main body of the device. This screw is typically located near the bottom or in the center, depending on the model.
- Using a Phillips #1 screwdriver, gently unscrew this fastener. Be careful not to strip the screw, as this could make reassembly difficult. Once the screw is removed, set it aside in a safe place to ensure you don’t lose it during the battery replacement process.
- After unscrewing, you will notice two arrows on the back of the panel. These arrows indicate the points where you should apply pressure to release the back cover.
- You can use your fingers to carefully pry the back panel apart, or for a more precise approach, use a small, flat tool designed for electronics. Insert the tool into the small gaps near the arrows and gently pry the cover off. This step requires some care to avoid damaging the plastic clips that hold the panel in place.
Removing the Barrel Plug

With the back panel removed, your next task is to disconnect the power supply to ensure a safe battery replacement. This involves removing the barrel plug, which connects the battery to the panel.
- Locate the barrel plug that connects the battery to the circuit board. This small cylindrical connector is typically found near the battery compartment and is responsible for supplying power from the battery to the device.
- Gently grip the barrel plug and pull it straight out of its socket. Be cautious during this step - pulling too hard or at an angle could damage the connector or the wires.
- Always ensure you are pulling on the plug itself and not the wires, as tugging on the wires could lead to internal damage that may affect the device’s performance.
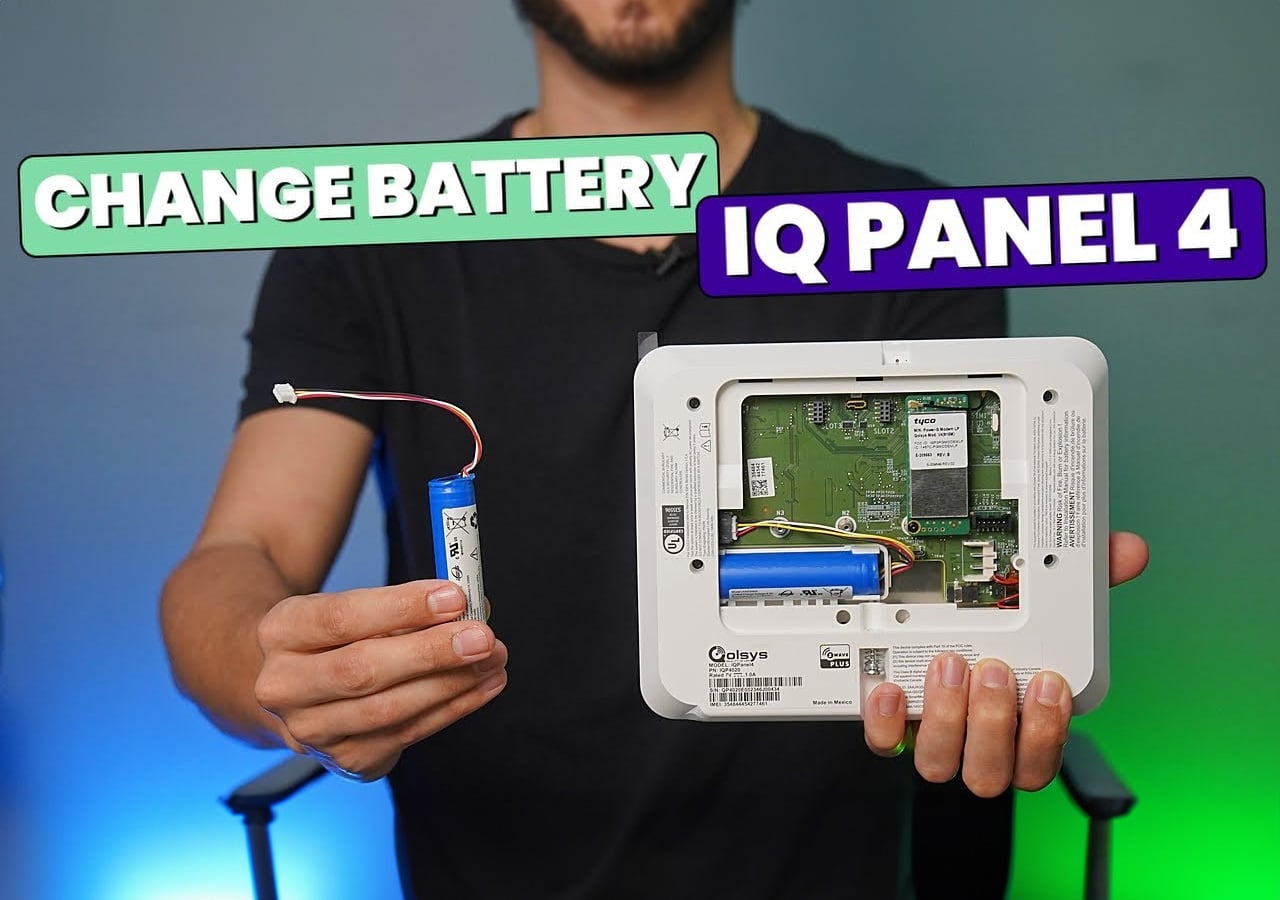
Removing the Battery

The final step in this section involves removing the old battery to make way for the new one. This step requires precision and care to avoid damaging any internal components.
- After disconnecting the barrel plug, you’ll see the battery secured in place by a clip. Use your fingers to carefully unclip the battery. The clip is typically designed to release the battery with a small amount of pressure, so avoid using excessive force.
- As you prepare to remove the battery, ensure that the wires are positioned downward, following the path of the enclosure. This positioning will make it easier to remove the battery without tangling or damaging the wires.
- With the clip released and wires positioned correctly, use your tool to gently push the battery out of its compartment. Start by sliding the battery up from the bottom, allowing it to detach from its holding position.
- Carefully pull the battery out of the device, ensuring that the wires remain untangled and intact.
With the battery successfully removed, you are now ready to install a new one and reassemble the IQ Panel 4.
Stay connected with Pipl Systems to continue receiving expert advice and tips for all your security installation needs.
Installing a New Battery
With the old battery safely removed, it’s time to install the new battery, ensuring that the panel continues to function optimally.

- Start by ensuring that the wires on your new battery are facing downward, just as they were with the old battery. This orientation is crucial as it allows the wires to fit neatly into the designated enclosure, preventing tangling or damage.
- Carefully pass the battery wires through the enclosure, ensuring they have enough slack to reach the connection point without strain. Gently slide the battery into its compartment, making sure it fits securely within the designated space.
- Once the battery is in place, plug the connector into the socket where the old battery was attached. Push the connector firmly until you hear a click, ensuring it is securely connected. Give the connector a gentle tug to confirm it is properly attached and won’t come loose during operation.
Reassembling the IQ Panel 4
Now that the new battery is installed, the next step is to reassemble the IQ Panel 4 and restore it to working order.

- Before closing up the panel, reconnect the barrel plug that you previously removed. This plug supplies power to the device, so make sure it’s inserted correctly and securely. A loose connection could prevent the device from powering on correctly.
- Place the back panel onto the IQ Panel 4, aligning it with the slots and arrows you observed earlier. Press down firmly around the edges to snap it back into place. The panel should sit flush with the rest of the device, with no gaps.
- Finally, use your Phillips screwdriver to reinsert the screw that you removed at the beginning. This screw helps to hold the back panel securely in place, protecting the internal components. Tighten it just enough to secure the panel without overtightening, which could strip the screw or damage the casing.
- With the back panel secured and the screw in place, it’s time to reconnect the IQ Panel 4 to its power supply. Plug the power adapter back into the wall socket, and turn the panel back over to its normal position.
- The device should power up automatically. If it doesn’t, check all connections to ensure everything is plugged in correctly. Once powered on, the panel will go through its normal startup sequence, indicating that the new battery is functioning as expected.
Conclusion
Replacing the battery in your Qolsys IQ Panel 4 is a critical maintenance task that ensures your security system remains reliable and effective. By following this detailed guide, you’ve learned how to safely and efficiently remove the old battery, install a new one, and reassemble the device, ensuring it continues to protect your property without interruption.

At Pipl Systems, we’re committed to providing expert advice and guidance to help you navigate the complexities of modern security systems. Whether you’re a professional installer, integrator, or a dedicated DIY enthusiast, staying informed and up-to-date with the latest technology is essential.

To continue receiving valuable insights, updates, and tips on the latest in security technology, subscribe to the Pipl Systems email newsletter. Stay ahead of the curve with expert advice delivered straight to your inbox.
Stay connected, and see you in the next guide!

To access a special offer on Qolsys products, visit the Qolsys page on the Pipl Systems website and make a request. Our team will connect you with a Qolsys representative in your region, who will assist you in obtaining an offer on favorable conditions tailored to your requirements. Take advantage of this opportunity to enhance your security systems with cutting-edge Qolsys products. Visit our website and submit your request today to unlock exclusive benefits and secure your organization's assets.
You may also be interested in previous articles about solutions from Qolsys:
Are You Looking for the Perfect Smart Lock? – IQ Lock-PG