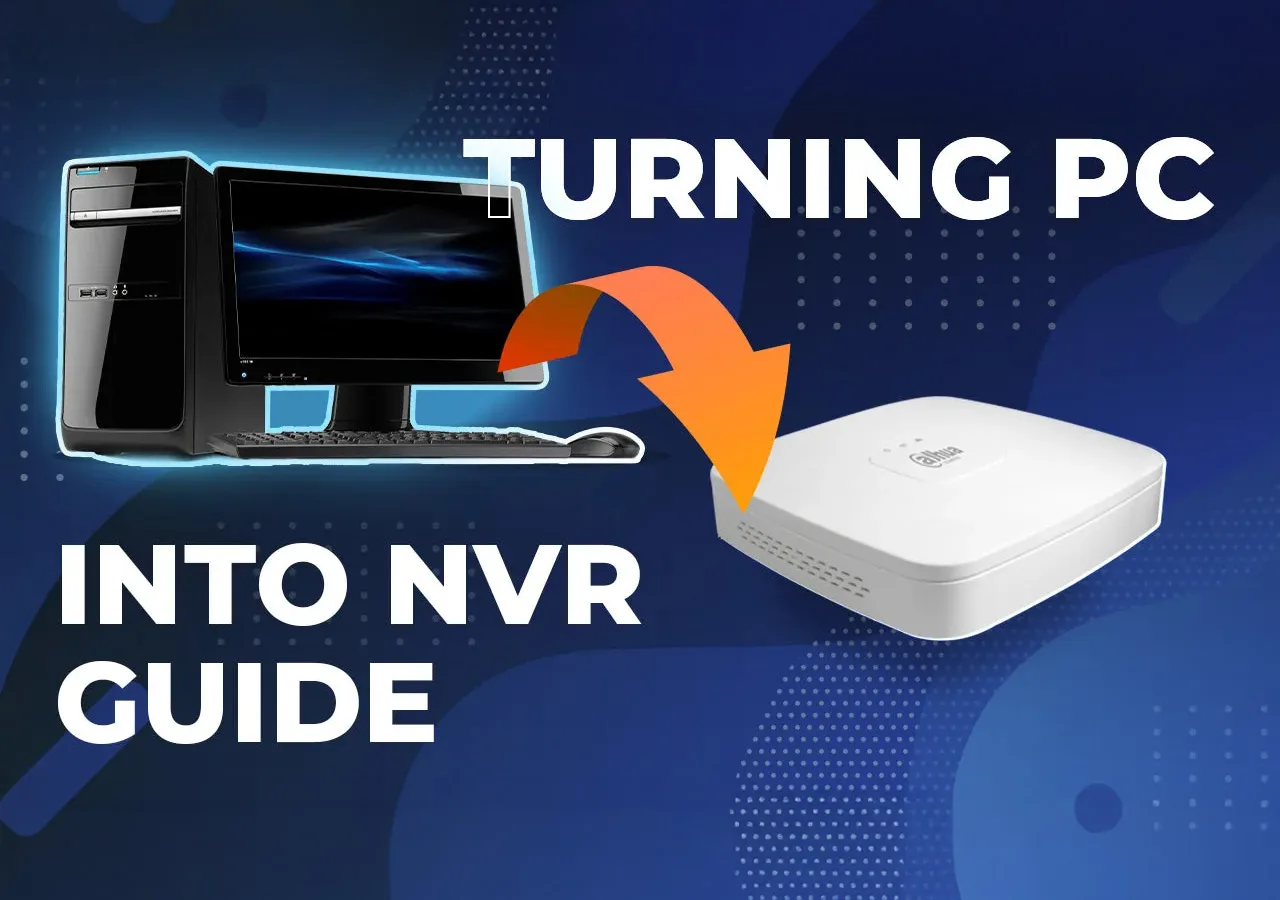
Turning Any PC Into NVR For Video Surveillance System Guide! Showcase & Set-up – Setting Up Server for Video Surveillance on PC
The title of this material accurately displays the contents – our goal is to create a full-featured standalone Network Video Recorder out of a computer. Laptop, in my case, into the NVR basically, which is quite convenient, to be fair, if you have a stationary computer in the home or on the site operating 24/7, and this is the way that allows you to replace the Video Recorder with your PC. It is a confirmed and full-featured option. This is more about what works better with you, and we’re going through the whole process from scratch, so you can see it and make it work for you.
Initially, you have a kind of a fork:
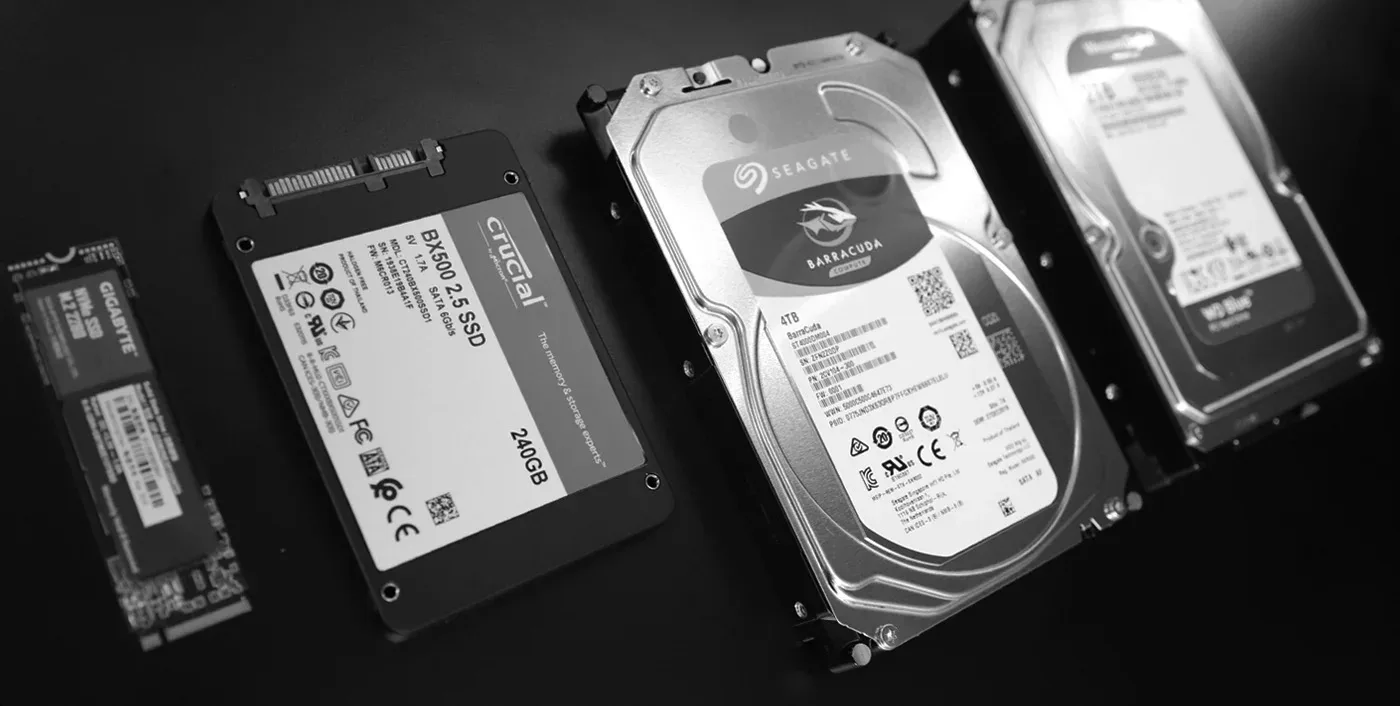
- You already have a hard drive in your PС with some empty space that you can allocate for video storage purposes;
- If you don’t have one – that’s the 2nd way – purchase an external hard drive connected via USB, or the internal HDD. And consider selecting the hard drive designed for the video surveillance system – that will be your best option. Like Western Digital Purple.
With options number 2 and 3, you can skip the next part and go straight to the Storage Server Setup because your drives are empty and ready to go, but for the #1 case, we need to prepare the HDD for further operations, and there are no difficulties about that.
Option #1: Preparing Existing HDD
Alright, we need to divide the hard drive into 2 independent sections – the 1st one goes for all common file types: the software, multimedia, OS and etc., and everything you normally store on your computer. The 2nd section will go exclusively for video surveillance. Why are we doing it like this? When we set up the video recording from the cameras onto the HDD, the system reserves all the available free space for its needs, for the videos, but we want our files to remain untouched. To the point.

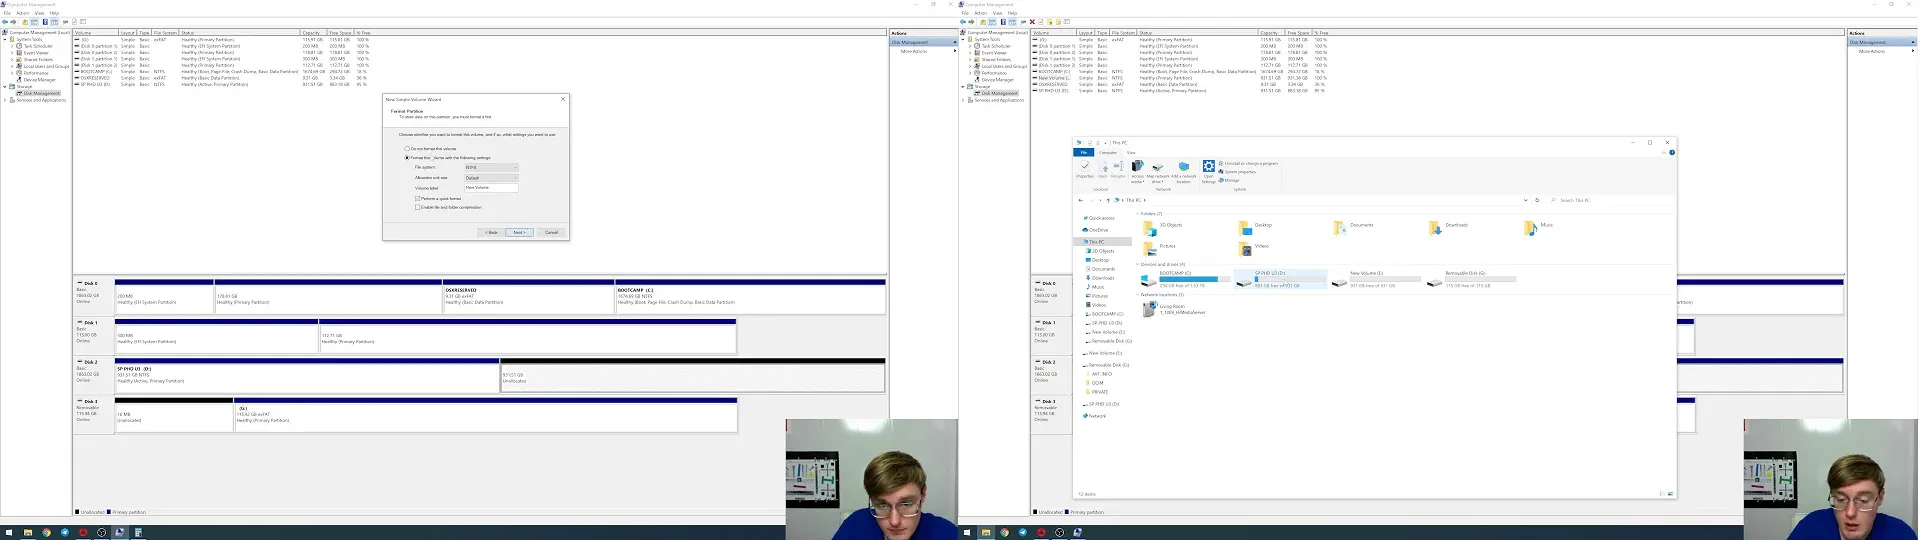
By analogy, I have a 2TB hard drive under the "F" letter, and I have some files on it. These are 15 GB there, including one of my project files, and I don’t want them to be removed. So that’s what I do: I go to file explorer, locate “My Computer” → right mouse click on it and “Manage.”. Then I go to “Storage” → “Disk Management” → locating my F drive. It’s 1800 GB, and now I want to split it into 2 volumes, the 2nd of which I will assign for the video surveillance.
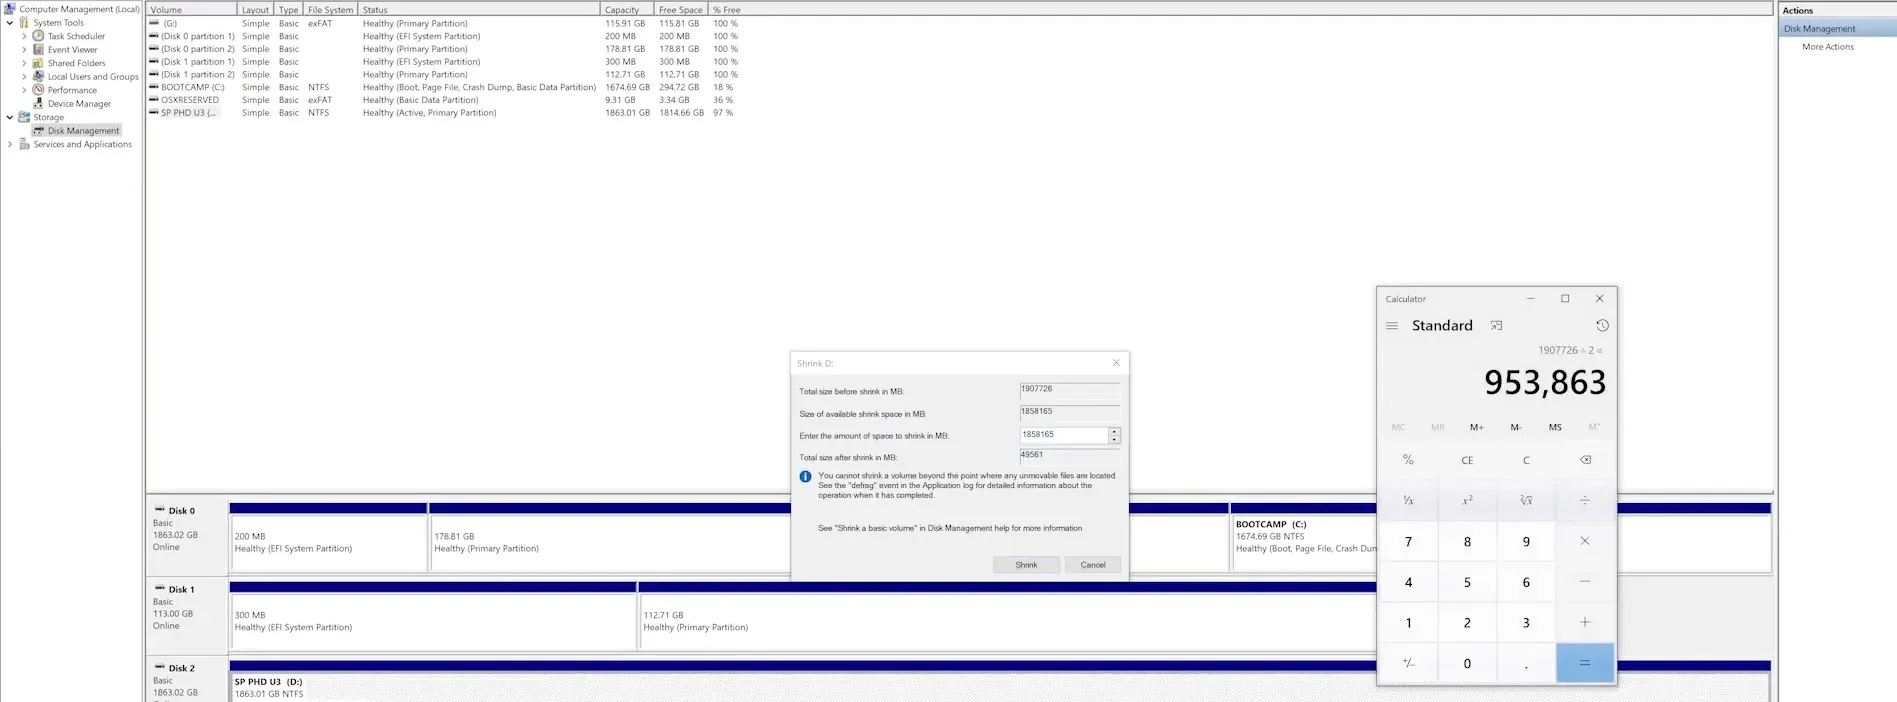
Right-click on it → “Shrink Volume”. Now we are dealing with the size of new drives, that is, allocating the space between them. The number on top is the total available space, and I want to get exactly 2 disks of the same size, so I divide 1 907 726 by 2 and get 953863.

I enter the output number there in the field → press “compress” → we’re done here. We have separated exactly half of the drive, and now we need to turn this section on. Right mouse click and “Create a new volume”. Size – nominal, not modifying, the same it was. We assign it a letter and now “Format” – either way without formatting it just won’t work, these are the rules → wait a bit and done. Now, “My computer” to check, and on the output, we have 2 separate drives made out of 1 solid, where I have my files left on the first main one, and the 2nd one is empty. From this point we can safely use it as a separate drive for the video surveillance files storage, and let’s get to that part.
Further On – Creating Server
From this point, you have a vacant hard drive in your computer that you can allocate for the video recording from your CCTV system. For Hikvision, it will look like this: we need 2 tools – the main one for managing the entire system, IVMS-4200, and the most important, a Storage Server, namely the tool we use to arrange a server on the computer. It is installed either as the additional item when you install IVMS software or can be downloaded separately. So, first of all, we launch the Storage Server on a PC. Right after you download and install it, the only thing it will ask you to do is to activate it, which is just to come up with a password, and that’s it – it will start instantly and will be ready to work; nothing else needs to be done.
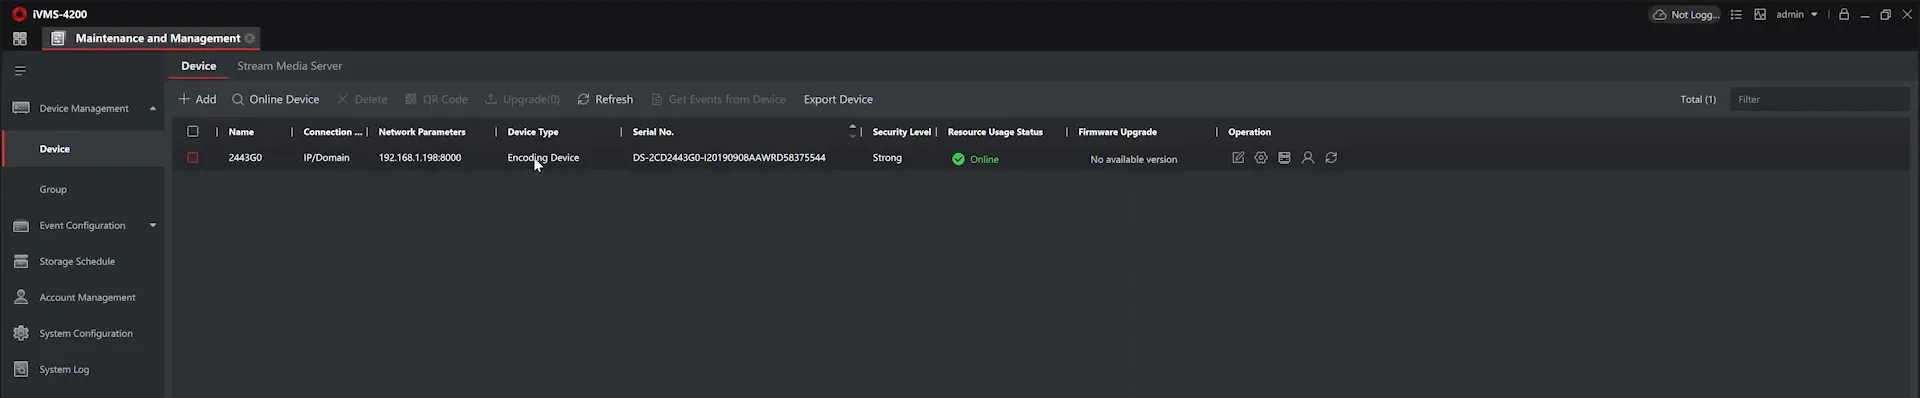
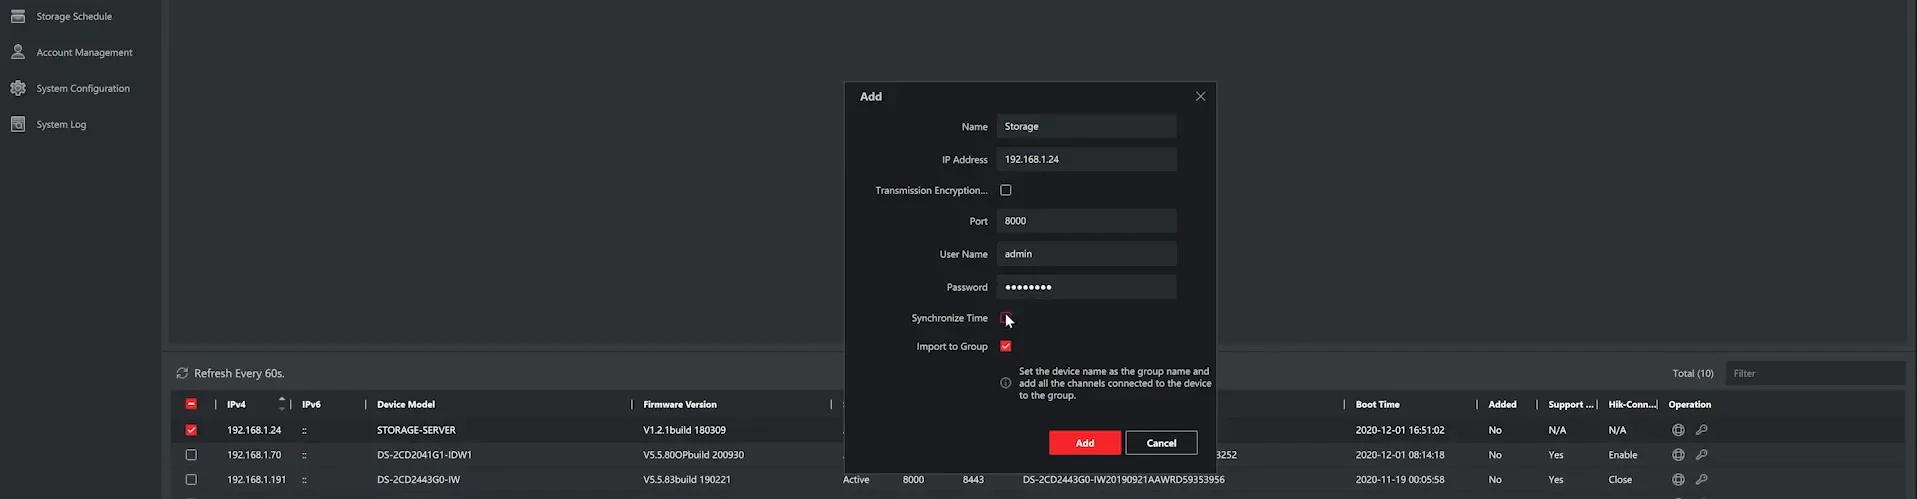
The server is running now, and I launch the IVMS → go to the “Device Management” tab. Here I have a camera that I use for all my performances. And now we need to add the server we have created a step back to the list of our devices. Click “Online Device” and get a list of online devices → locating “Storage Server” → checking the box left to it and pressing “add” → name it whatever you want → the standard username is “admin”, the password is that one that you created a minute ago when were activating it. Now the device is online and can be found in the top list.
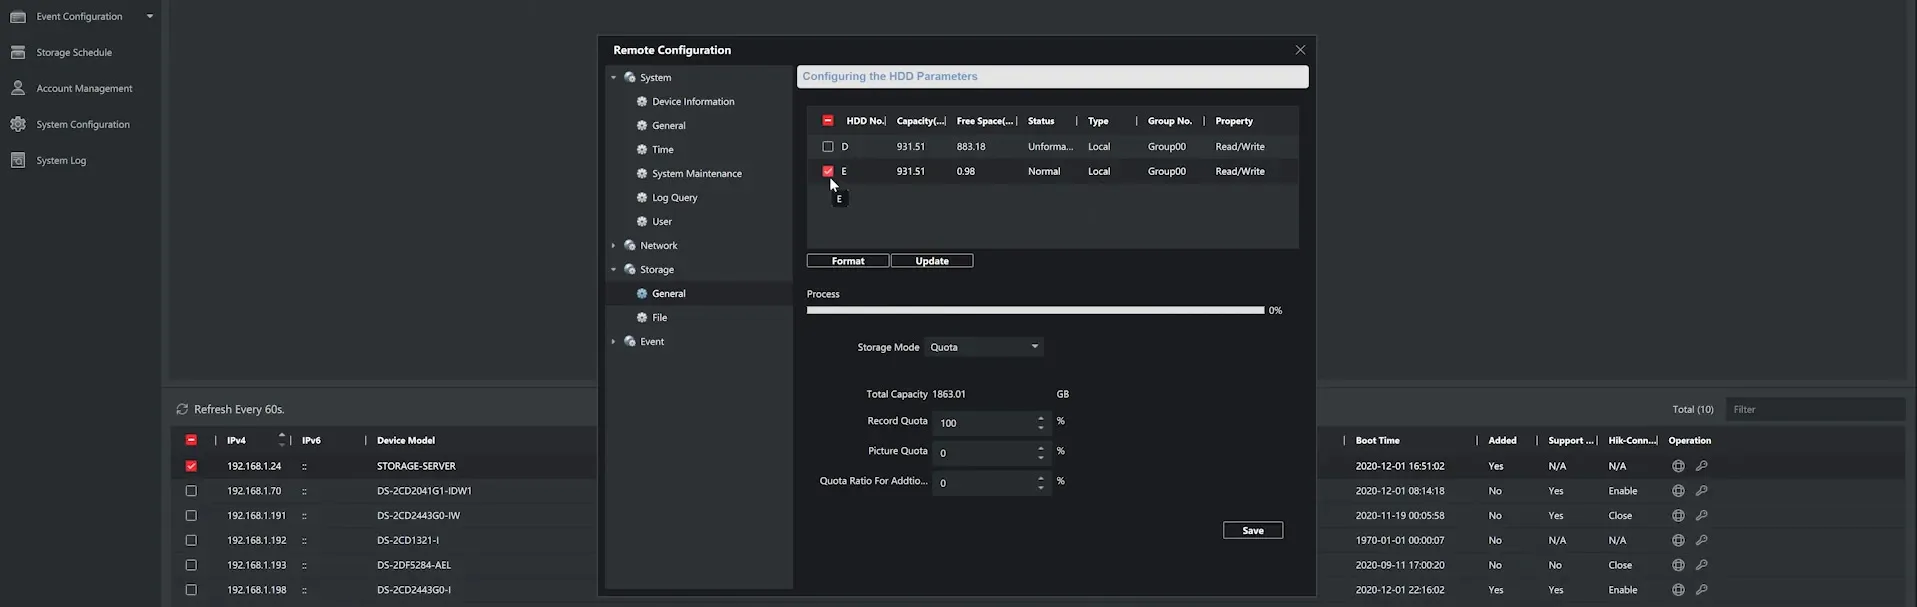
Click on the cog icon, and you’ll be directed to the server’s settings → go to storage item → and here our very 2 drives appear, which we have made from the whole one, and created in the previous stage. In my case I have drive “E” completely empty and ready to go. I put a tick left of it and pressed “format”. Trust me, It won’t work if you skip this step because what is happening now – the server reserves all free disk space for itself. These are the rules.
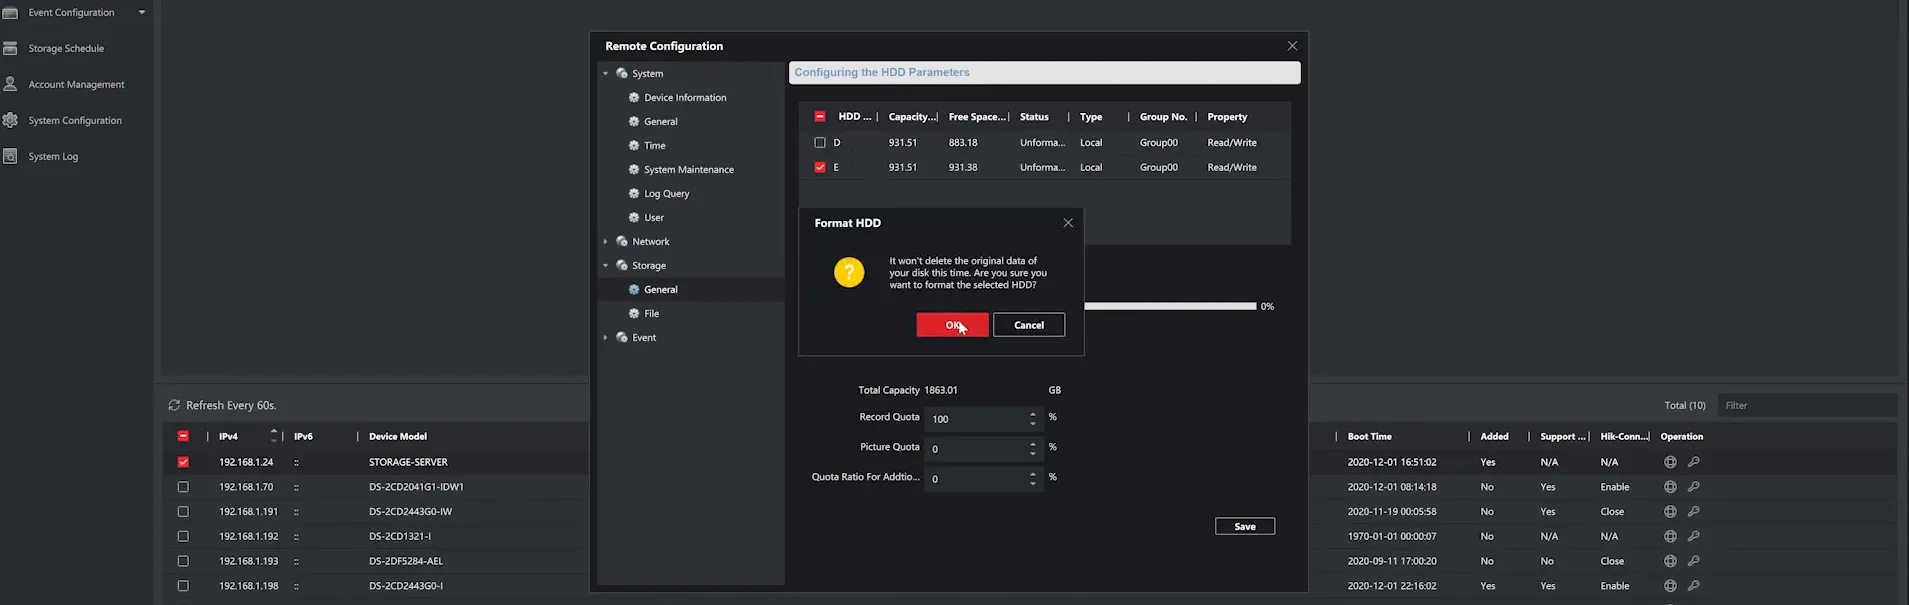
Then it will ask if you want it to restart, and of course, we agree. Now go back to the server and you will see that the status changed to “normal” if done right. Put a tick left to it and “Save”. That’s it. Now, we literally have a video recorder on our computer, and all that’s left to do is to enable the recording itself.
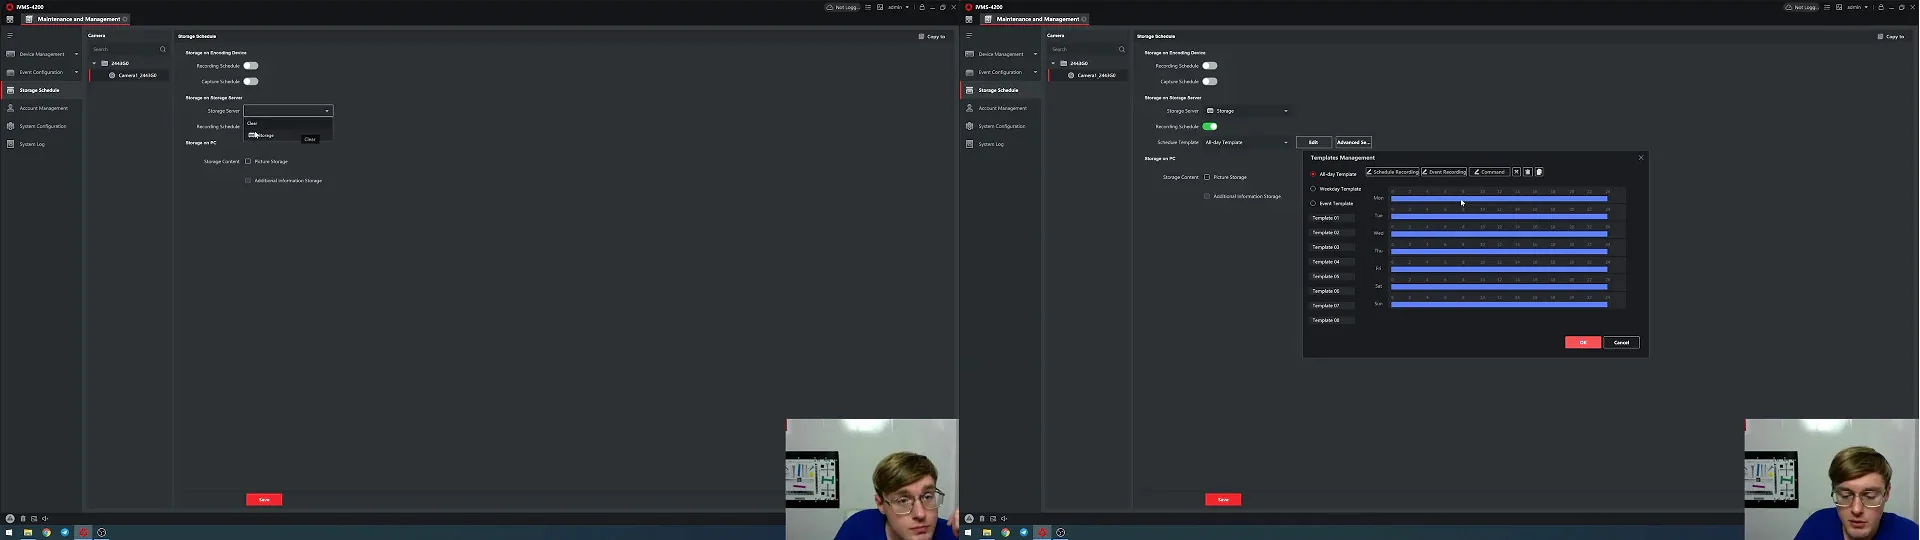
To do this, go to the “Storage Schedule” item down in the “Device Management” section and select the camera you need. For me it’s DS-2CD2423G0. Open its recording settings, press on it, and the item in the middle – open it and select the Storage Server, and the next button is the recording schedule. Select the recording profile and simply set up the recording template you need. I am choosing non-stop continuous recording, and for me all hours and all days are getting filled with blue color, meaning a continuous type of recording. OK, save, and that’s it for settings.
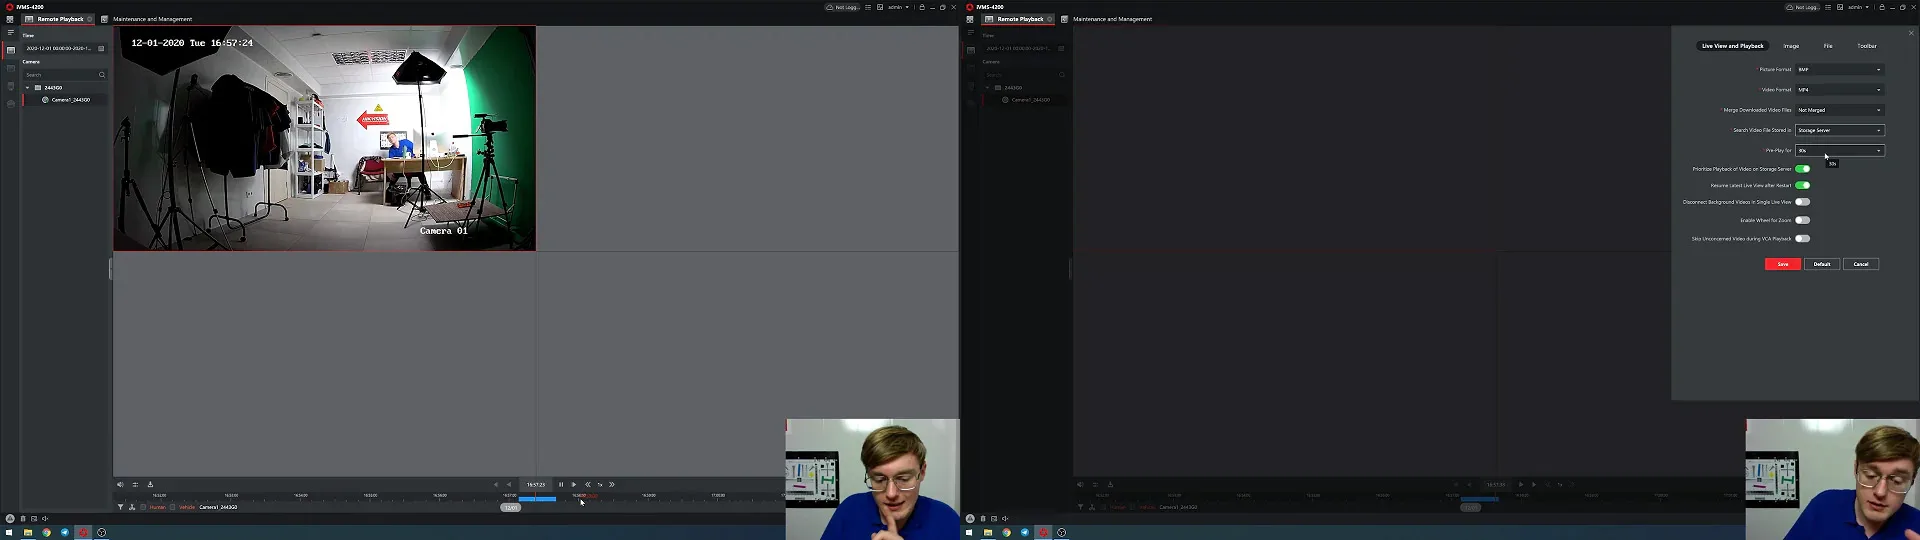
Now, let’s check if we did everything correctly. Go to the Remote Playback tab in the IVMS, select the camera, and you will be able to see the recorded video archive that started recording a minute ago, just when we turned it on. There, you will be able to see the recorded timeline. In fact, that is it, but there’s a thing I recommend you to do. It’s not necessary, but still, I advise you to – go to settings of remote playback and select to “show only recording from the server” and save. Just to be sure that there is no confusion.
I’m confident it’s a thing. Even if you have just a home video surveillance system. You have a stationary computer, and you need just a simple video recording. And you don’t even need to purchase the NVR anymore. For the pros, though, this is, of course, just a quick guide to create a server with storage for video surveillance on a PC with no advanced functionality.
Watch Our Video on YouTube!
Ultimate Residential Security Guide: A Real-World Ajax Case Study by Roger’s Security Systems
I’m Jack from Roger’s Security Systems. Together with the Pipl Systems team, we spent two days on a real residential project or Ajax Systems residential case study in Southern Ontario, Canada, filming and documenting a full Ajax Systems installation. This is not a lab demo or show-room build: Our goal with this project - and […]
Read More Ultimate Residential Security Guide: A Real-World Ajax Case Study by Roger’s Security SystemsContinue
How to Choose the Right Smart Lock for Your Business in 2026
In a home, one or two people hold the keys. In a business, dozens do. You have staff, cleaners, vendors, temps - and because of that, a business smart lock may open hundreds of times a day, which raises the stakes for reliability, accountability, and speed of management. So, frame the decision correctly. You are […]
Read More How to Choose the Right Smart Lock for Your Business in 2026Continue
6 Commercial Smart Locks Every Business Manager Should Know About
Keys have a talent for vanishing at the worst moment. And in a business where many people carry keys, that's a recipe for lost time, unexpected cost, and real security gaps. Keys get copied, misplaced, or ride home in someone's pocket after their last shift. Now you're rekeying doors, chasing spare sets, and wondering who […]
Read More 6 Commercial Smart Locks Every Business Manager Should Know AboutContinue
Ajax DoorBell Full Review & Installation: AI Video Doorbell for Installers & Integrators
I'm Jack Dugas, a systems integrator with Roger's Security Systems based in Toronto. Over the years, I've deployed hundreds of security solutions across residential and commercial properties, and I've worked extensively with Ajax Systems products – a platform I genuinely respect for its reliability, ease of installation, and intelligent design. In this article, I'll walk […]
Read More Ajax DoorBell Full Review & Installation: AI Video Doorbell for Installers & IntegratorsContinue
How to Choose a Commercial Intercom System in 2026
There are technologies we use every day without really thinking about how well they're made. They blend into our routine so seamlessly that we forget they're even there. A reliable commercial intercom system works exactly like this: effortless and invisible until something goes wrong. Think about what happens when the system works: a courier arrives, […]
Read More How to Choose a Commercial Intercom System in 2026Continue
From Immigrant to Security Integrator in 3 Years: 100+ Installations, Commercial Clients from Google
Immigrating to Canada and starting from scratch is never easy, especially when you’re building a business in the demanding world of security camera installation. In this episode of Pipl Systems Podcast, our guest Vitalii Sukhyna, Owner of Sense Group Security Systems, shares his candid, boots-on-the-ground story of how persistence, adaptability, and genuine client relationships helped […]
Read More From Immigrant to Security Integrator in 3 Years: 100+ Installations, Commercial Clients from GoogleContinue