

Today we are reviewing Hikvision Video Access Control Terminal of a DS-K1T500 Series, and the marking of this particular device we have is DS-K1T500SF, that features some very awesome stuff, like finger, card, and QR-code authentication ways, which is great, because I love to have as much options available as possible, and of course we’re going to setup all those options real-time (featured in video), connect it to a reader module and an Indoor Station Monitor to show you how that is done, and thus let’s get to review.
Unboxing & Appearance

This is professional equipment, so the box contents are not the main focus here. However, here is what you will find inside the box:
Terminal device
Bracket for on-wall installation
Hexagon screwdriver
User manual
Quick start guide
Pack of screws and anchors
Three communication wires (I will explain each one’s purpose further)
Regarding the device itself, the first thing I want to highlight is that it feels very solid - the body is metal and rated IP65 for dust and water protection. There is a microphone hole on the front and a speaker on the bottom, which means we have a two-way audio feature.
Below the microphone is the main 1080p camera module, equipped with infrared lighting. You will also find an LED indicator, a fingerprint scanner, a card reader area, and two buttons at the bottom: the first is a chime (doorbell) button, and next to it is the voice talk button.
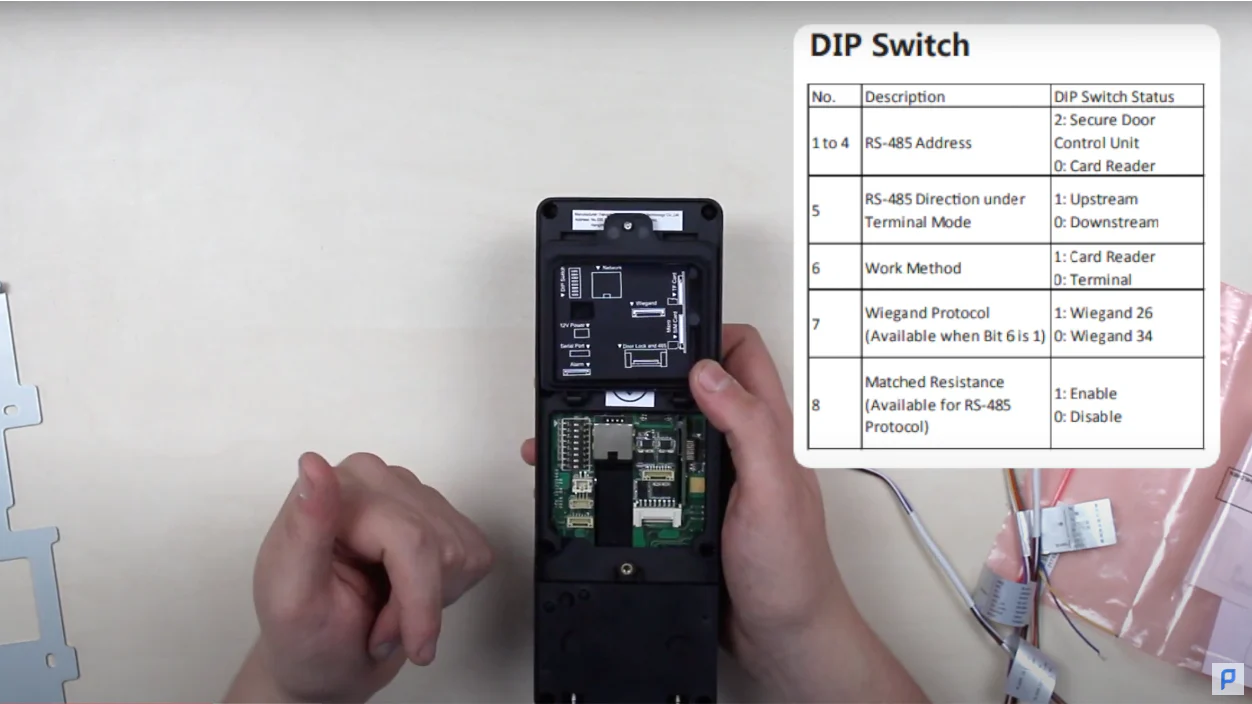
The most interesting part is located on the back of the device. Let’s open it up. Here, you have a control unit with a DIP switch that allows you to configure the device’s role - for example, switch number six selects between card reader mode or terminal mode. You will also find the following connections:
RJ45 LAN port
12V power input
Serial port
Alarm input
Door lock output
RS-485 port
SIM card slot
Wiegand protocol input
MicroSD card slot (supports up to 128 GB)
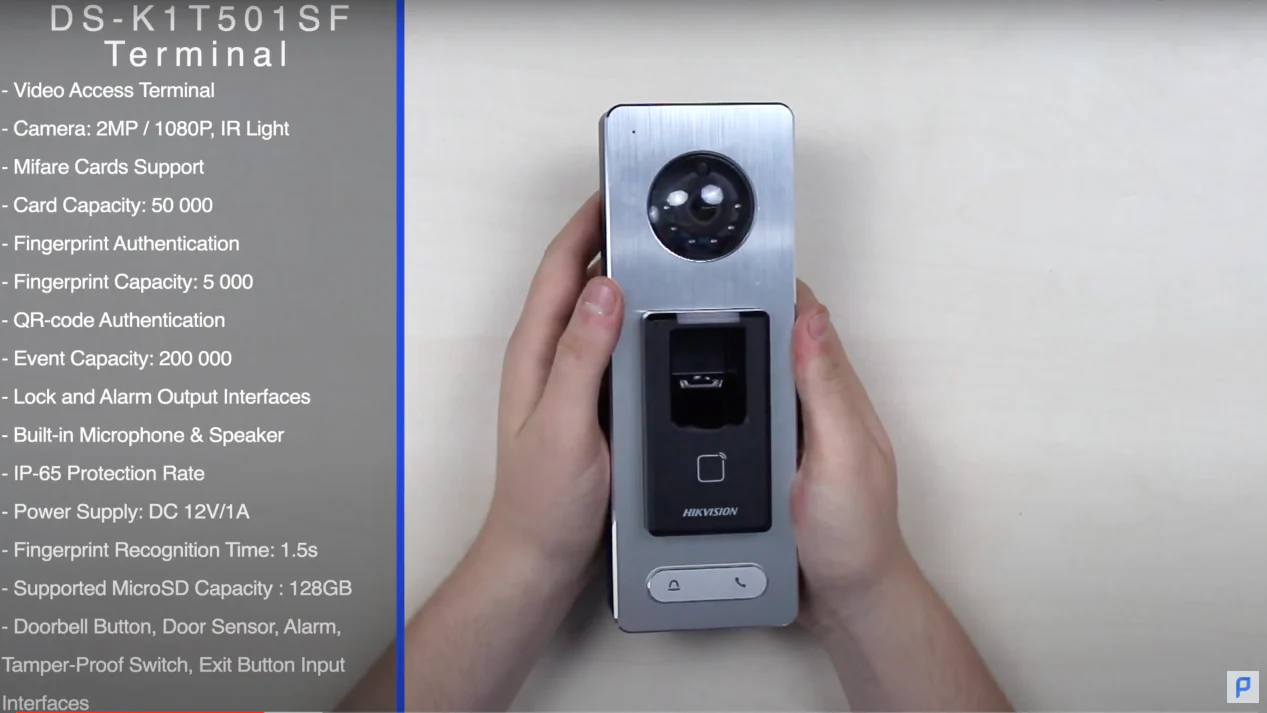
DS-K1T500SF Specifications
- Video Access Terminal
- Camera: 2MP / 1080P, IR Light
- Mifare Cards Support
- Card Capacity: 50,000
- Fingerprint Authentication
- Fingerprint Capacity: 5,000
- QR-code Authentication
- Event Capacity: 200,000
- Lock and Alarm Output Interfaces
- Built-in Microphone & Speaker
- IP65 Protection Rate
- Power Supply: DC 12V/1A
- Fingerprint Recognition Time: 1.5s
- Supported MicroSD Capacity: 128GB
- Doorbell Button, Door Sensor, Alarm, Tamper-Proof Switch, Exit Button, Input Interfaces
The Video Access Control Terminal we have is capable of granting entry via fingerprint, card, or QR code. As we stated before, it is highly beneficial to have multiple access options, as this allows for greater flexibility - each user has a unique identifier, and the system maintains a complete event log so you can always see which user accessed the terminal and at what time. Thanks to the QR code feature, you can also generate disposable one-time entry codes.
The device can store up to 200,000 event records, 50,000 cards, and 5,000 fingerprints - an impressive capacity. Additionally, the built-in camera module supports real-time face detection, captures snapshots, and records video, which can then be stored on an inserted microSD card (up to 128 GB supported).
The device does not support PoE, but this is not a significant drawback, as it is a fully wired unit by design. It also features two-way audio via its microphone and speaker, supports MiFare cards, enables remote door opening, and can integrate with both smart electric and magnetic locks.
Activation & Set up Part 1
Let’s imagine, the case is: we need to make a two-way entry and exit through a one entrance door, and we need to have a one device to monitor and control that, that is why we have here an Indoor Staion Monitor to view and control the devices, and a fingerprint plus card reader module to install indoors to be able to exit a room via fingerprint or a card. First of all, we are powering the devices on and connecting them all within.
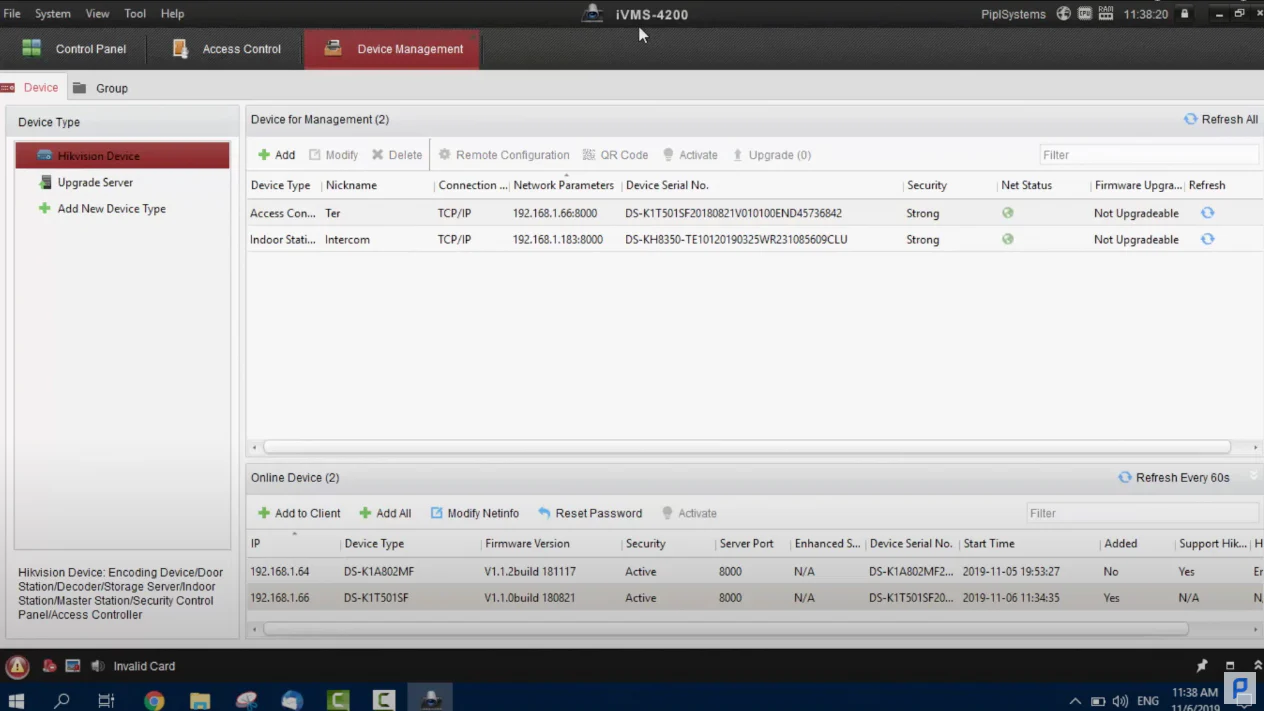
We connected a Terminal to the internet via RJ-45, powered it on with 12 12-volt power supply adapter, and via TS-485 tied it within a fingerprint reader module, powered from a 12V power adapter too. An intercom monitor we have supports PoE, thus we powered it on and connected it to the internet with a one LAN cable. We have already activated the devices in the SADP tool, and now we’re launching IVMS-4200 on a PC to set them all up.
- Go into IVMS, locate your terminal device
- Click the terminal to highlight it and press “remote configuration”.
- Go to “General” and change its name to 100101, save (according to the manufacturer’s instructions)
- Click Monitor to highlight it and press “remote configuration.”
- Go into “Network” and then to “Linked Network Configuration”
- Type in a Terminal’s IP address (viewed on IVMS main device screen) into a Door Station IP Address field
- Repeat for “Sip Server IP Address” field, save
Activation & Set up Part 2
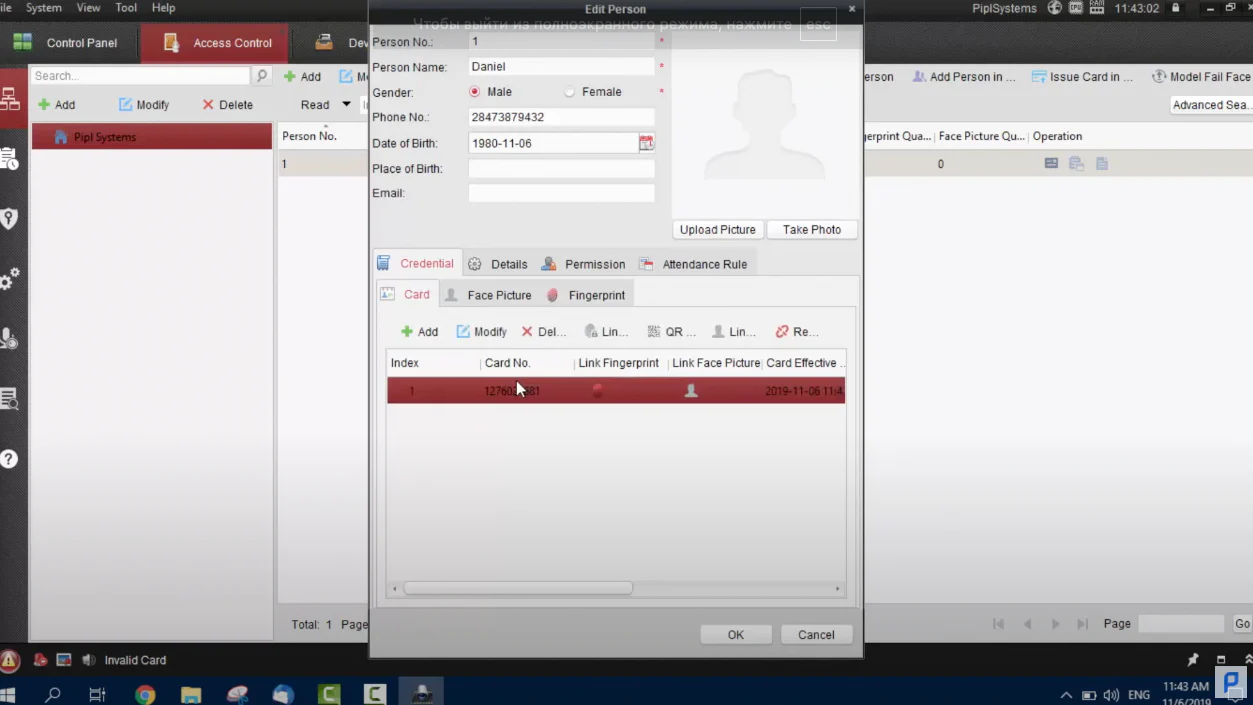
Now we’re creating a company and an employee, create a fingerprint, a card, and a QR code for him.
- In the IVMS, go to the Control Panel tab, locate “Access control,” and press it.
- In the left column, press “Add” and create a company and name it.
- Above the main field on the right, click “add” to create an employee.
- Input all the required information like name, birth date, phone number, etc..
- Under the “credential” and “card” tabs, press the “add” button;
- In the appeared menu, select “Access Control” and pick an “Entrance Card Reader” next to it (Or the one you have);
- Press “Read” and now touch the reader’s area with a Mifare card (It may say there’s an error occurred, but it doesn’t matter);
- Our card was read. Press “OK” to save.
- To add a fingerprint, press a fingerprint under the credential tab. Press “remote collection.”;
- Press “select device” and pick your device – “OK”, now pick a finger by clicking in the IVMS.
- The terminal will ask you to press your finger to the fingerprint module area multiple times until you hear a success message.
- Press “stop”, go back to the card tab, and press the fingerprint emblem under “Link fingerprint”, select a fingerprint you’ve just collected.
- From here, you can also generate a QR code and then save it to your phone so you can authenticate with it.
- Press ‘OK”, now you see a new person has been added to that board ;
- To give the user permission, go to the 3rd tab in the left column with a key emblem on it;
- Press “add”, name it, and tick all boxes you see there, then press the right arrow symbol between boards to transfer data, “OK”;
- A software will ask you to apply recline changes, apply, and wait until the data is loaded into your terminal.
- Done!
Hikvision Fingerprint Access
Conclusion
This is a very high-end device from the professional segment, combining advanced access control with full video intercom functionality. In terms of access control, it supports fingerprint recognition, card reading, and QR-code scanning. On the intercom side, the built-in camera, microphone, and speaker enable two-way video calls.
The device is capable of real-time face detection, taking snapshots, recording video, and storing the footage on a microSD card. It integrates seamlessly with electric locks, doors, intercom monitors, and additional readers. Designed for demanding environments, it also boasts an IP65 protection rating for reliable outdoor operation.